> ## Documentation Index
> Fetch the complete documentation index at: https://www.truefoundry.com/llms.txt
> Use this file to discover all available pages before exploring further.
# Databricks
> Add and configure Databricks models in TrueFoundry's AI Gateway.
### Adding Models
This section explains the steps to add Databricks models and configure the required access controls.
From the TrueFoundry dashboard, navigate to `AI Gateway` > `Models` and select `Databricks`.
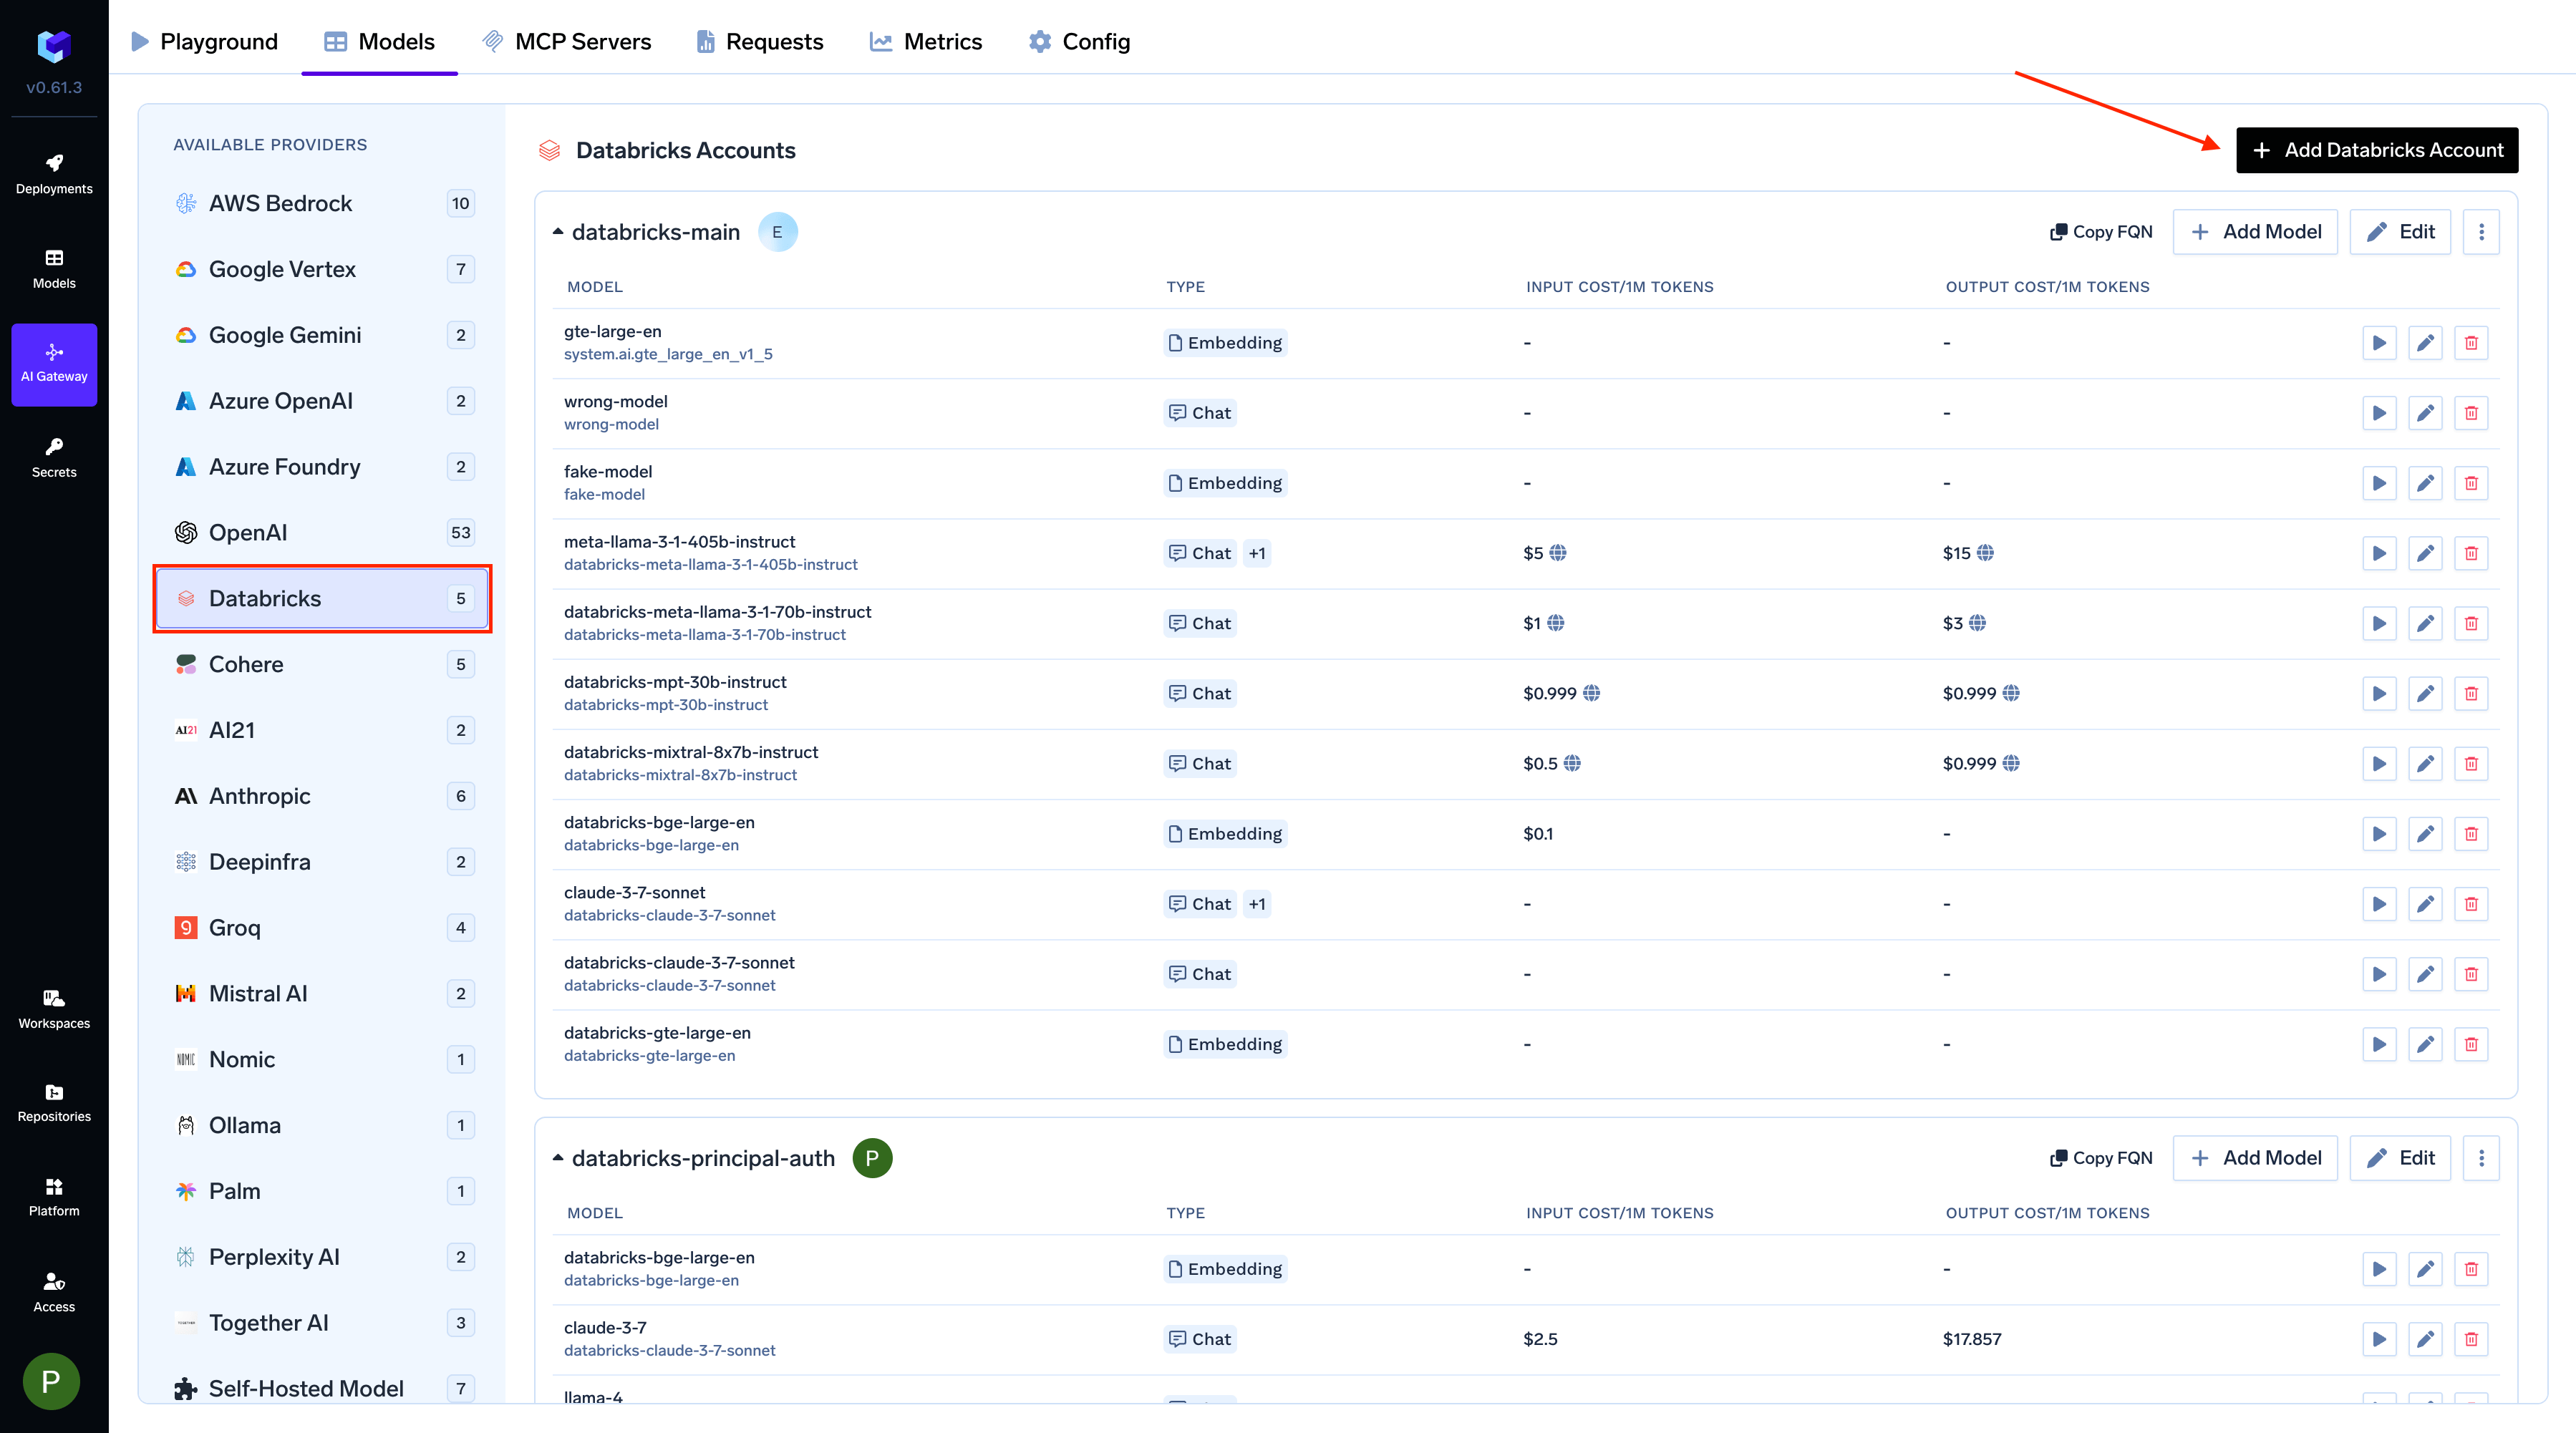 Give a unique name for the Databricks account. This will be used to refer to the models later. Provide the authentication details for the AI Gateway to access your Databricks models. TrueFoundry supports both Service Principal and Personal Access Token (PAT) based authentication.
**Using Service Principal (Recommended):**
Service Principal authentication is the recommended approach for production environments as it provides better security and access control.
* Choose **Service Principal Auth**.
* Enter your Databricks Service Principal `Client ID` and `OAuth Secret`.
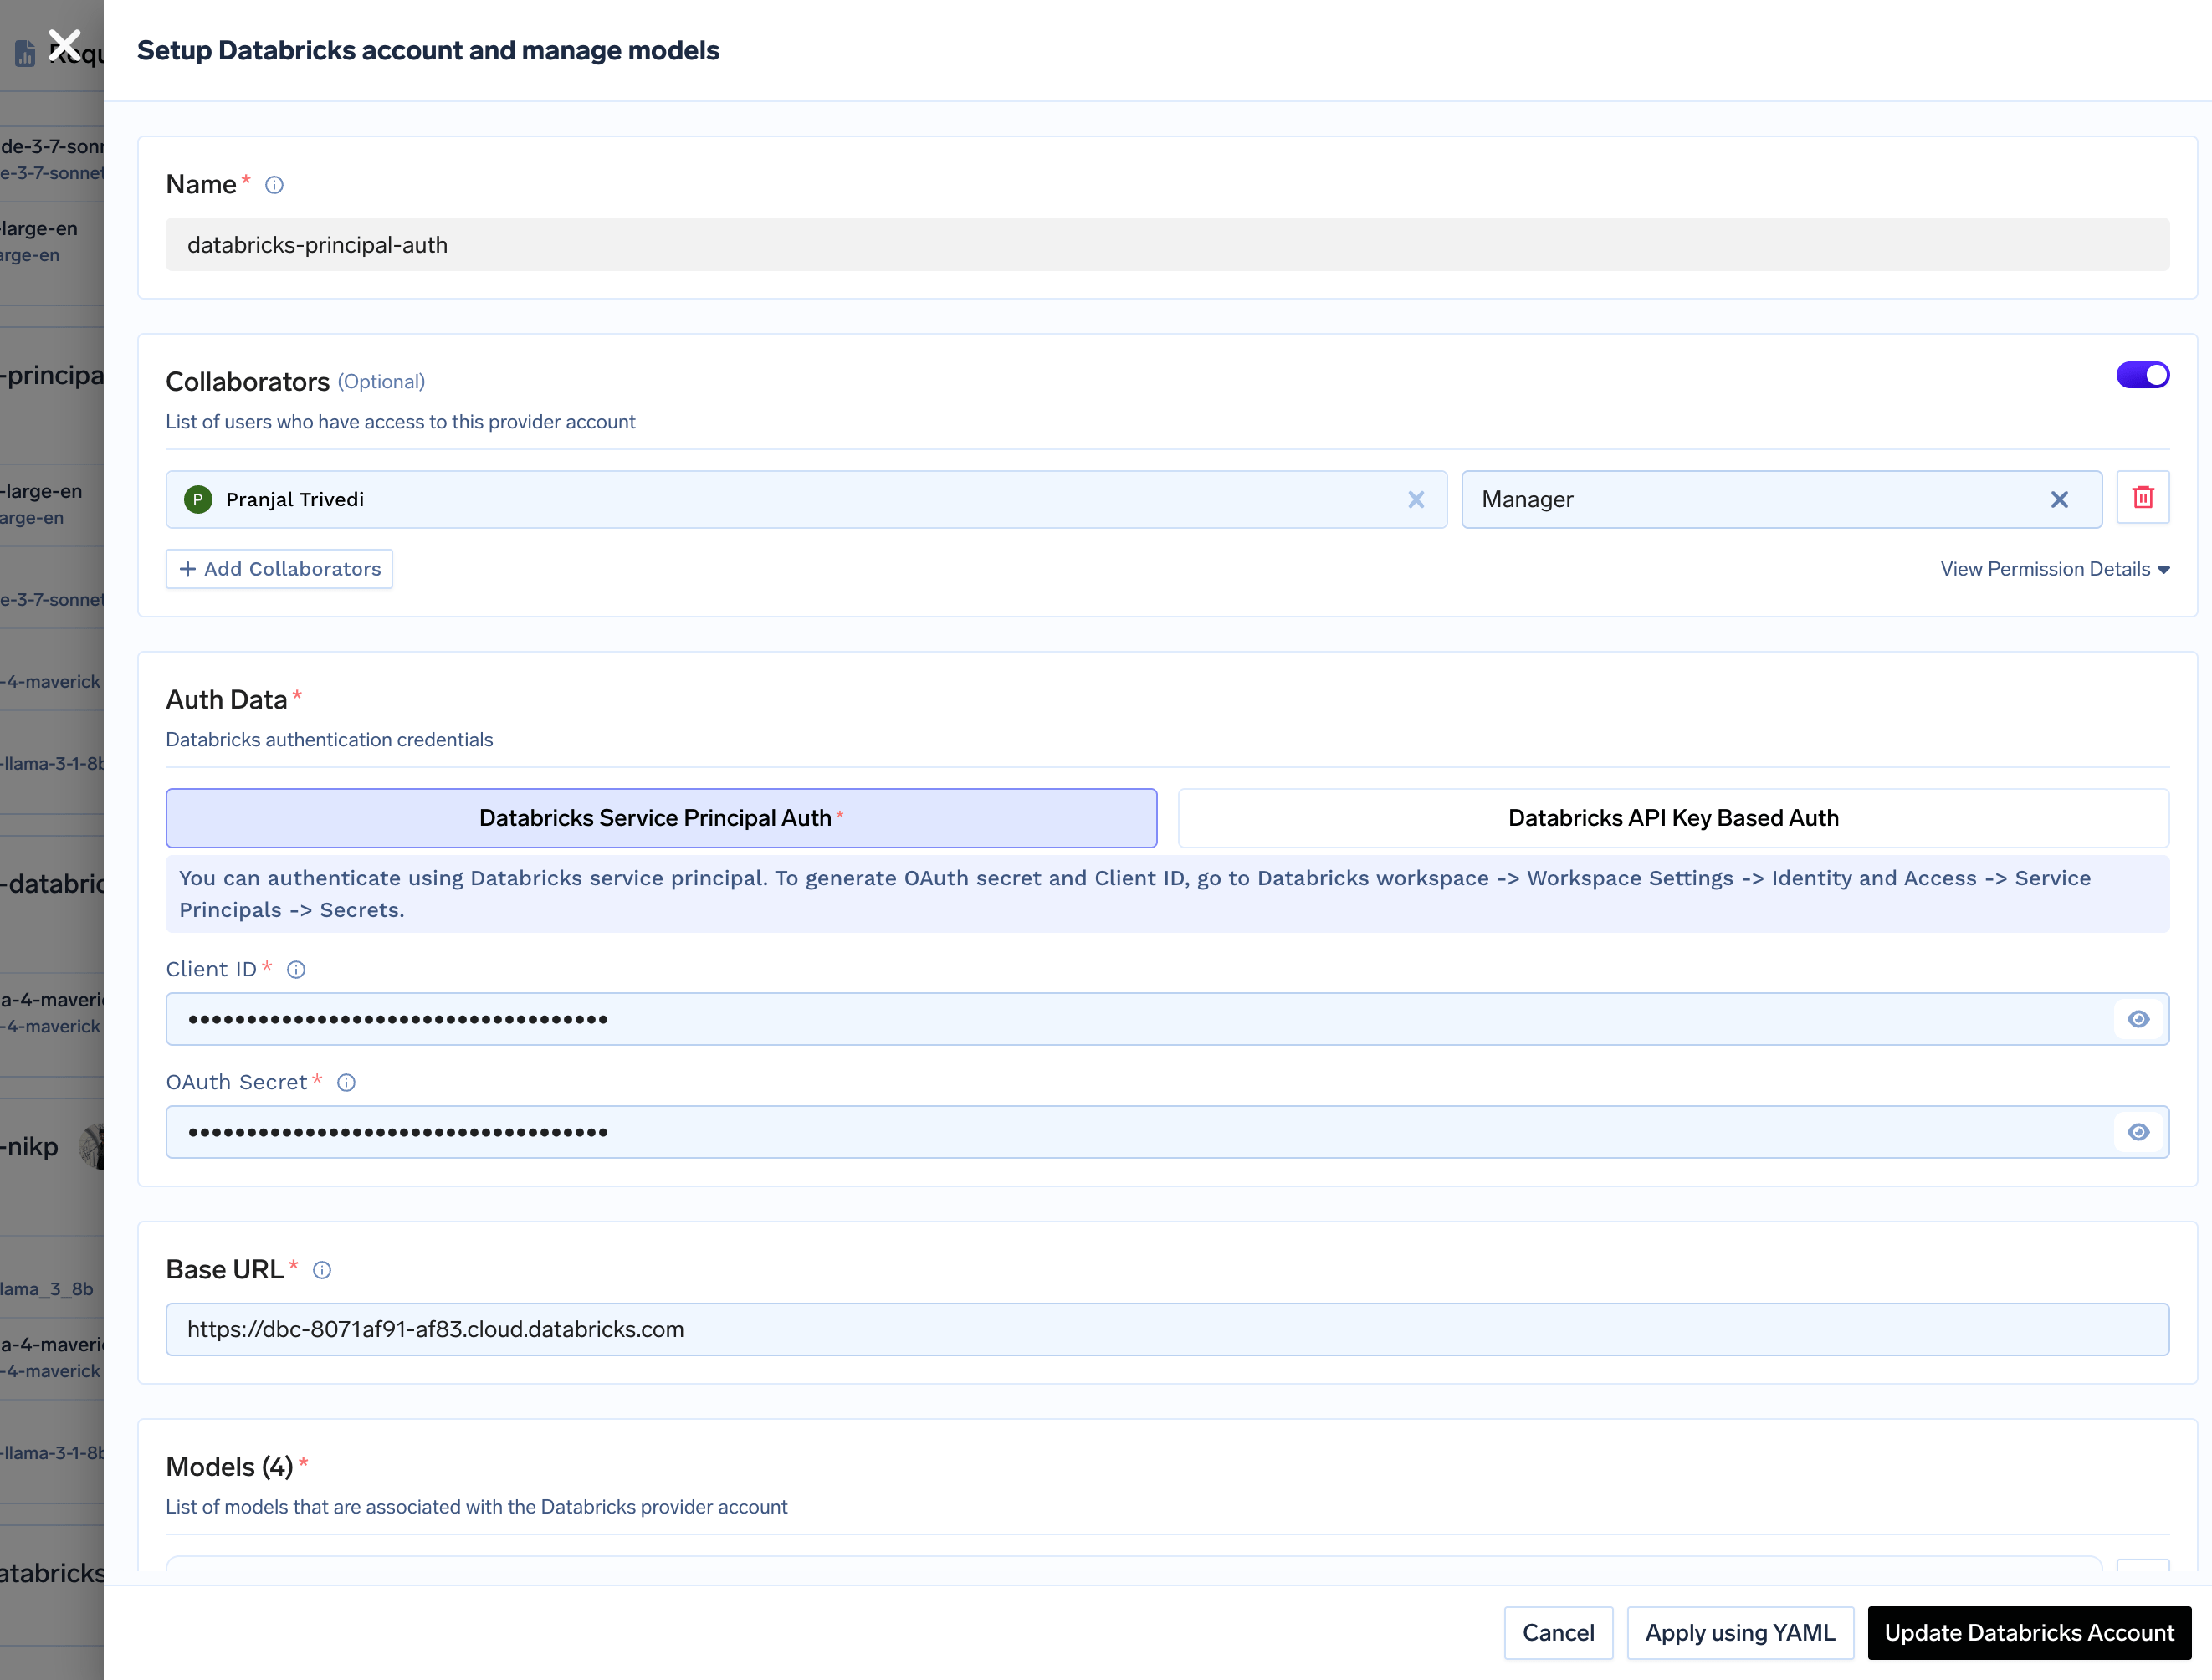
Give a unique name for the Databricks account. This will be used to refer to the models later. Provide the authentication details for the AI Gateway to access your Databricks models. TrueFoundry supports both Service Principal and Personal Access Token (PAT) based authentication.
**Using Service Principal (Recommended):**
Service Principal authentication is the recommended approach for production environments as it provides better security and access control.
* Choose **Service Principal Auth**.
* Enter your Databricks Service Principal `Client ID` and `OAuth Secret`.
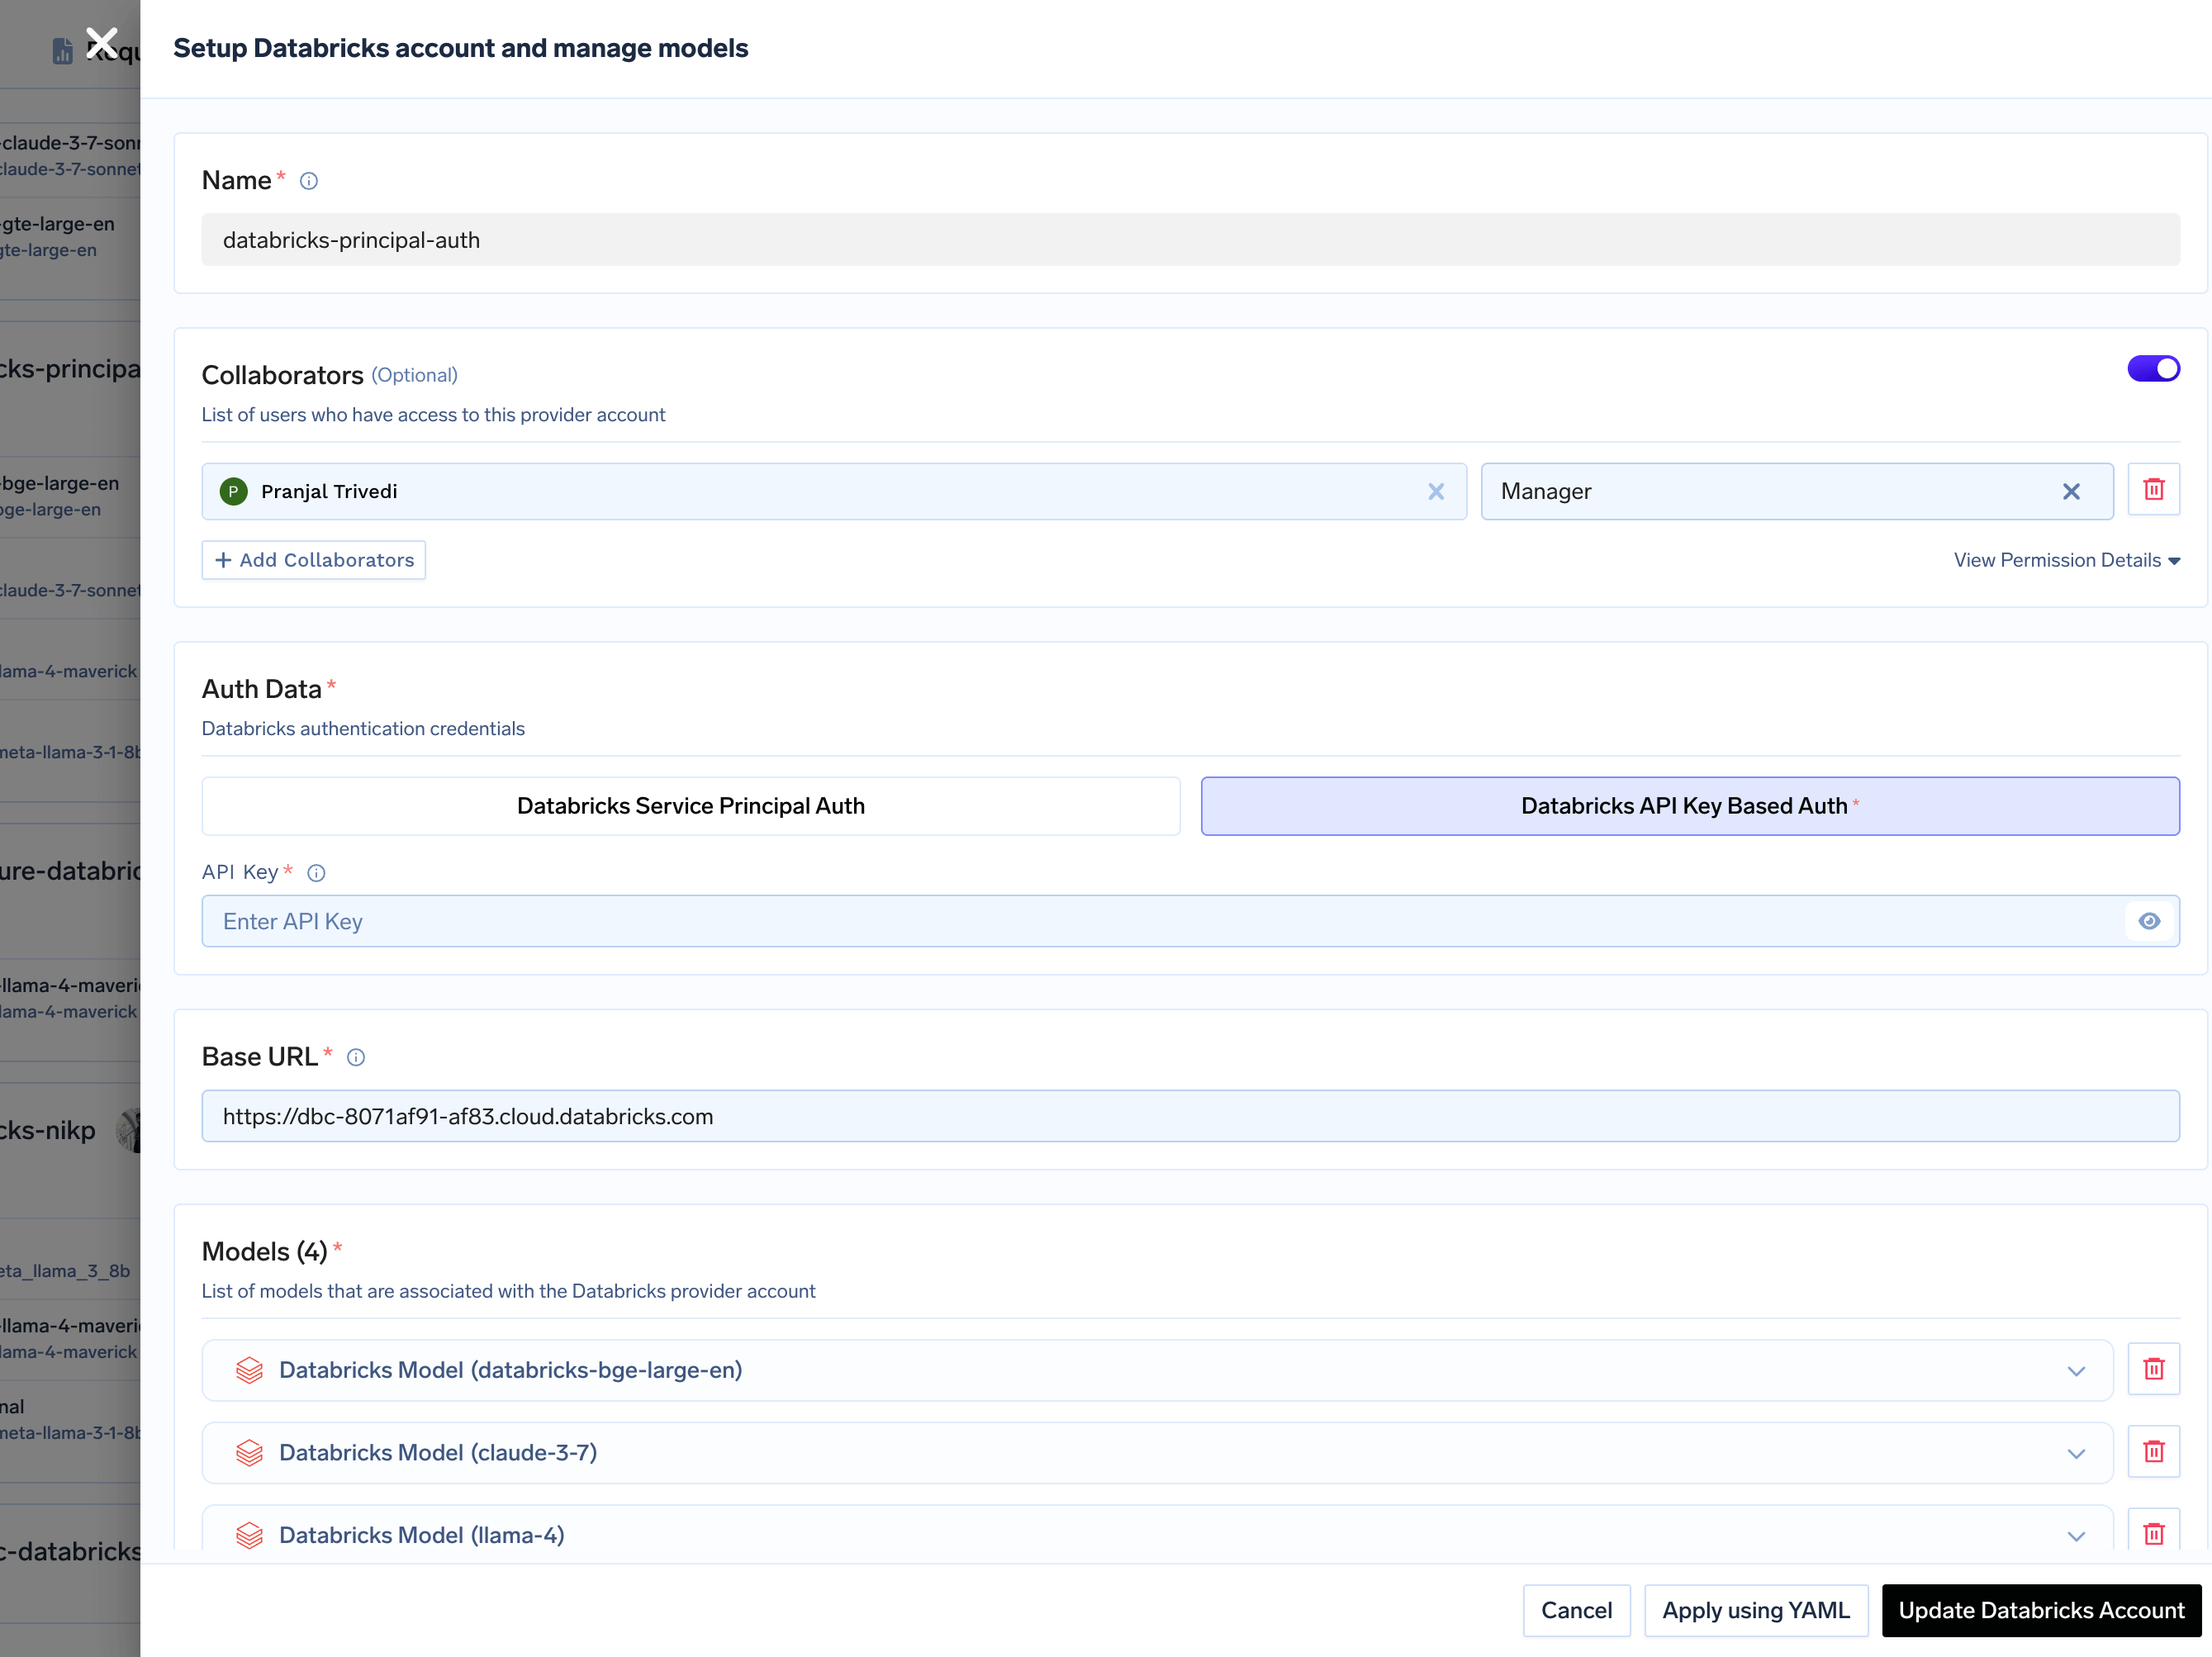
 **Using Personal Access Token (PAT):**
Personal Access Tokens are suitable for development and testing environments.
* Choose **Databricks API Key Based Auth**.
* Enter your `PAT`.
**Using Personal Access Token (PAT):**
Personal Access Tokens are suitable for development and testing environments.
* Choose **Databricks API Key Based Auth**.
* Enter your `PAT`.
 Finally, enter your Databricks workspace URL (e.g., `https://.databricks.com`).
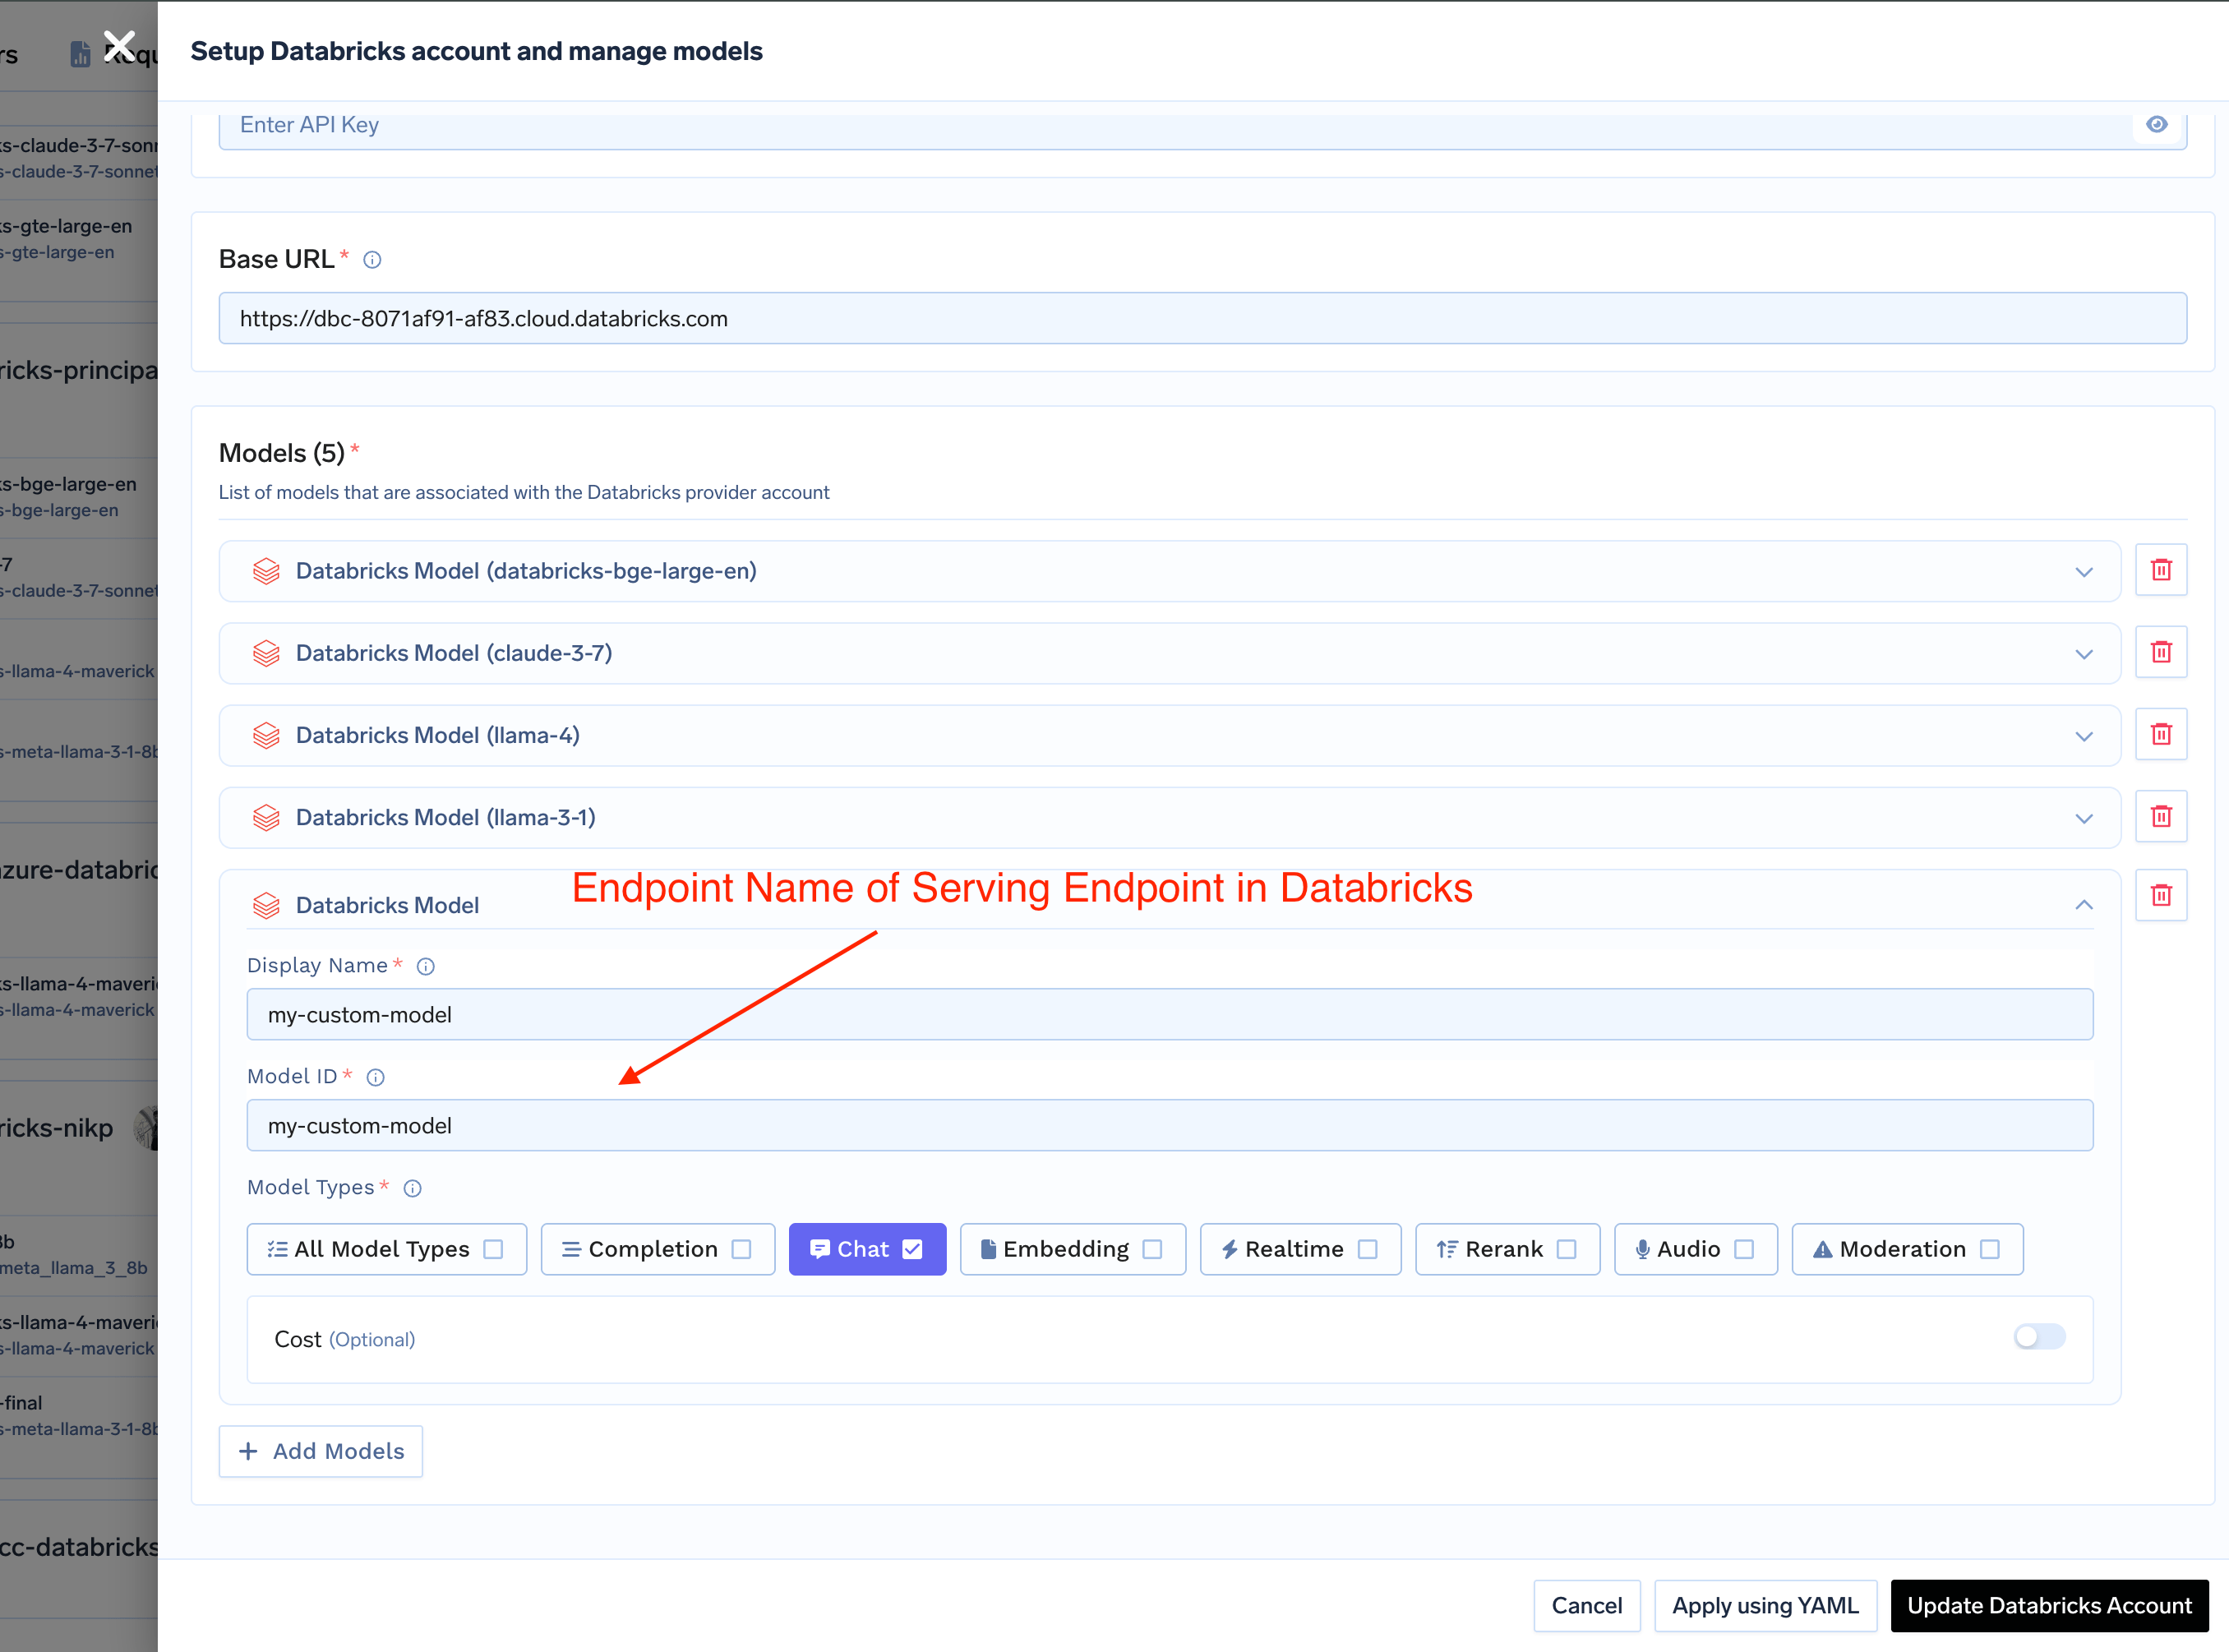
Click `+ Add Model` to add a new model configuration. The `Model ID` in TrueFoundry **must exactly match** the **serving endpoint name** in your Databricks workspace.
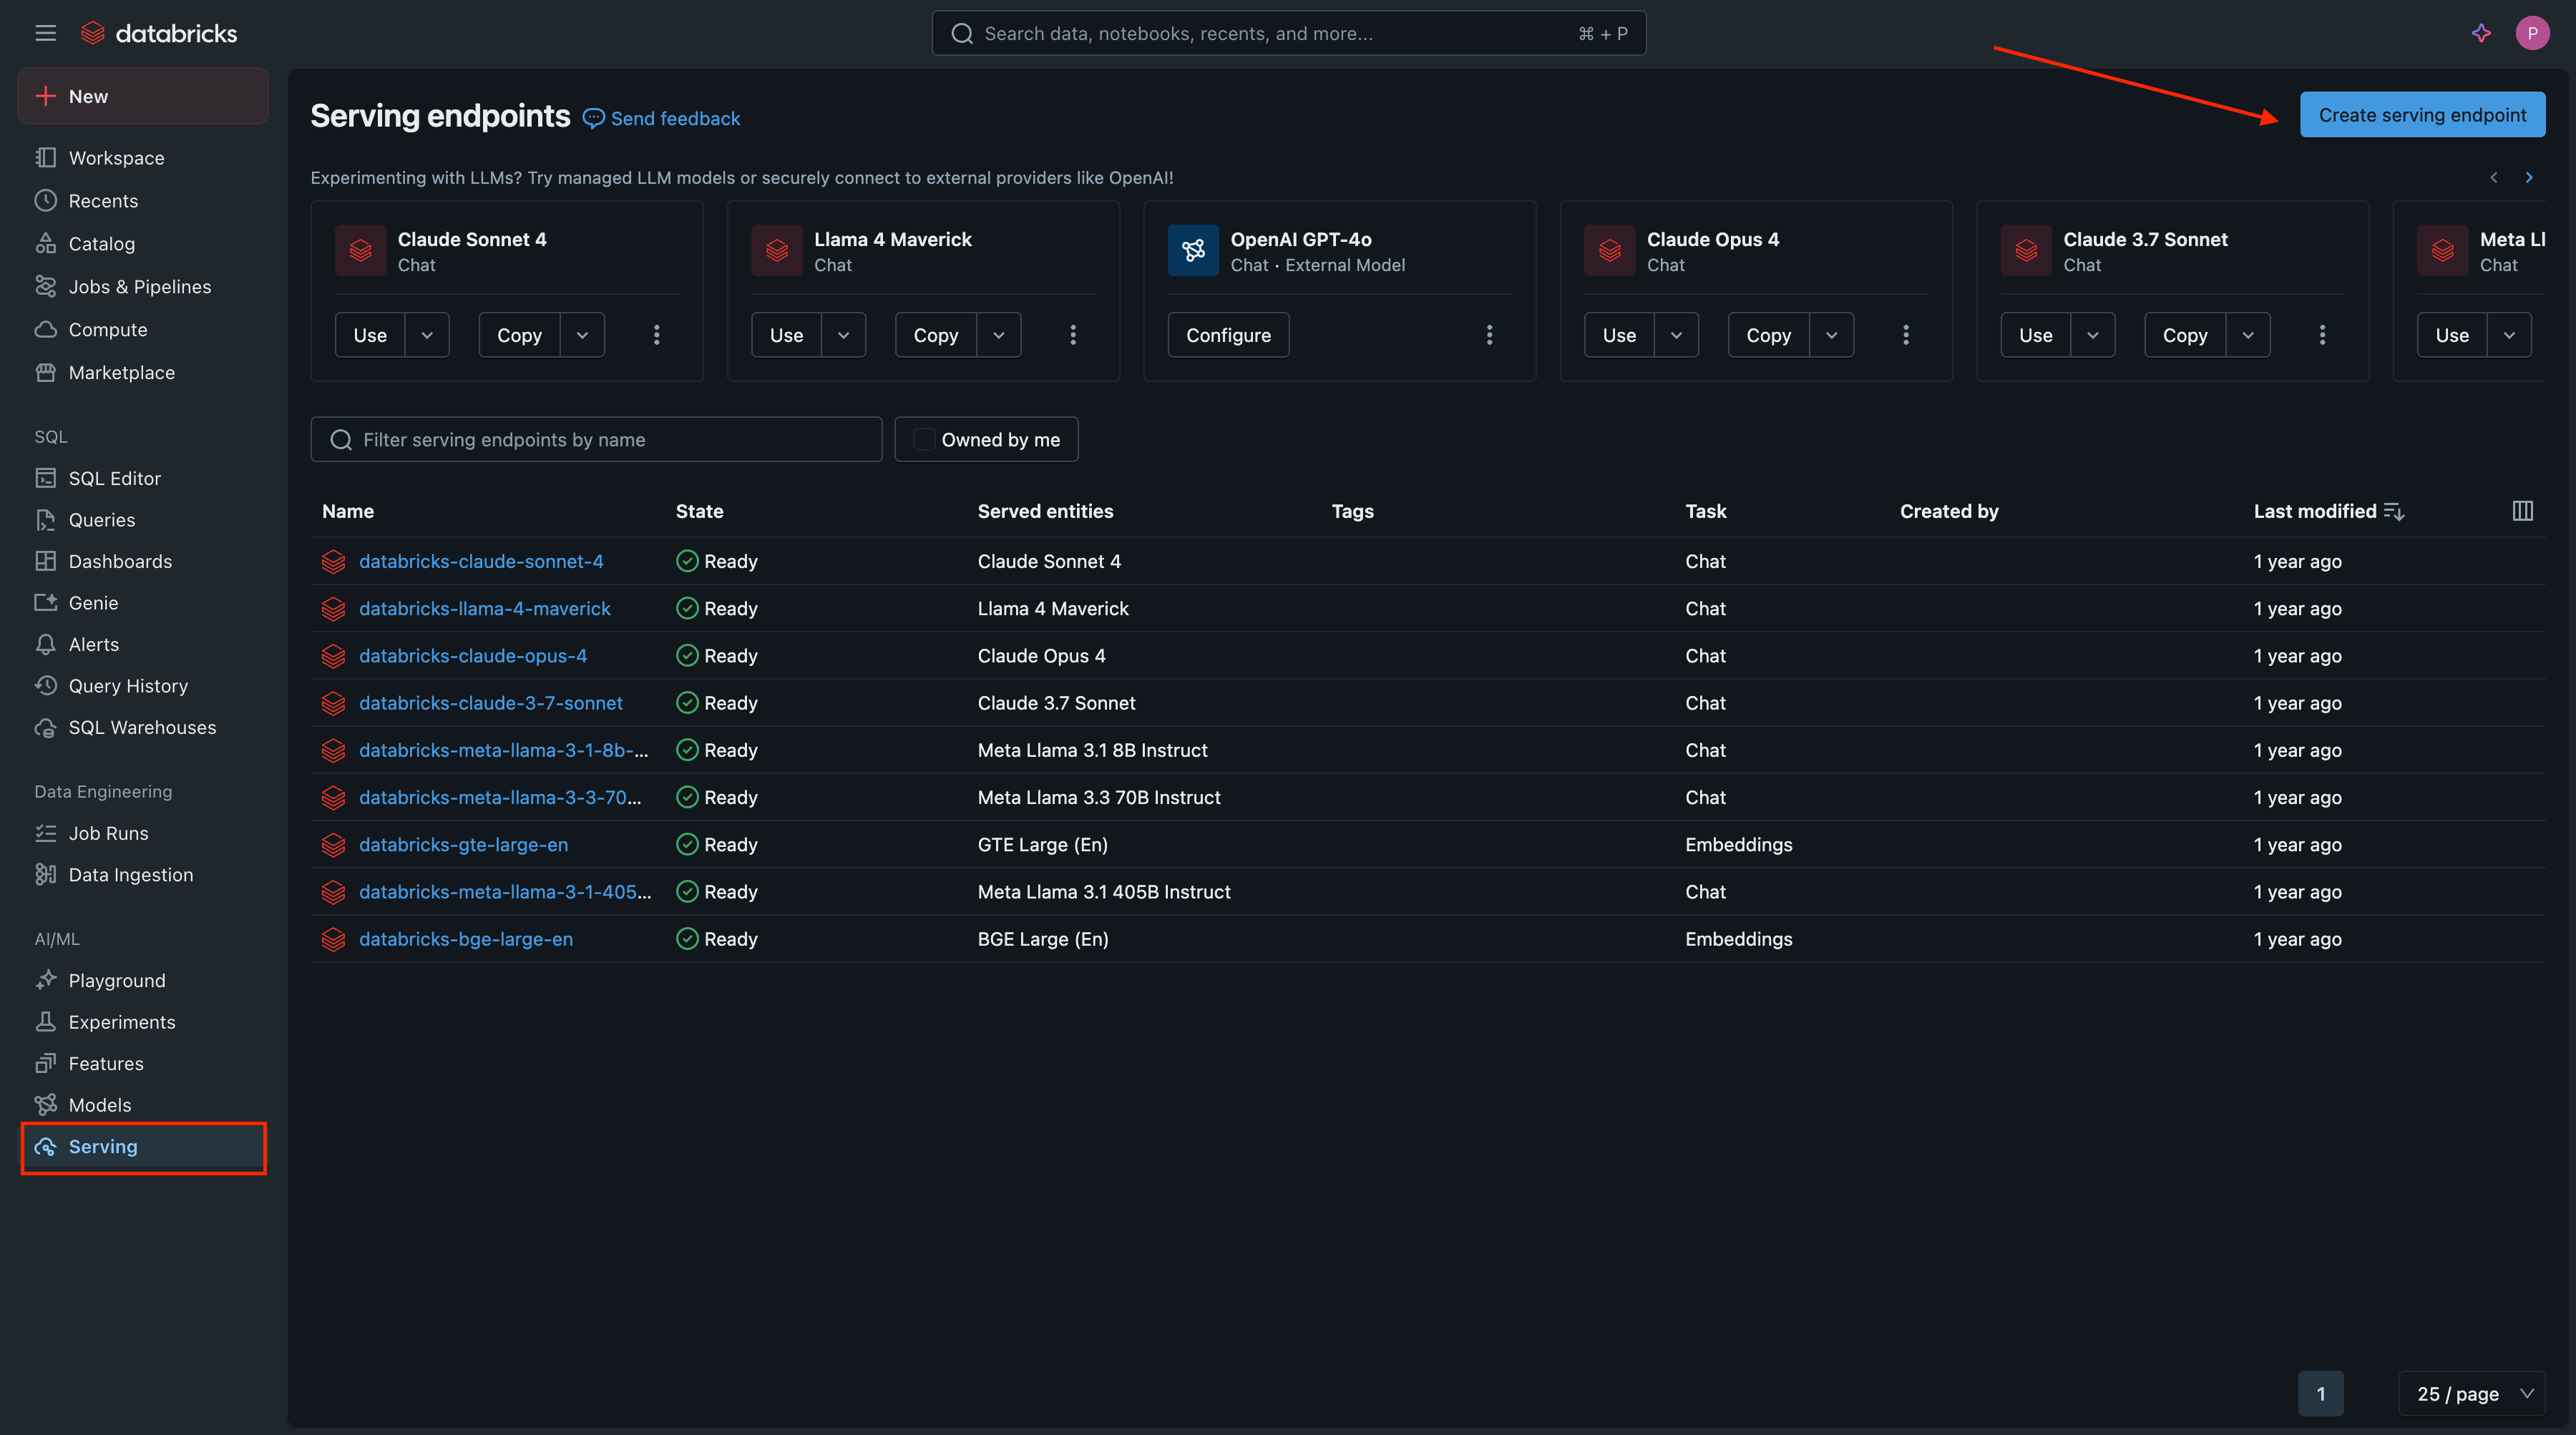
1. **Access Databricks Serving**: In your Databricks workspace, navigate to **Serving** in the left sidebar and click **Create serving endpoint**.
Finally, enter your Databricks workspace URL (e.g., `https://.databricks.com`).
Click `+ Add Model` to add a new model configuration. The `Model ID` in TrueFoundry **must exactly match** the **serving endpoint name** in your Databricks workspace.
1. **Access Databricks Serving**: In your Databricks workspace, navigate to **Serving** in the left sidebar and click **Create serving endpoint**.
 2. **Configure Endpoint**:
* **Endpoint name**: Choose a descriptive name. This name will be your **Model ID** in TrueFoundry.
* **Served Entity**: Choose from **Foundation Models** or your custom models.
2. **Configure Endpoint**:
* **Endpoint name**: Choose a descriptive name. This name will be your **Model ID** in TrueFoundry.
* **Served Entity**: Choose from **Foundation Models** or your custom models.
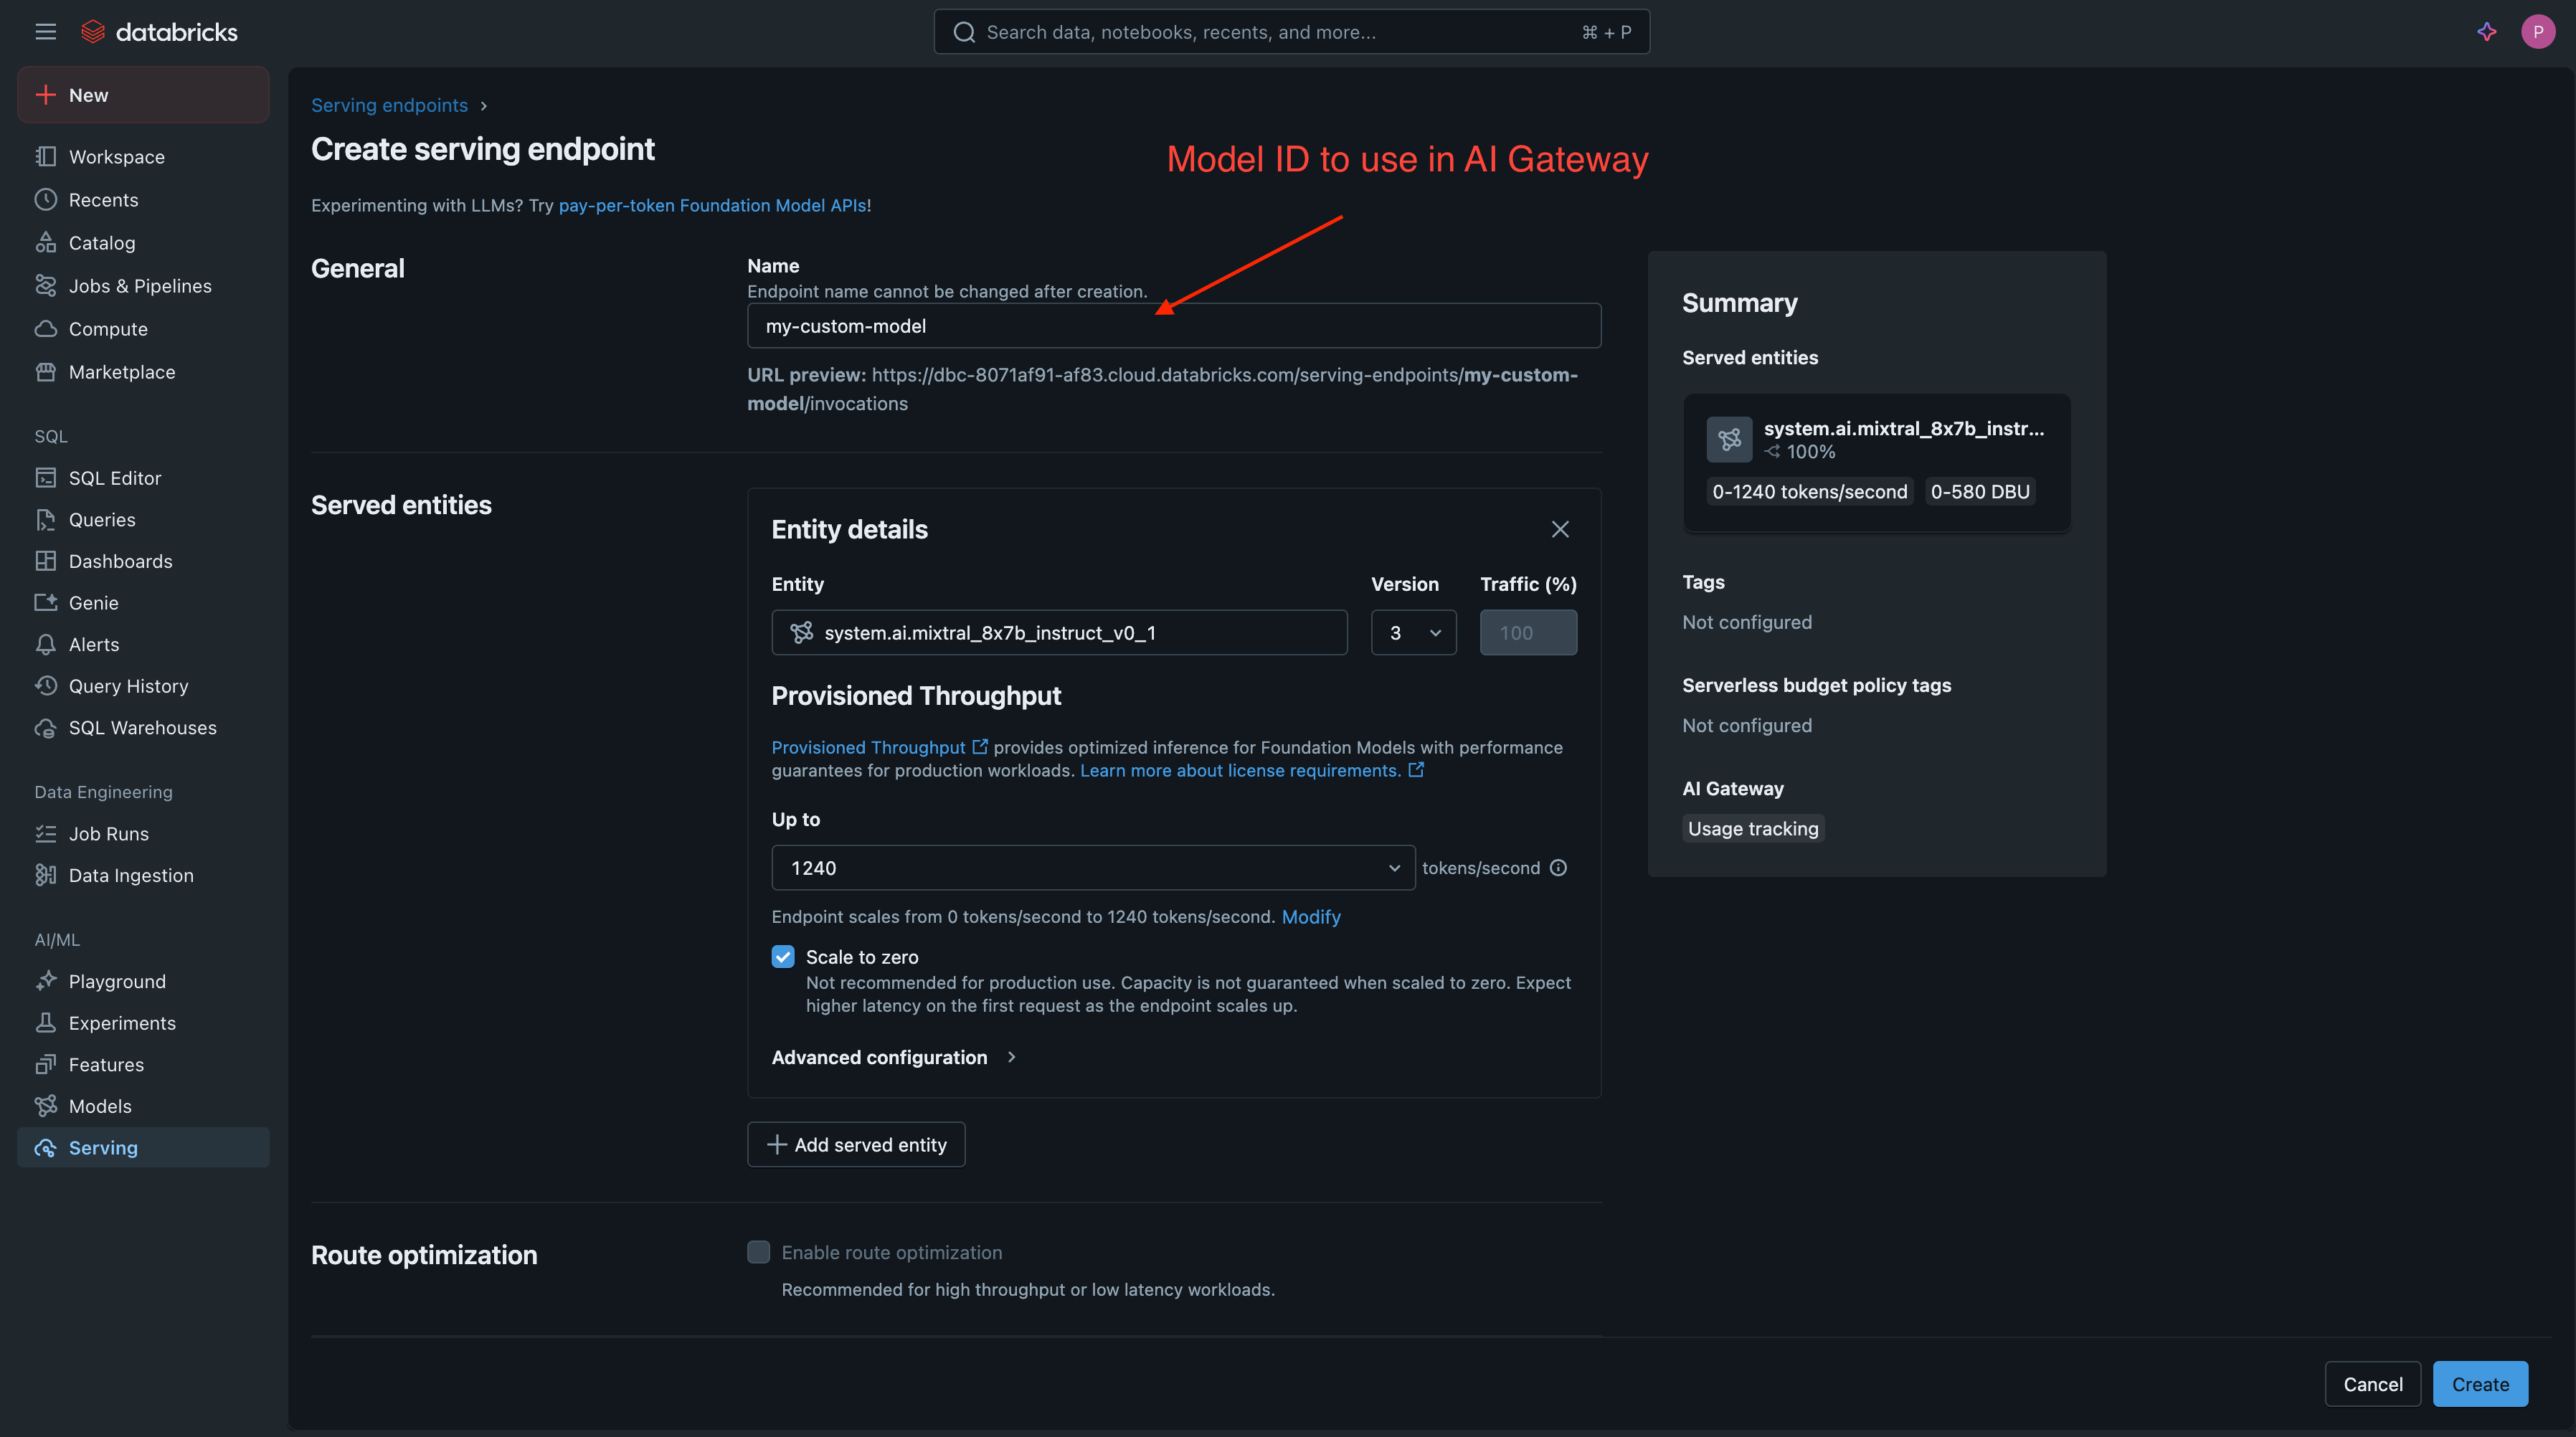 3. **Deploy and Verify**: Click **Create** and wait for the deployment to become **Ready**.
 ### Inference
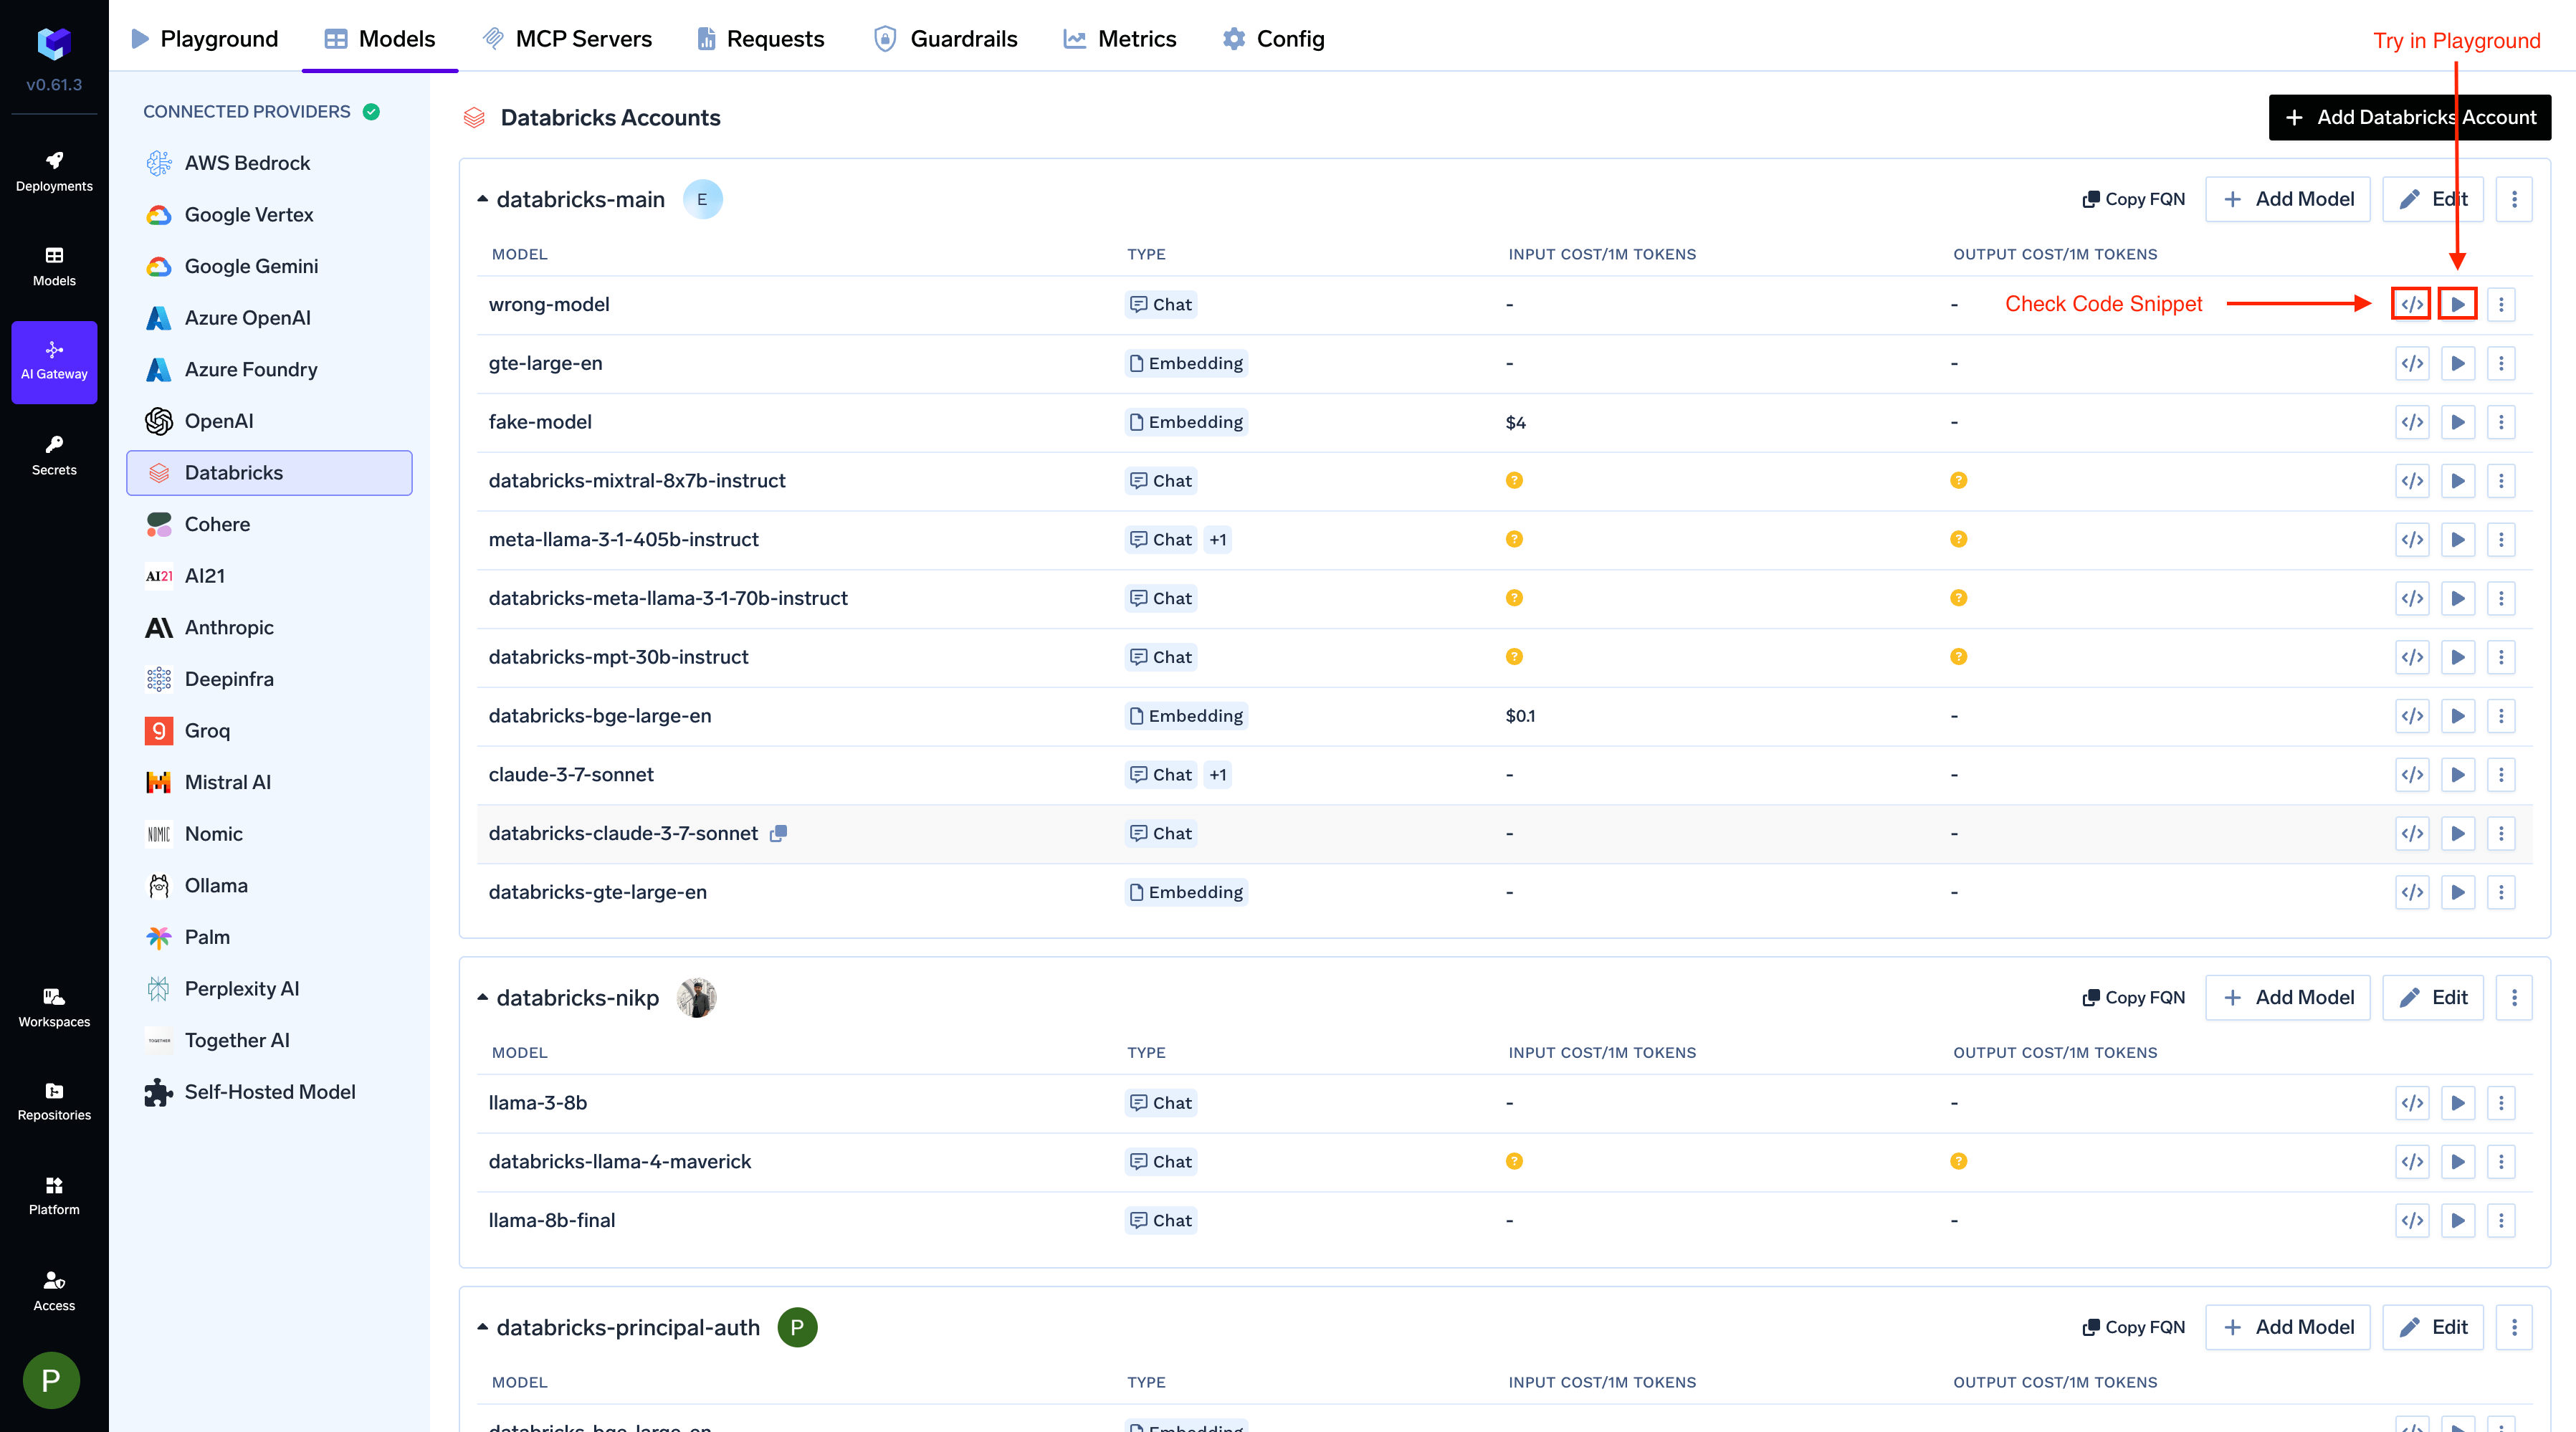
After adding the models, you can perform inference using an OpenAI-compatible API via the Playground or by integrating it with your own application.
### Inference
After adding the models, you can perform inference using an OpenAI-compatible API via the Playground or by integrating it with your own application.
 ### Responses API
Databricks serves the [Responses API](/docs/ai-gateway/responses-api) natively for its OpenAI foundation model endpoints — `databricks-gpt-5`, `databricks-gpt-5-1`, `databricks-gpt-5-mini`, and the rest of the `databricks-gpt-5*` family. The AI Gateway forwards these requests to Databricks unchanged, so you get back a real Responses object with a `resp_` id, including the model's reasoning output.
```python Python lines theme={"dark"}
from openai import OpenAI
client = OpenAI(
api_key="your-truefoundry-api-key",
base_url="{GATEWAY_BASE_URL}",
)
response = client.responses.create(
model="databricks-main/databricks-gpt-5-1",
input=[{"role": "user", "content": "What is TrueFoundry in one line?"}],
)
print(response.output_text)
```
Streaming works the same way — set `stream=True` and iterate over the emitted events.
**Every other Databricks endpoint still accepts `/responses`**, but the AI Gateway translates the request into a chat completion and converts the reply back. The response `id` tells you which path a request took: `resp_` means it went to Databricks natively, `chatcmpl-` means it was translated. Reasoning output is not returned on the translated path.
This is decided by the **serving endpoint name**, which is your Model ID in TrueFoundry. A GPT-5 model you deploy behind a custom endpoint name is treated like any other endpoint.
Databricks does not support server-side conversation state on pay-per-token endpoints. `previous_response_id`, `store`, and `background` are passed through to Databricks rather than dropped, so sending them returns an upstream 400 rather than silently losing your conversation history:
```text theme={"dark"}
databricks error: BAD_REQUEST: Databricks does not support the previous_response_id parameter for OpenAI Responses API
```
To hold a multi-turn conversation, send the full history in `input` on each turn.
### Responses API
Databricks serves the [Responses API](/docs/ai-gateway/responses-api) natively for its OpenAI foundation model endpoints — `databricks-gpt-5`, `databricks-gpt-5-1`, `databricks-gpt-5-mini`, and the rest of the `databricks-gpt-5*` family. The AI Gateway forwards these requests to Databricks unchanged, so you get back a real Responses object with a `resp_` id, including the model's reasoning output.
```python Python lines theme={"dark"}
from openai import OpenAI
client = OpenAI(
api_key="your-truefoundry-api-key",
base_url="{GATEWAY_BASE_URL}",
)
response = client.responses.create(
model="databricks-main/databricks-gpt-5-1",
input=[{"role": "user", "content": "What is TrueFoundry in one line?"}],
)
print(response.output_text)
```
Streaming works the same way — set `stream=True` and iterate over the emitted events.
**Every other Databricks endpoint still accepts `/responses`**, but the AI Gateway translates the request into a chat completion and converts the reply back. The response `id` tells you which path a request took: `resp_` means it went to Databricks natively, `chatcmpl-` means it was translated. Reasoning output is not returned on the translated path.
This is decided by the **serving endpoint name**, which is your Model ID in TrueFoundry. A GPT-5 model you deploy behind a custom endpoint name is treated like any other endpoint.
Databricks does not support server-side conversation state on pay-per-token endpoints. `previous_response_id`, `store`, and `background` are passed through to Databricks rather than dropped, so sending them returns an upstream 400 rather than silently losing your conversation history:
```text theme={"dark"}
databricks error: BAD_REQUEST: Databricks does not support the previous_response_id parameter for OpenAI Responses API
```
To hold a multi-turn conversation, send the full history in `input` on each turn.