> ## Documentation Index
> Fetch the complete documentation index at: https://www.truefoundry.com/llms.txt
> Use this file to discover all available pages before exploring further.
# AWS Compute Plane Setup
> This page provides an overview of the architecture, requirements and steps to install the TrueFoundry compute plane cluster in AWS.
## Architecture
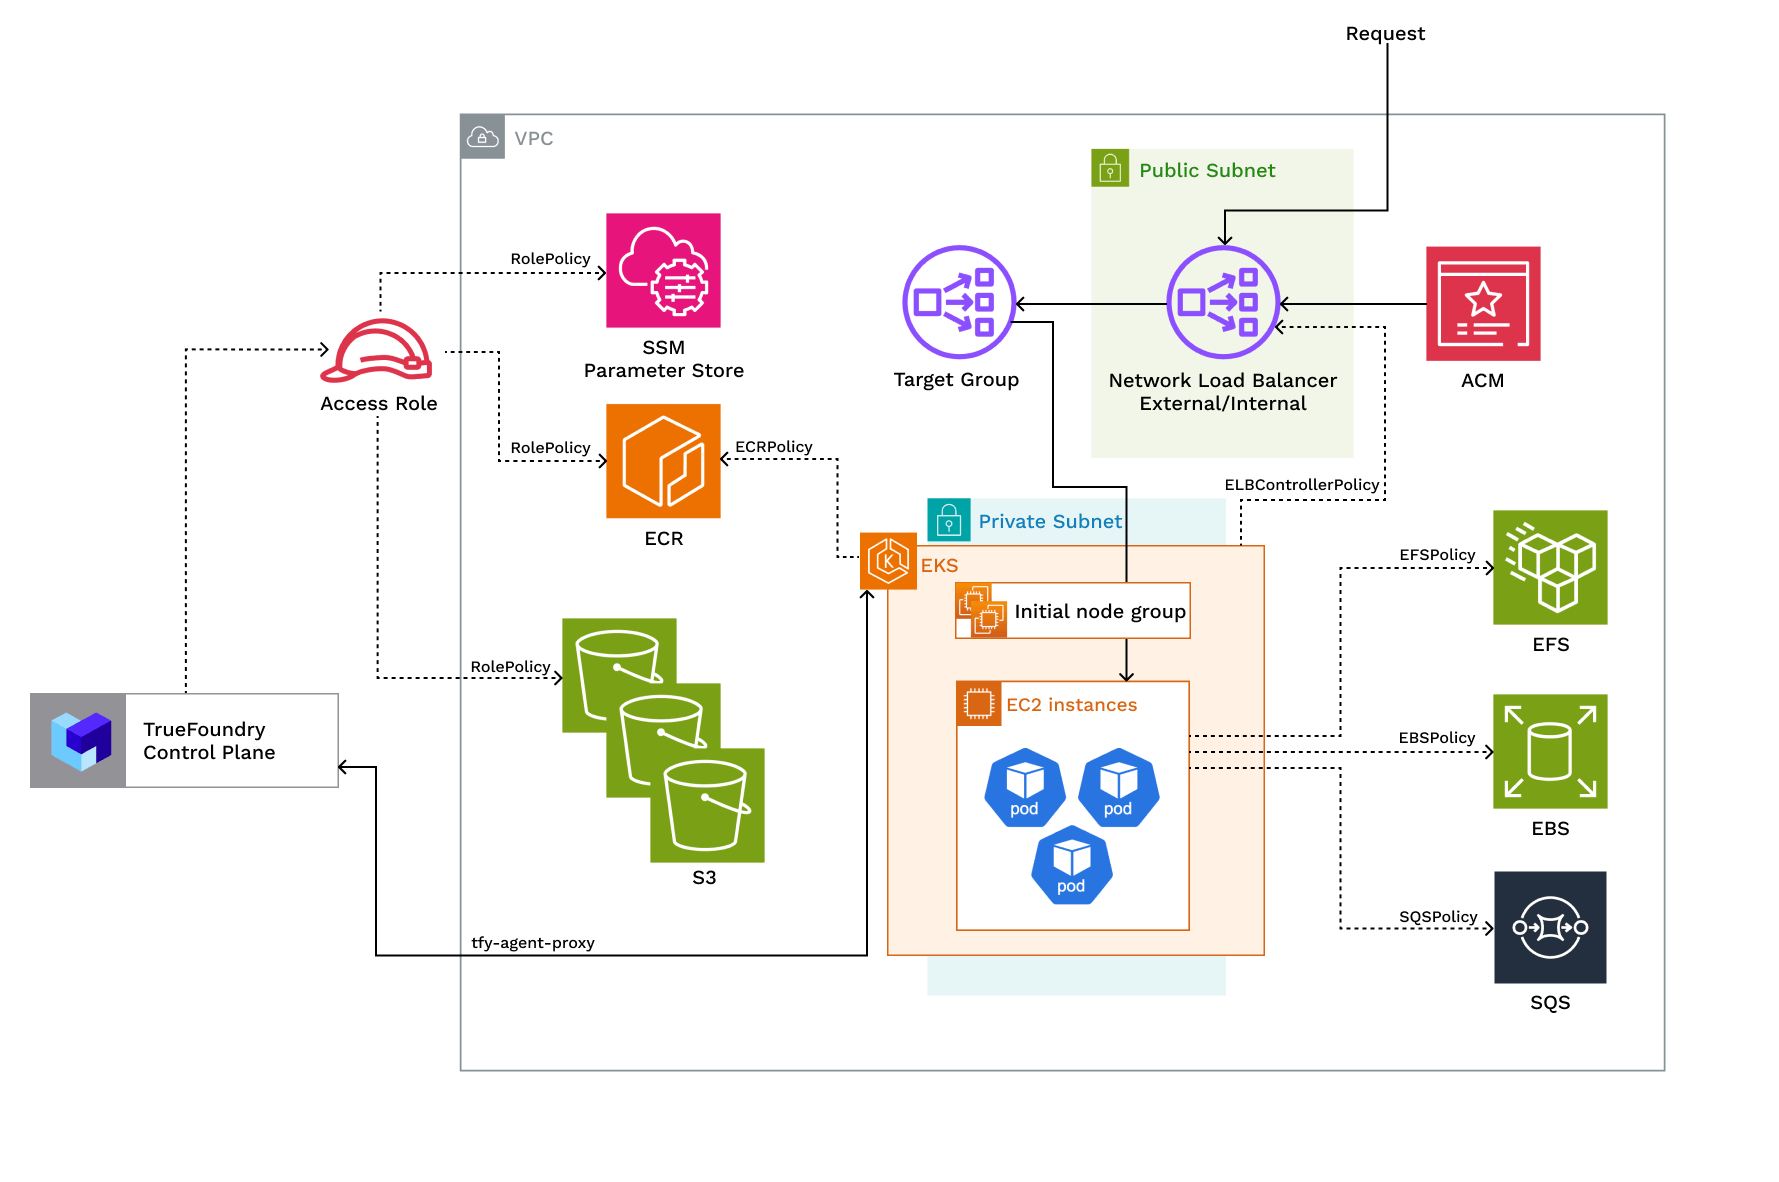
The diagram below shows the architecture of the TrueFoundry compute plane.
 ### Access Policies
The compute plane requires the following IAM policies to operate. These are created automatically during platform deployment.
| Policy | Description |
| ----------------------------------------------------------------------------------------------------------------------------------------------------------------------------------------------------------------------------------------------------------------------------------------------------------------------------------------------------------------------------------------------------------------------------------------------------------------------------------------------------------------------------------------------------------------------------------------------------------------------------------------------------------------------------------------------------------------------------------------------------------------------------------------------------------- | -------------------------------------------------------------------------------------------------------------------------------------------------------------------------------------------------------------------------------------------------------------------------------- |
| [ELBControllerPolicy](https://github.com/terraform-aws-modules/terraform-aws-iam/blob/f37809108f86d8fbdf17f735df734bf4abe69315/modules/iam-role-for-service-accounts-eks/policies.tf#L752) | Role assumed by load balancer controller to provision ELB when a service of type LoadBalancer is created |
| [KarpenterPolicy](https://github.com/terraform-aws-modules/terraform-aws-iam/blob/f37809108f86d8fbdf17f735df734bf4abe69315/modules/iam-role-for-service-accounts-eks/policies.tf#L619) and [SQSPolicy](https://github.com/truefoundry/terraform-aws-truefoundry-karpenter/blob/76f04a4c4abf1dc22e97b80994015c8e2e77d06f/sqs.tf#L8) | Role assumed by Karpenter to dynamically provision nodes and handle spot node termination |
| [EFSPolicy](https://github.com/truefoundry/terraform-aws-truefoundry-efs/blob/574d6680e1fc0ff4cff8c0f4df507c6f13659f10/efs.tf#L8) | Role assumed by EFS CSI to provision and attach EFS volumes |
| [EBSPolicy](https://docs.aws.amazon.com/aws-managed-policy/latest/reference/AmazonEBSCSIDriverPolicy.html) | Role assumed by EBS CSI to provision and attach EBS volumes |
| RolePolicy with policies for:- [ECR](https://github.com/truefoundry/terraform-aws-truefoundry-platform-features/blob/98bb8c09e5760dd5c2d557e27b7a94e2056da266/iam.tf#L57-L98), [S3](https://github.com/truefoundry/terraform-aws-truefoundry-platform-features/blob/98bb8c09e5760dd5c2d557e27b7a94e2056da266/iam.tf#L5-L18), [SSM](https://github.com/truefoundry/terraform-aws-truefoundry-platform-features/blob/98bb8c09e5760dd5c2d557e27b7a94e2056da266/iam.tf#L20-L36), [EKS](https://github.com/truefoundry/terraform-aws-truefoundry-platform-features/blob/98bb8c09e5760dd5c2d557e27b7a94e2056da266/iam.tf#L100-L144)
### Access Policies
The compute plane requires the following IAM policies to operate. These are created automatically during platform deployment.
| Policy | Description |
| ----------------------------------------------------------------------------------------------------------------------------------------------------------------------------------------------------------------------------------------------------------------------------------------------------------------------------------------------------------------------------------------------------------------------------------------------------------------------------------------------------------------------------------------------------------------------------------------------------------------------------------------------------------------------------------------------------------------------------------------------------------------------------------------------------------- | -------------------------------------------------------------------------------------------------------------------------------------------------------------------------------------------------------------------------------------------------------------------------------- |
| [ELBControllerPolicy](https://github.com/terraform-aws-modules/terraform-aws-iam/blob/f37809108f86d8fbdf17f735df734bf4abe69315/modules/iam-role-for-service-accounts-eks/policies.tf#L752) | Role assumed by load balancer controller to provision ELB when a service of type LoadBalancer is created |
| [KarpenterPolicy](https://github.com/terraform-aws-modules/terraform-aws-iam/blob/f37809108f86d8fbdf17f735df734bf4abe69315/modules/iam-role-for-service-accounts-eks/policies.tf#L619) and [SQSPolicy](https://github.com/truefoundry/terraform-aws-truefoundry-karpenter/blob/76f04a4c4abf1dc22e97b80994015c8e2e77d06f/sqs.tf#L8) | Role assumed by Karpenter to dynamically provision nodes and handle spot node termination |
| [EFSPolicy](https://github.com/truefoundry/terraform-aws-truefoundry-efs/blob/574d6680e1fc0ff4cff8c0f4df507c6f13659f10/efs.tf#L8) | Role assumed by EFS CSI to provision and attach EFS volumes |
| [EBSPolicy](https://docs.aws.amazon.com/aws-managed-policy/latest/reference/AmazonEBSCSIDriverPolicy.html) | Role assumed by EBS CSI to provision and attach EBS volumes |
| RolePolicy with policies for:- [ECR](https://github.com/truefoundry/terraform-aws-truefoundry-platform-features/blob/98bb8c09e5760dd5c2d557e27b7a94e2056da266/iam.tf#L57-L98), [S3](https://github.com/truefoundry/terraform-aws-truefoundry-platform-features/blob/98bb8c09e5760dd5c2d557e27b7a94e2056da266/iam.tf#L5-L18), [SSM](https://github.com/truefoundry/terraform-aws-truefoundry-platform-features/blob/98bb8c09e5760dd5c2d557e27b7a94e2056da266/iam.tf#L20-L36), [EKS](https://github.com/truefoundry/terraform-aws-truefoundry-platform-features/blob/98bb8c09e5760dd5c2d557e27b7a94e2056da266/iam.tf#L100-L144)
Use the [trust relationship](https://github.com/truefoundry/terraform-aws-truefoundry-platform-features/blob/98bb8c09e5760dd5c2d557e27b7a94e2056da266/iam.tf#L192-L229). | Role assumed by TrueFoundry to allow access to ECR, S3, and SSM services. If you are using TrueFoundry's control plane the role will be assumed by `arn:aws:iam::416964291864:role/tfy-ctl-euwe1-production-truefoundry-deps` otherwise it will be your control plane's IAM role |
| ClusterRole with policies:
- [AmazonEKSClusterPolicy](https://docs.aws.amazon.com/aws-managed-policy/latest/reference/AmazonEKSClusterPolicy.html)
- [AmazonEKSVPCResourceControllerPolicy](https://docs.aws.amazon.com/aws-managed-policy/latest/reference/AmazonEKSVPCResourceController.html)
- EncryptionPolicy | Role that provides Kubernetes permissions to manage the cluster lifecycle, networking, and encryption |
| NodeRole with policies: [AmazonEC2ContainerRegistryReadOnlyPolicy](https://docs.aws.amazon.com/aws-managed-policy/latest/reference/AmazonEC2ContainerRegistryReadOnly.html), [AmazonEKS\_CNI\_Policy](https://docs.aws.amazon.com/aws-managed-policy/latest/reference/AmazonEKS_CNI_Policy.html), [AmazonEKSWorkerNodePolicy](https://docs.aws.amazon.com/aws-managed-policy/latest/reference/AmazonEKSWorkerNodePolicy.html), [AmazonSSMManagedInstanceCorePolicy](https://docs.aws.amazon.com/aws-managed-policy/latest/reference/AmazonSSMManagedInstanceCore.html) | Role assumed by EKS nodes to work with AWS resources for ECR access, IP assignment, and cluster registration |
EncryptionPolicy to create and manage key for encryption:
```json theme={"dark"}
{
"Statement": [
{
"Action": [
"kms:Encrypt",
"kms:Decrypt",
"kms:ListGrants",
"kms:DescribeKey"
],
"Effect": "Allow",
"Resource": "arn:aws:kms:::key/"
}
],
"Version": "2012-10-17"
}
```
## Requirements
Common requirements for setting up the compute plane:
* Billing and [STS](https://docs.aws.amazon.com/IAM/latest/UserGuide/id_credentials_temp_enable-regions.html#sts-regions-activate-deactivate) must be enabled for the AWS account.
* Egress access to container registries — `public.ecr.aws`, `quay.io`, `ghcr.io`, `tfy.jfrog.io`, `docker.io/natsio`, `nvcr.io`, `registry.k8s.io` — to pull images for ArgoCD, NATS, GPU Operator, Argo Rollouts, Argo Workflows, Istio, and Keda.
* A domain mapped to the service endpoints, plus a certificate to encrypt traffic. A wildcard domain such as `*.services.example.com` is preferred. TrueFoundry supports path-based routing (e.g. `services.example.com/tfy/*`), but many frontend applications do not. Create the certificate for your domain in AWS Certificate Manager (ACM) and keep the ARN ready (covered in the **Get Domain and Certificate ARN** step below).
* Sufficient CPU/GPU/Inferentia quotas for your use case. Check and increase them at [AWS EC2 service quotas](https://docs.aws.amazon.com/AWSEC2/latest/UserGuide/ec2-resource-limits.html).
* Sufficient permissions on the AWS account to create the compute-plane resources. See [Permissions required to create the infrastructure](#permissions-required-to-create-the-infrastructure) for details.
### Permissions required to create the infrastructure
Admin permission on the AWS account is the simplest. For the exact least-privilege set, the policy below is the base cluster policy plus the compute-plane (blob storage) delta. Substitute `$REGION`, `$ACCOUNT_ID`, and `$CLUSTER_NAME` with your values before attaching.
```json expandable theme={"dark"}
{
"Version": "2012-10-17",
"Statement": [
{
"Effect": "Allow",
"Action": [
"cloudformation:DescribeStacks",
"cloudformation:ListStacks",
"eks:*",
"ec2:*",
"iam:GetRole",
"iam:ListPolicies",
"elasticfilesystem:*",
"kms:*",
"route53:AssociateVPCWithHostedZone",
"s3:ListAllMyBuckets",
"sts:GetCallerIdentity",
"tag:GetResources"
],
"Resource": "*"
},
{
"Effect": "Allow",
"Action": [
"events:*"
],
"Resource": [
"arn:aws:events:$REGION:$ACCOUNT_ID:rule/$CLUSTER_NAME*",
"arn:aws:events:$REGION:$ACCOUNT_ID:rule/Karpenter*"
]
},
{
"Effect": "Allow",
"Action": [
"iam:AddRoleToInstanceProfile",
"iam:CreateInstanceProfile",
"iam:DeleteInstanceProfile",
"iam:GetInstanceProfile",
"iam:TagInstanceProfile",
"iam:UntagInstanceProfile",
"iam:RemoveRoleFromInstanceProfile"
],
"Resource": "arn:aws:iam::$ACCOUNT_ID:instance-profile/$CLUSTER_NAME*"
},
{
"Effect": "Allow",
"Action": [
"cloudformation:CreateStack",
"cloudformation:DeleteStack",
"cloudformation:GetTemplate"
],
"Resource": "arn:aws:cloudformation:$REGION:$ACCOUNT_ID:stack/$CLUSTER_NAME*"
},
{
"Effect": "Allow",
"Action": [
"iam:CreateOpenIDConnectProvider",
"iam:DeleteOpenIDConnectProvider",
"iam:GetOpenIDConnectProvider",
"iam:TagOpenIDConnectProvider"
],
"Resource": "arn:aws:iam::$ACCOUNT_ID:oidc-provider/*"
},
{
"Effect": "Allow",
"Action": [
"iam:CreatePolicy",
"iam:DeletePolicy",
"iam:GetPolicy",
"iam:TagPolicy",
"iam:UntagPolicy",
"iam:GetPolicyVersion",
"iam:ListPolicyVersions"
],
"Resource": [
"arn:aws:iam::$ACCOUNT_ID:policy/$CLUSTER_NAME*",
"arn:aws:iam::$ACCOUNT_ID:policy/tfy-*",
"arn:aws:iam::$ACCOUNT_ID:policy/truefoundry-*",
"arn:aws:iam::$ACCOUNT_ID:policy/AmazonEKS_Karpenter_Controller_Policy*",
"arn:aws:iam::$ACCOUNT_ID:policy/AmazonEKS_CNI_Policy*",
"arn:aws:iam::$ACCOUNT_ID:policy/AmazonEKS_AWS_Load_Balancer_Controller*",
"arn:aws:iam::aws:policy/AmazonEC2ContainerRegistryFullAccess"
]
},
{
"Effect": "Allow",
"Action": [
"iam:AttachRolePolicy",
"iam:CreateRole",
"iam:CreateServiceLinkedRole",
"iam:DeleteRole",
"iam:DetachRolePolicy",
"iam:ListAttachedRolePolicies",
"iam:ListInstanceProfilesForRole",
"iam:ListRolePolicies",
"iam:PutRolePolicy",
"iam:GetRolePolicy",
"iam:DeleteRolePolicy",
"iam:TagRole",
"iam:PassRole"
],
"Resource": "arn:aws:iam::$ACCOUNT_ID:role/$CLUSTER_NAME*"
},
{
"Effect": "Allow",
"Action": [
"logs:*"
],
"Resource": [
"arn:aws:logs:$REGION:$ACCOUNT_ID:log-group:/aws/eks/$CLUSTER_NAME*",
"arn:aws:logs:$REGION:$ACCOUNT_ID:log-group::log-stream:"
]
},
{
"Effect": "Allow",
"Action": [
"s3:*"
],
"Resource": [
"arn:aws:s3:::$CLUSTER_NAME*",
"arn:aws:s3:::$CLUSTER_NAME*/*"
]
},
{
"Effect": "Allow",
"Action": "sqs:*",
"Resource": "arn:aws:sqs:$REGION:$ACCOUNT_ID:$CLUSTER_NAME*"
},
{
"Effect": "Allow",
"Action": [
"ssm:GetParameter",
"ssm:GetParameters"
],
"Resource": "arn:aws:ssm:$REGION::parameter/aws/service/*"
}
]
}
```
Regarding the VPC and EKS cluster, you can decide between the following scenarios:
1. The new VPC will have a CIDR range of /20 or larger, at least 2 availability zones, and private subnets with CIDR range of /24 or larger. This ensures capacity for \~250 instances and 4096 pods.
2. If you are using [custom networking](https://docs.aws.amazon.com/eks/latest/userguide/cni-custom-network.html), you need a CGNAT IP address in each AZ. CGNAT space and route tables will be set up in the VPC.
3. A NAT gateway will be provisioned to provide internet access to the private subnets.
1. The existing VPC should have min 2 private subnets in different AZs with CIDR /24. This ensures capacity for \~250 instances and 4096 pods. The VPC should have NAT gateway for private subnets. If you want to use a smaller network range for your EKS cluster, TrueFoundry supports [EKS custom networking](https://docs.aws.amazon.com/eks/latest/userguide/cni-custom-network.html) as well.
2. If you want to have a load balancer in the public subnet, there should be at least one public subnet in the existing VPC with min CIDR range of /28.
3. The VPC should have [Auto-assign IP address](https://docs.aws.amazon.com/AWSEC2/latest/UserGuide/ec2-launch-instance-wizard.html#liw-network-settings:~:text=Auto%2Dassign%20Public,IPv4%20addresses.) enabled. It should also have [DNS support](https://docs.aws.amazon.com/glue/latest/dg/set-up-vpc-dns.html) and [DNS hostnames](https://docs.aws.amazon.com/glue/latest/dg/set-up-vpc-dns.html) enabled.
Your subnets must have the following tags for the TrueFoundry OpenTofu/Terraform code to work with them.
| Resource Type | Required Tags | Description |
| ----------------------- | --------------------------------------------------------------------------------------------------------------------------------- | ------------------------------------------------------------------------------------------- |
| Private Subnets | - `kubernetes.io/cluster/${clusterName}`: `"shared"`
- `subnet`: `"private"`
- `kubernetes.io/role/internal-elb`: `"1"` | Tags required for EKS to properly manage internal load balancers and subnet identification |
| Public Subnets | - `kubernetes.io/cluster/${clusterName}`: `"shared"`
- `subnet`: `"public"`
- `kubernetes.io/role/elb`: `"1"` | Tags required for EKS to properly manage external load balancers and subnet identification |
| EKS Node Security Group | - `karpenter.sh/discovery`: `"${clusterName}"` | This tag is required for Karpenter to discover and manage node provisioning for the cluster |
1. EKS Version should be 1.30 or higher with [IRSA](https://docs.aws.amazon.com/eks/latest/userguide/iam-roles-for-service-accounts.html) enabled.
2. EBS CSI Driver should be installed [Installation Guide](https://github.com/kubernetes-sigs/aws-ebs-csi-driver/blob/master/docs/install.md) - Required for persistent volume support for Notebooks, SSH.
3. EFS CSI Driver should be installed [Installation Guide](https://github.com/kubernetes-sigs/aws-efs-csi-driver/blob/master/docs/README.md) - Required for model and data caching.
4. AWS Load Balancer Controller (>=v2.12.0) should be installed [Installation Guide](https://kubernetes-sigs.github.io/aws-load-balancer-controller/latest/deploy/installation/) - Required for Ingress and Service type LoadBalancer support. The appropriate IAM roles for service account (IRSA) should be created.
5. Although not compulsory, installing Karpenter on the cluster is highly recommended. It makes many TrueFoundry functionalities easier, faster, and more cost-effective.
## Setting up compute plane
TrueFoundry compute plane infrastructure is provisioned using OpenTofu/Terraform. You can download the OpenTofu/Terraform code for your exact account by filling up your account details and downloading a script that can be executed on your local machine.
To enable the deployment feature which allows you to deploy services through the platform, you need to enable it;
* In the left hand navigation, go to `Settings` then `Platform Feature Visibility` under `Preferences`
* Click on `Edit` button. Then enable the toggle for `Enable Deployment`
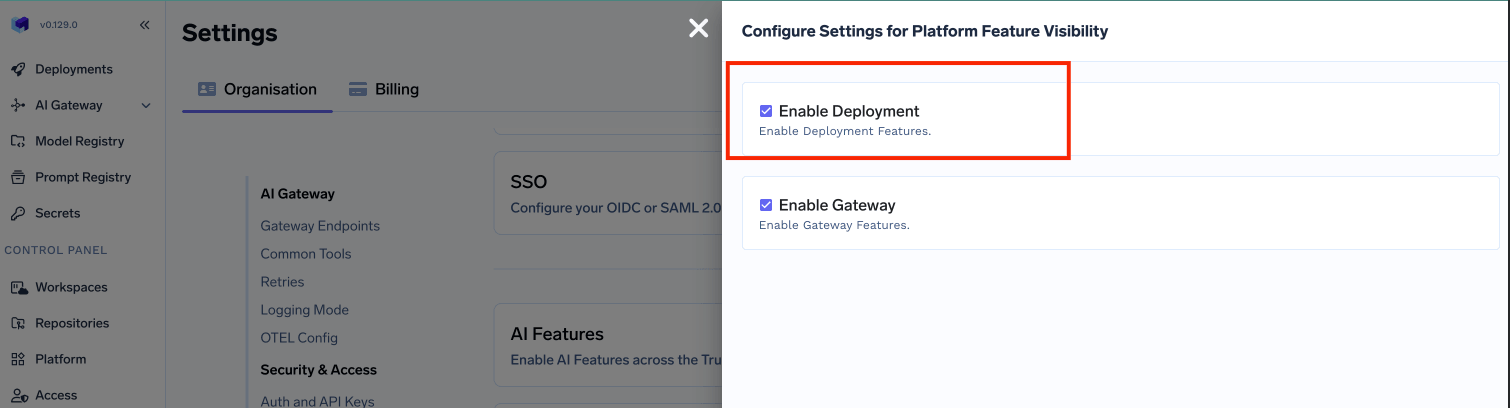 * Click on `Save` button.
This will enable the deployment feature in the platform and allow you to create either a control plane and compute plane.
* Click on `Save` button.
This will enable the deployment feature in the platform and allow you to create either a control plane and compute plane.
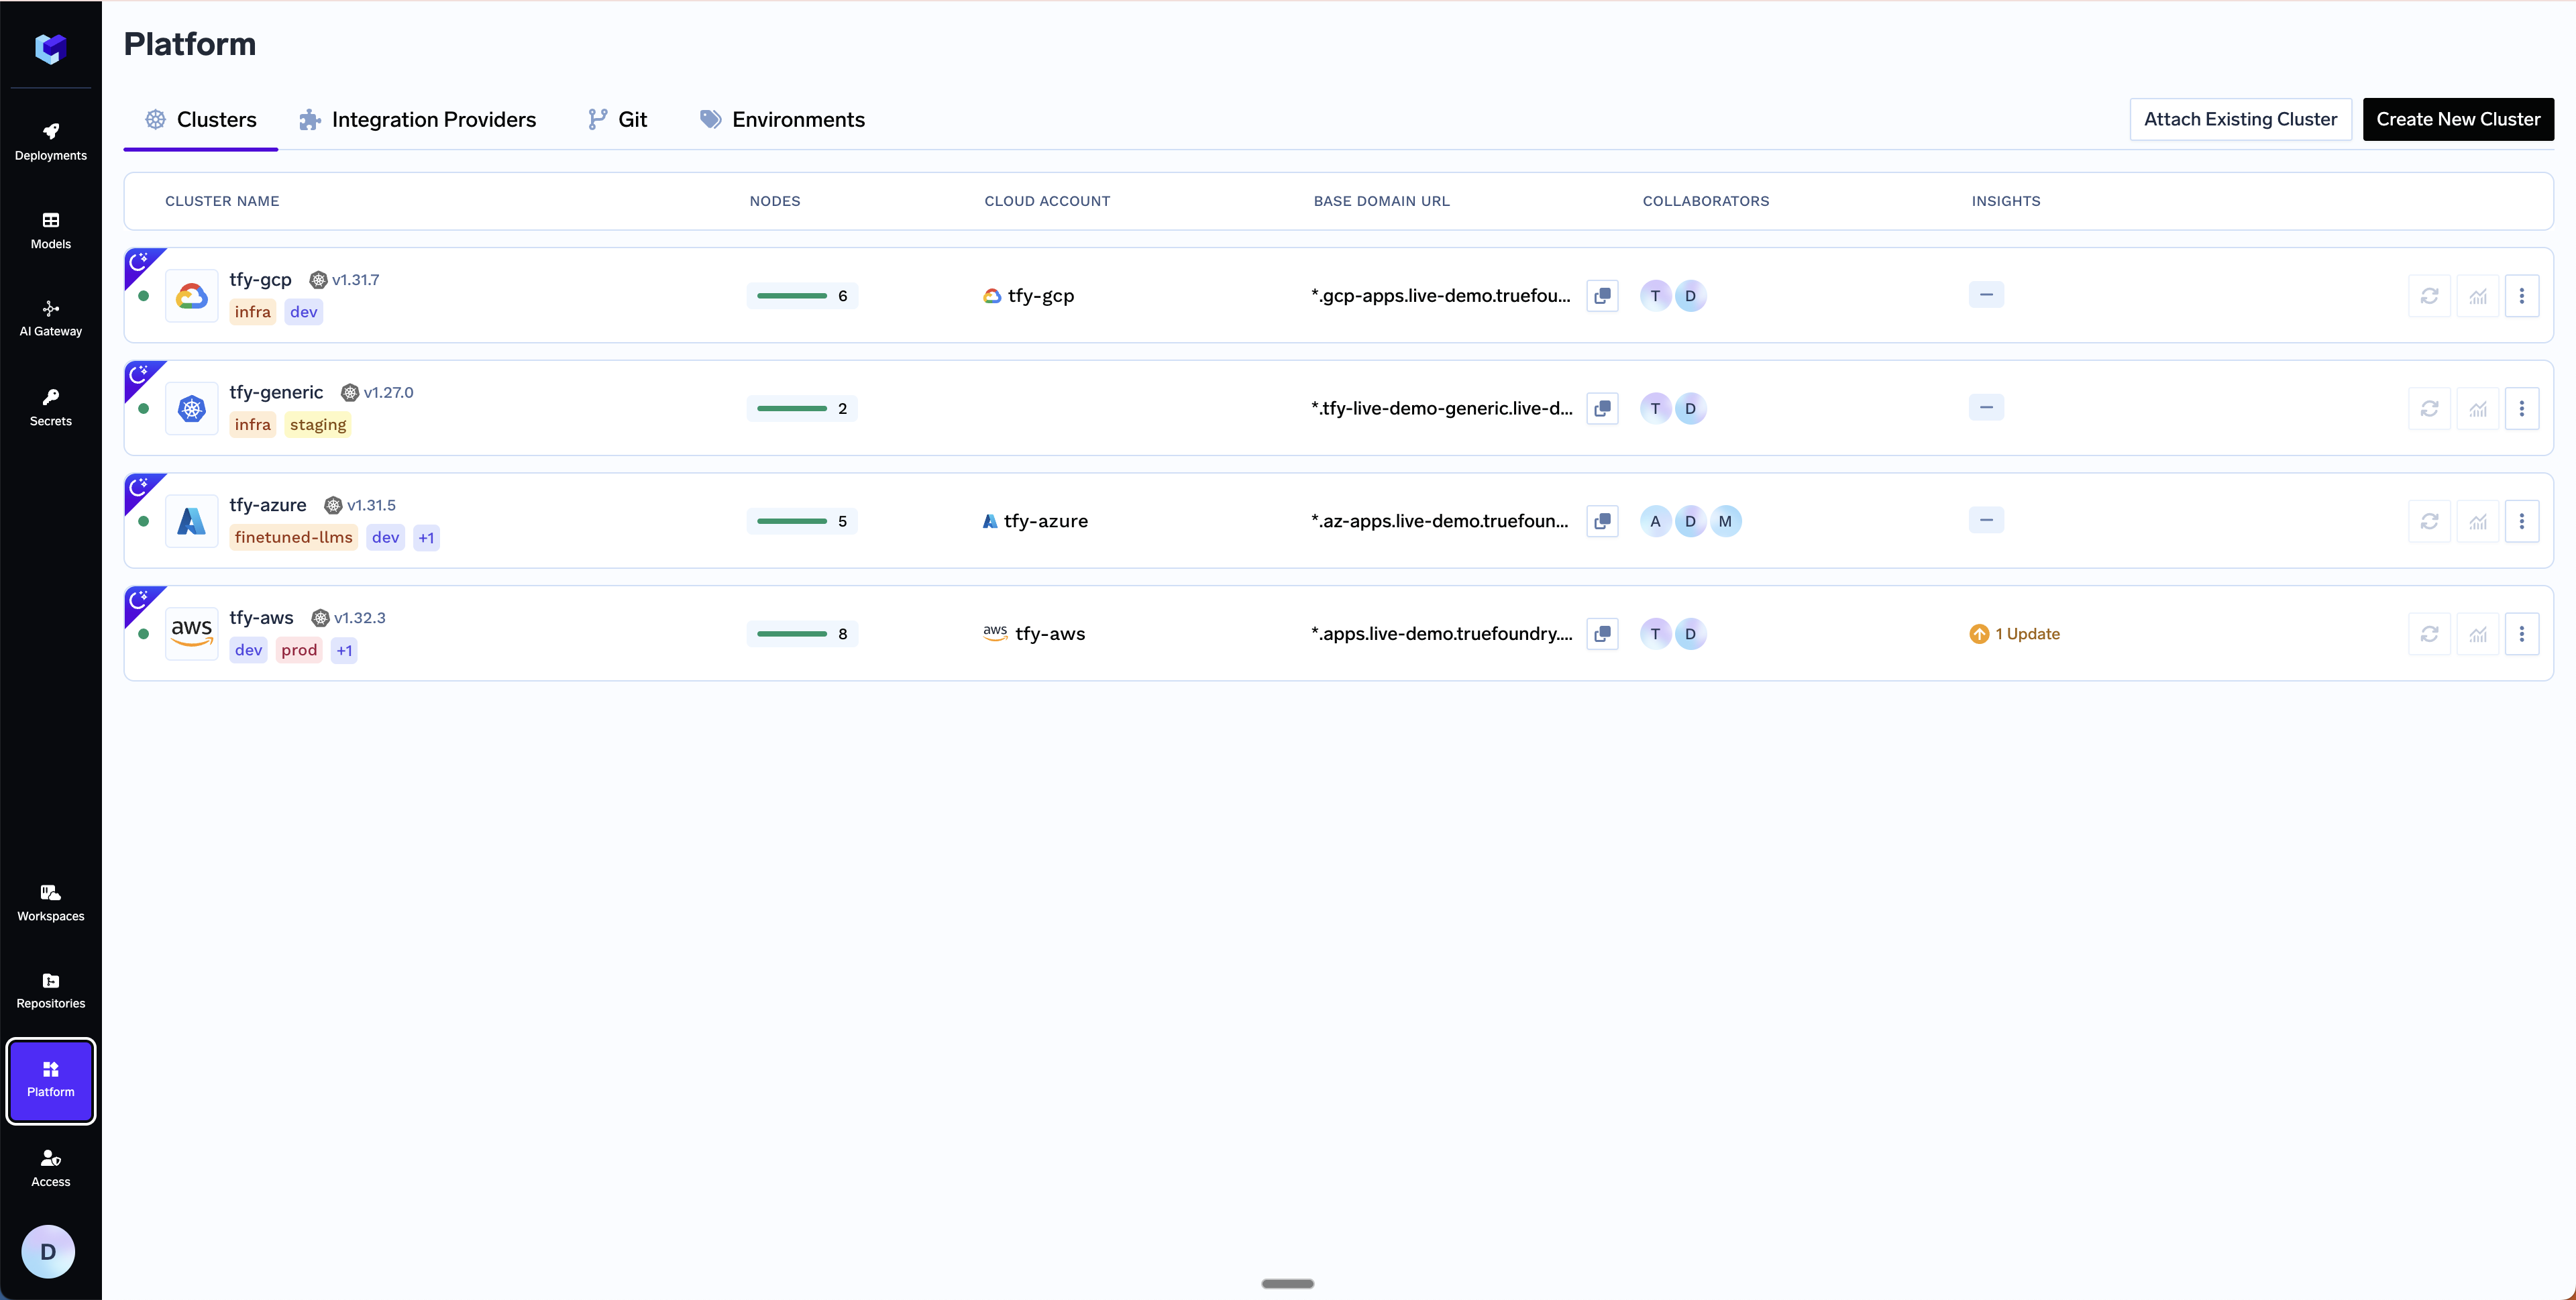
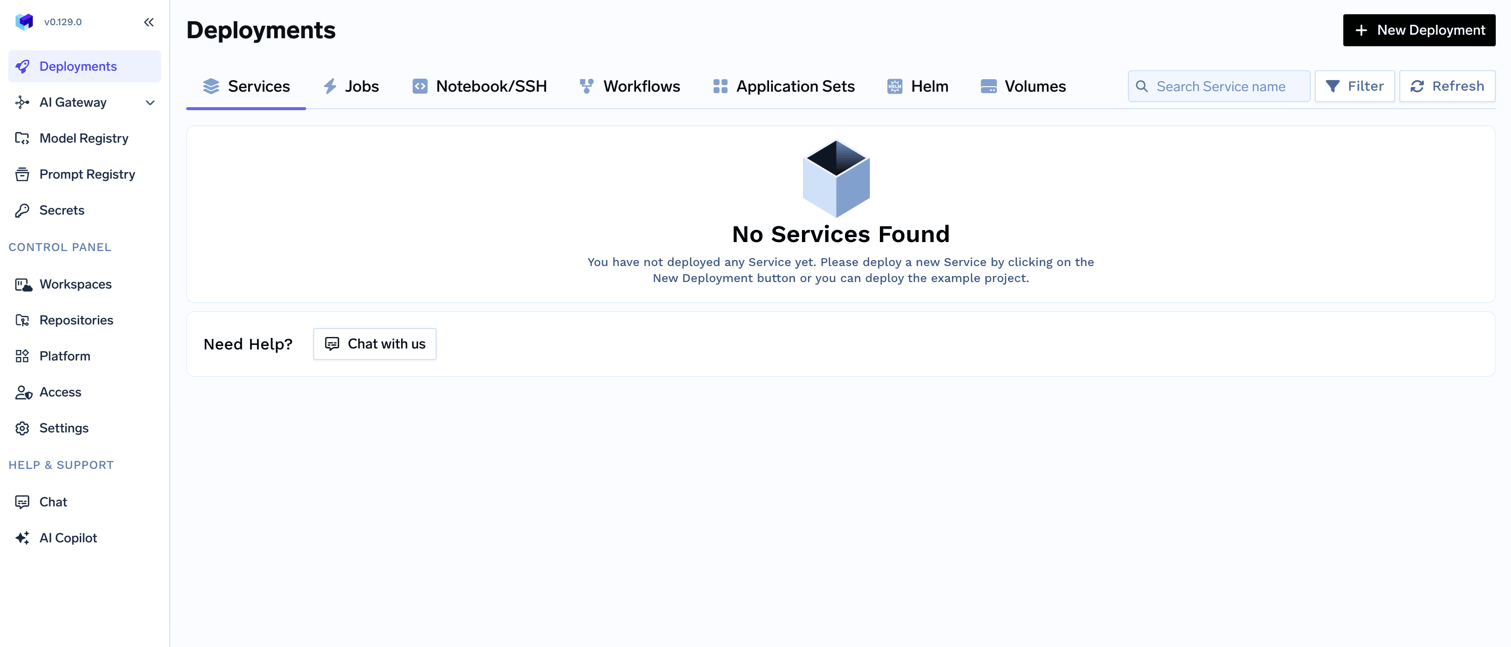 Go to the platform section in the left panel and click on `Clusters`. You can click on `Create New Cluster` or `Attach Existing Cluster` depending on your use case. Read the requirements and if everything is satisfied, click on `Continue`.
 You need a domain and certificate ARN to point to the load balancer created in the next step. For example, if you have a domain like `*.services.example.com`, you will create a DNS record for it later in Step 6. We recommend using [AWS Certificate Manager (ACM)](https://docs.aws.amazon.com/acm/latest/userguide/acm-overview.html) to create the certificate, since it manages and renews certificates automatically. To generate a certificate ARN, follow the steps below. If you are not using AWS Certificate Manager, skip this step and continue to the next one.
1. Navigate to AWS Certificate Manager in the AWS console.
2. [Request a public certificate](https://docs.aws.amazon.com/acm/latest/userguide/gs-acm-request-public.html).
3. Specify your domain (e.g. `*.services.example.com`).
4. Choose DNS validation (recommended).
5. Add the CNAME records provided by ACM to your DNS provider. Follow the [official AWS guide for DNS validation](https://docs.aws.amazon.com/acm/latest/userguide/dns-validation.html). For detailed steps on adding CNAME records, see the [AWS documentation on DNS validation](https://docs.aws.amazon.com/acm/latest/userguide/gs-acm-validate-dns.html).
6. Wait for the certificate to change to "Active" status (this may take 30 minutes or longer).
7. Copy the certificate ARN for the next step (the format will be like `arn:aws:acm:region:account:certificate/certificate-id`).
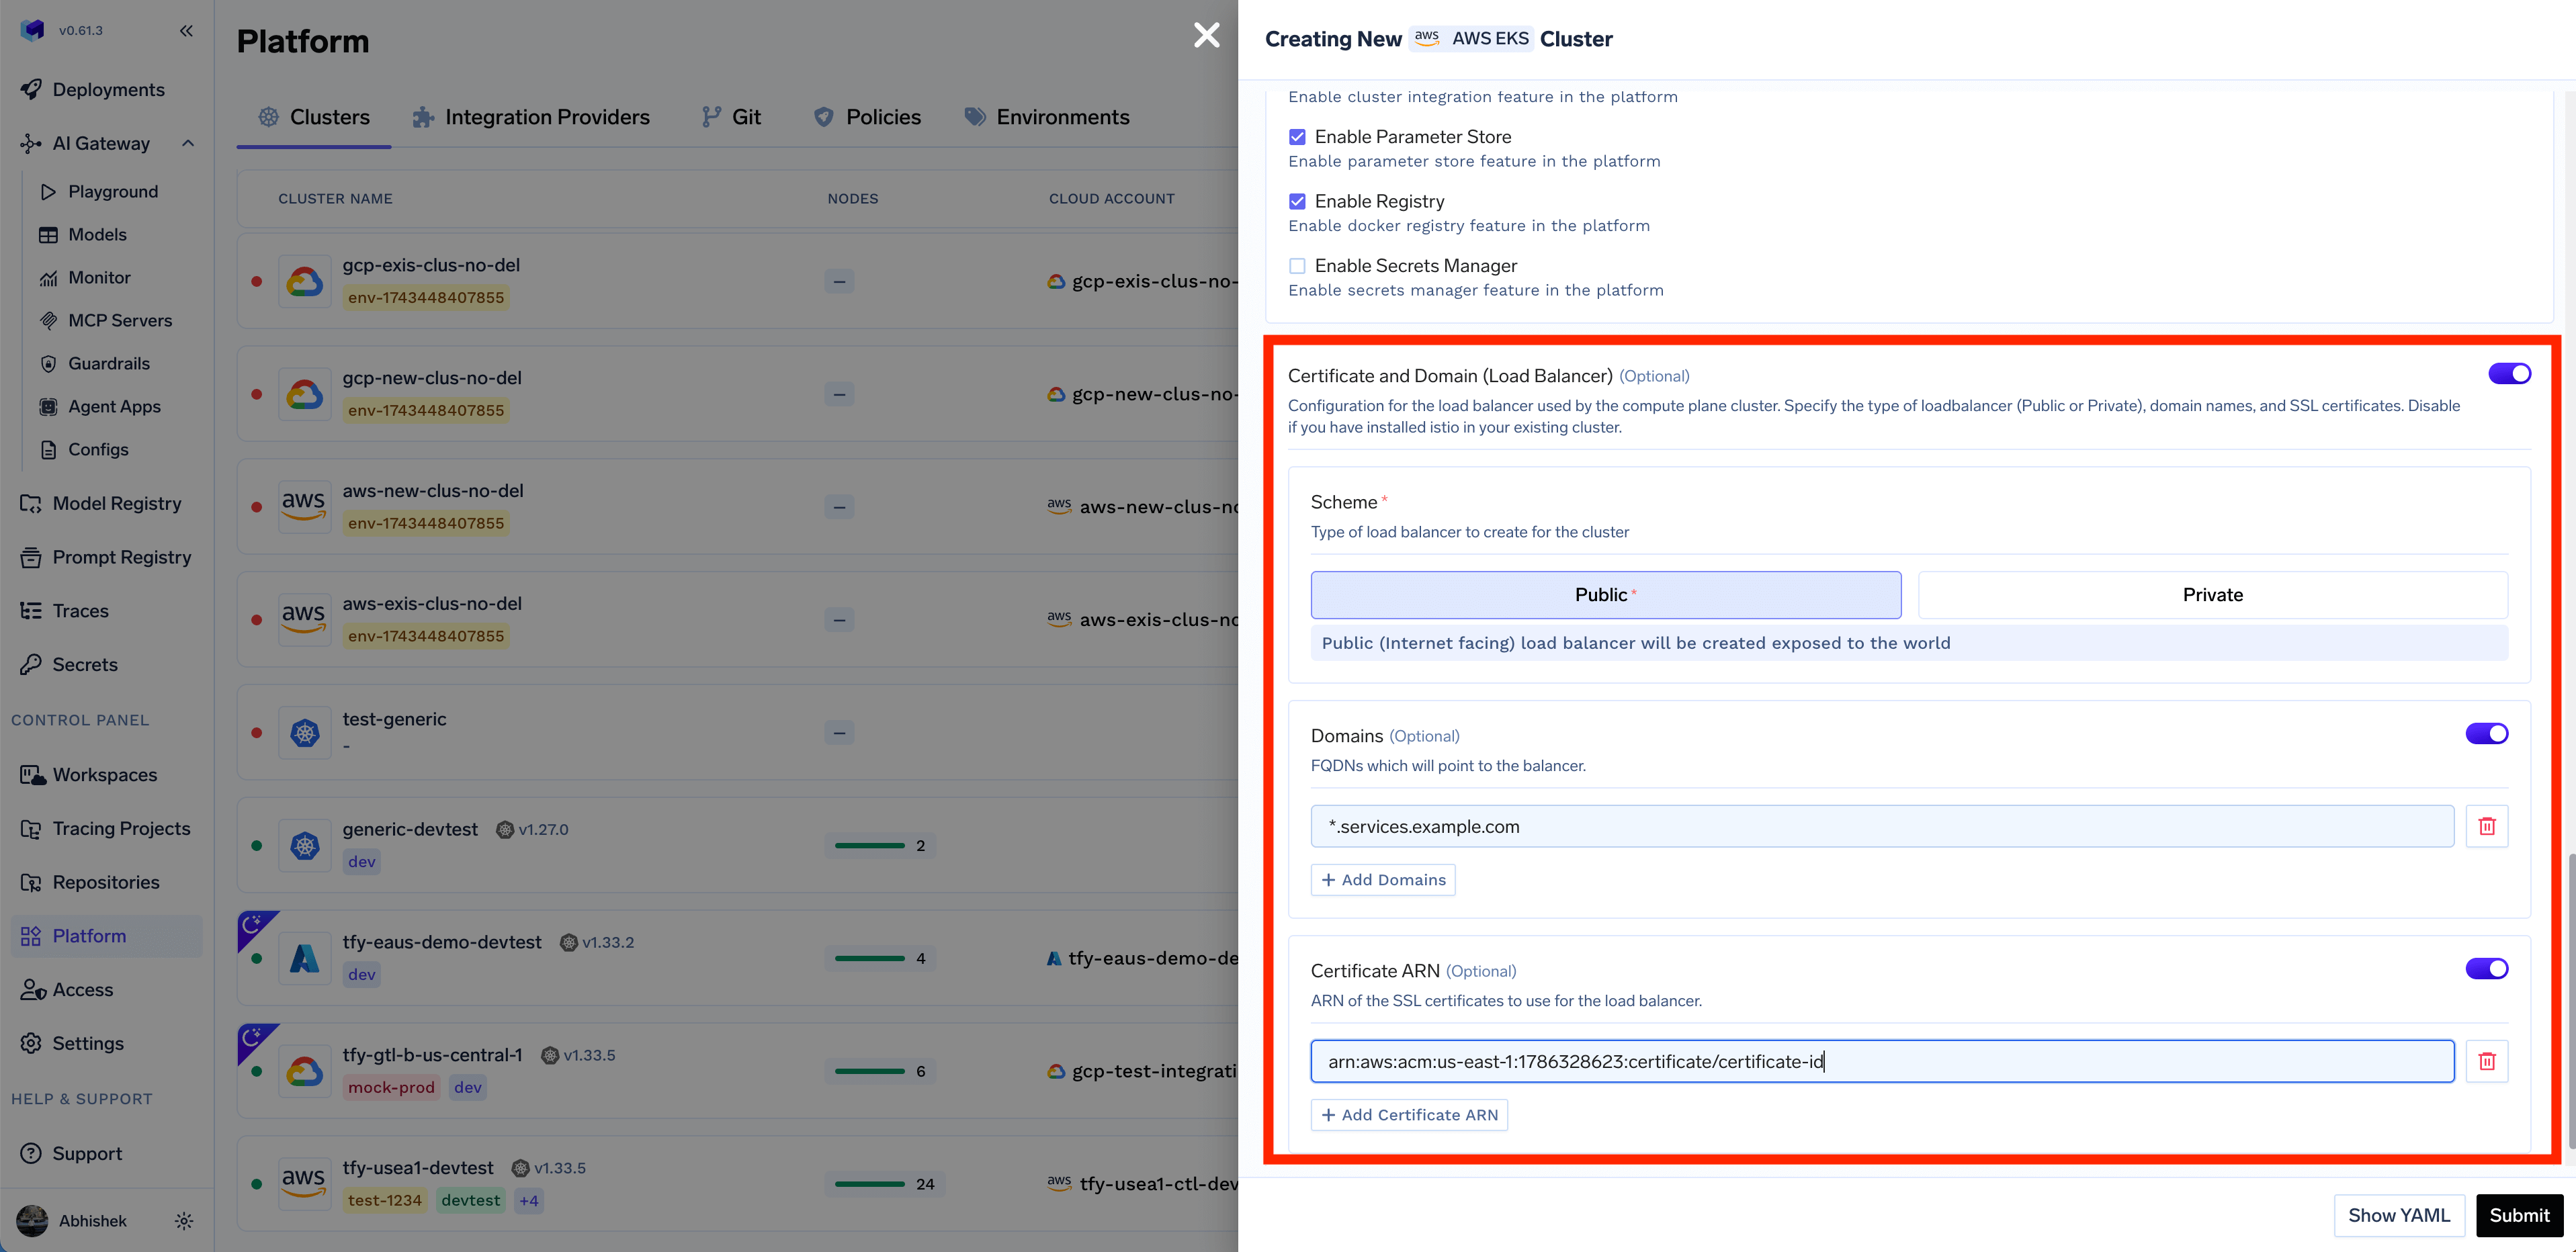
A form will be presented with the details for the new cluster to be created. Fill in with your cluster details. Click `Submit` when done.
The key fields to fill up here are:
* `Cluster Name` - A name for your cluster.
* `Region` - The region where you want to create the cluster.
* `Network Configuration` - Choose between `New VPC` or `Existing VPC` depending on your use case.
* `Authentication` - This is how you are authenticated to AWS on your local machine. It's used to configure OpenTofu/Terraform to authenticate with AWS.
* `S3 Bucket for OpenTofu/Terraform State` - OpenTofu/Terraform state will be stored in this bucket. It can be a preexisting bucket or a new bucket name. The new bucket will automatically be created by our script.
* `Load Balancer Configuration` - This is to configure the load balancer for your cluster. You can choose between `Public` or `Private` Load Balancer, it defaults to `Public`. You can also add certificate ARNs and domain names for the load balancer but these are optional.
* `Platform Features` - This is to decide which features like Blob Storage, Cluster Integration, Parameter Store, Docker Registry, and Secrets Manager will be enabled for your cluster. To read more on how these integrations are used in the platform, please refer to the [platform features](/docs/infrastructure/deploy-compute-plane) page.
The key fields to fill up here are:
* `Region` - The region where your cluster is already created.
* `Cluster Configuration` - Provide the details of the existing cluster like the name of the cluster, URL of the OIDC provider, and the other required ARNs on the form.
* `Cluster Addons` - TrueFoundry needs to install addons like ArgoCD, Argo Workflows, Keda, Istio, etc. Please disable the addons that are already installed on your cluster so that the TrueFoundry installation does not override the existing configuration and affect your existing workloads.
* `Network Configuration` - Provide the details of the existing VPC and subnets where the cluster is already created.
* `Authentication` - This is how you are authenticated to AWS on your local machine. It's used to configure OpenTofu/Terraform to authenticate with AWS.
* `S3 Bucket for OpenTofu/Terraform State` - OpenTofu/Terraform state will be stored in this bucket. It can be a preexisting bucket or a new bucket name. The new bucket will automatically be created by our script.
* `Load Balancer Configuration` - This is to configure the load balancer for your cluster. You can choose between `Public` or `Private` Load Balancer, it defaults to `Public`. You can also add certificate ARNs and domain names for the load balancer but these are optional.
* `Platform Features` - This is to decide which features like Blob Storage, Cluster Integration, Parameter Store, Docker Registry, and Secrets Manager will be enabled for your cluster. To read more on how these integrations are used in the platform, please refer to the [platform features](/docs/infrastructure/deploy-compute-plane) page.
Enter the domain and the certificate ARN from the previous step in the form as shown below.
You need a domain and certificate ARN to point to the load balancer created in the next step. For example, if you have a domain like `*.services.example.com`, you will create a DNS record for it later in Step 6. We recommend using [AWS Certificate Manager (ACM)](https://docs.aws.amazon.com/acm/latest/userguide/acm-overview.html) to create the certificate, since it manages and renews certificates automatically. To generate a certificate ARN, follow the steps below. If you are not using AWS Certificate Manager, skip this step and continue to the next one.
1. Navigate to AWS Certificate Manager in the AWS console.
2. [Request a public certificate](https://docs.aws.amazon.com/acm/latest/userguide/gs-acm-request-public.html).
3. Specify your domain (e.g. `*.services.example.com`).
4. Choose DNS validation (recommended).
5. Add the CNAME records provided by ACM to your DNS provider. Follow the [official AWS guide for DNS validation](https://docs.aws.amazon.com/acm/latest/userguide/dns-validation.html). For detailed steps on adding CNAME records, see the [AWS documentation on DNS validation](https://docs.aws.amazon.com/acm/latest/userguide/gs-acm-validate-dns.html).
6. Wait for the certificate to change to "Active" status (this may take 30 minutes or longer).
7. Copy the certificate ARN for the next step (the format will be like `arn:aws:acm:region:account:certificate/certificate-id`).
A form will be presented with the details for the new cluster to be created. Fill in with your cluster details. Click `Submit` when done.
The key fields to fill up here are:
* `Cluster Name` - A name for your cluster.
* `Region` - The region where you want to create the cluster.
* `Network Configuration` - Choose between `New VPC` or `Existing VPC` depending on your use case.
* `Authentication` - This is how you are authenticated to AWS on your local machine. It's used to configure OpenTofu/Terraform to authenticate with AWS.
* `S3 Bucket for OpenTofu/Terraform State` - OpenTofu/Terraform state will be stored in this bucket. It can be a preexisting bucket or a new bucket name. The new bucket will automatically be created by our script.
* `Load Balancer Configuration` - This is to configure the load balancer for your cluster. You can choose between `Public` or `Private` Load Balancer, it defaults to `Public`. You can also add certificate ARNs and domain names for the load balancer but these are optional.
* `Platform Features` - This is to decide which features like Blob Storage, Cluster Integration, Parameter Store, Docker Registry, and Secrets Manager will be enabled for your cluster. To read more on how these integrations are used in the platform, please refer to the [platform features](/docs/infrastructure/deploy-compute-plane) page.
The key fields to fill up here are:
* `Region` - The region where your cluster is already created.
* `Cluster Configuration` - Provide the details of the existing cluster like the name of the cluster, URL of the OIDC provider, and the other required ARNs on the form.
* `Cluster Addons` - TrueFoundry needs to install addons like ArgoCD, Argo Workflows, Keda, Istio, etc. Please disable the addons that are already installed on your cluster so that the TrueFoundry installation does not override the existing configuration and affect your existing workloads.
* `Network Configuration` - Provide the details of the existing VPC and subnets where the cluster is already created.
* `Authentication` - This is how you are authenticated to AWS on your local machine. It's used to configure OpenTofu/Terraform to authenticate with AWS.
* `S3 Bucket for OpenTofu/Terraform State` - OpenTofu/Terraform state will be stored in this bucket. It can be a preexisting bucket or a new bucket name. The new bucket will automatically be created by our script.
* `Load Balancer Configuration` - This is to configure the load balancer for your cluster. You can choose between `Public` or `Private` Load Balancer, it defaults to `Public`. You can also add certificate ARNs and domain names for the load balancer but these are optional.
* `Platform Features` - This is to decide which features like Blob Storage, Cluster Integration, Parameter Store, Docker Registry, and Secrets Manager will be enabled for your cluster. To read more on how these integrations are used in the platform, please refer to the [platform features](/docs/infrastructure/deploy-compute-plane) page.
Enter the domain and the certificate ARN from the previous step in the form as shown below.
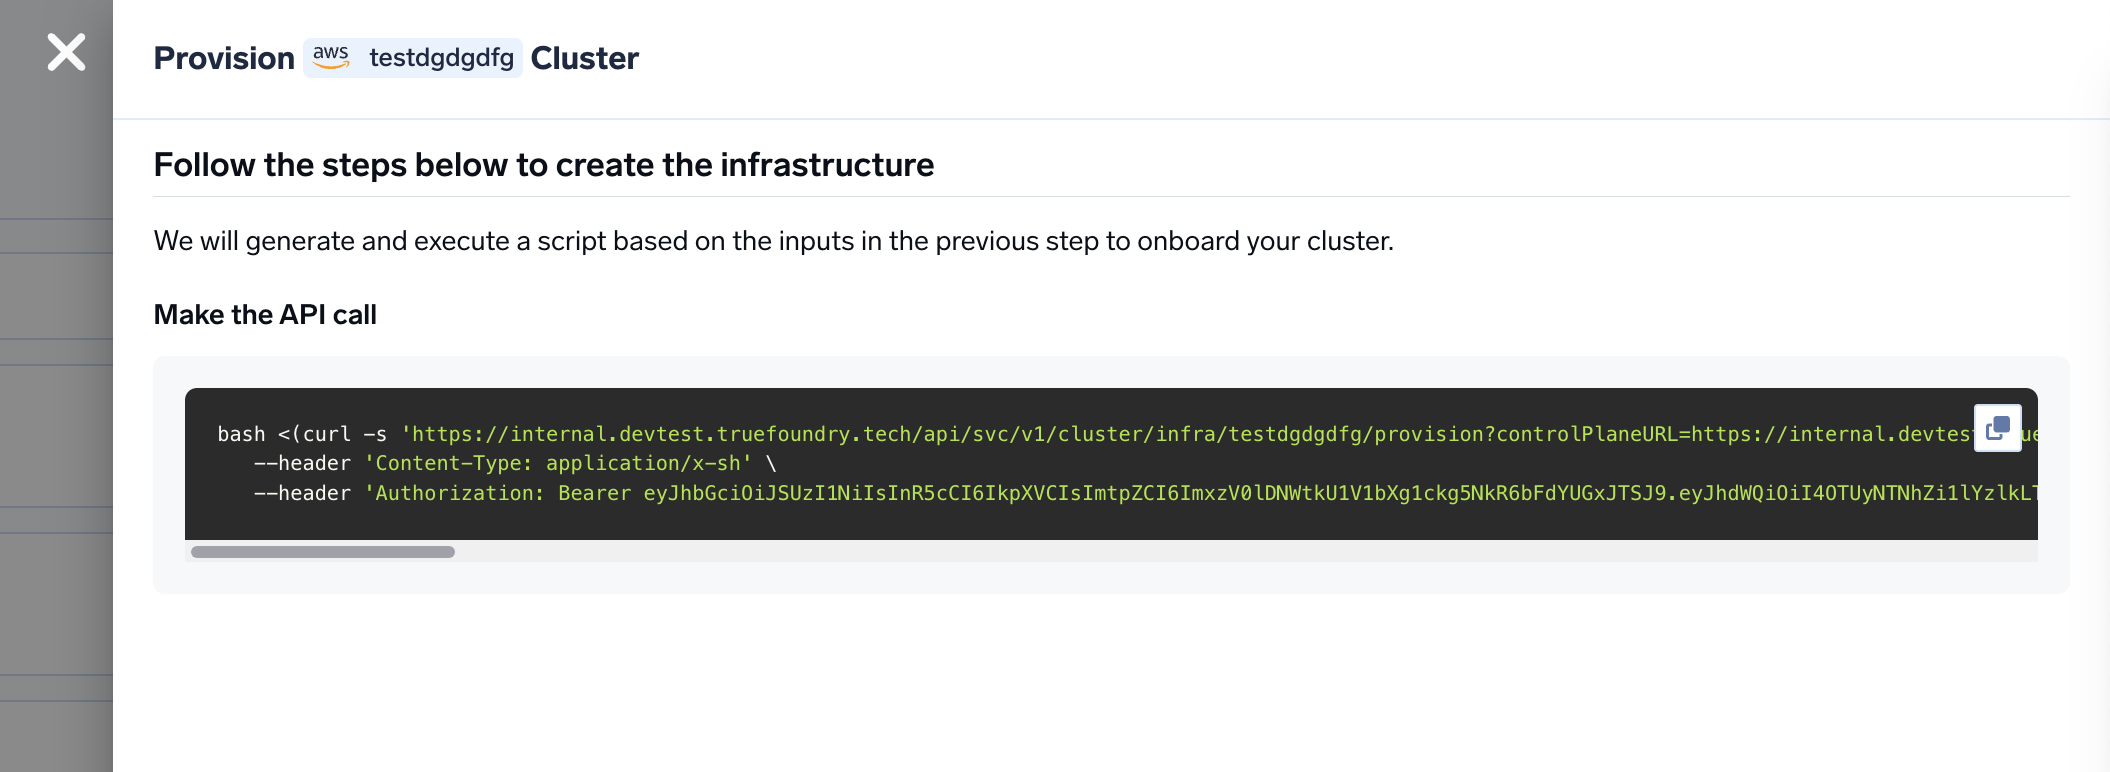
 You will be presented with a `curl` command to download and execute the script. The script will take care of installing the prerequisites, downloading OpenTofu/Terraform code, and running it on your local machine to create the cluster. This will take around 40-50 minutes to complete.
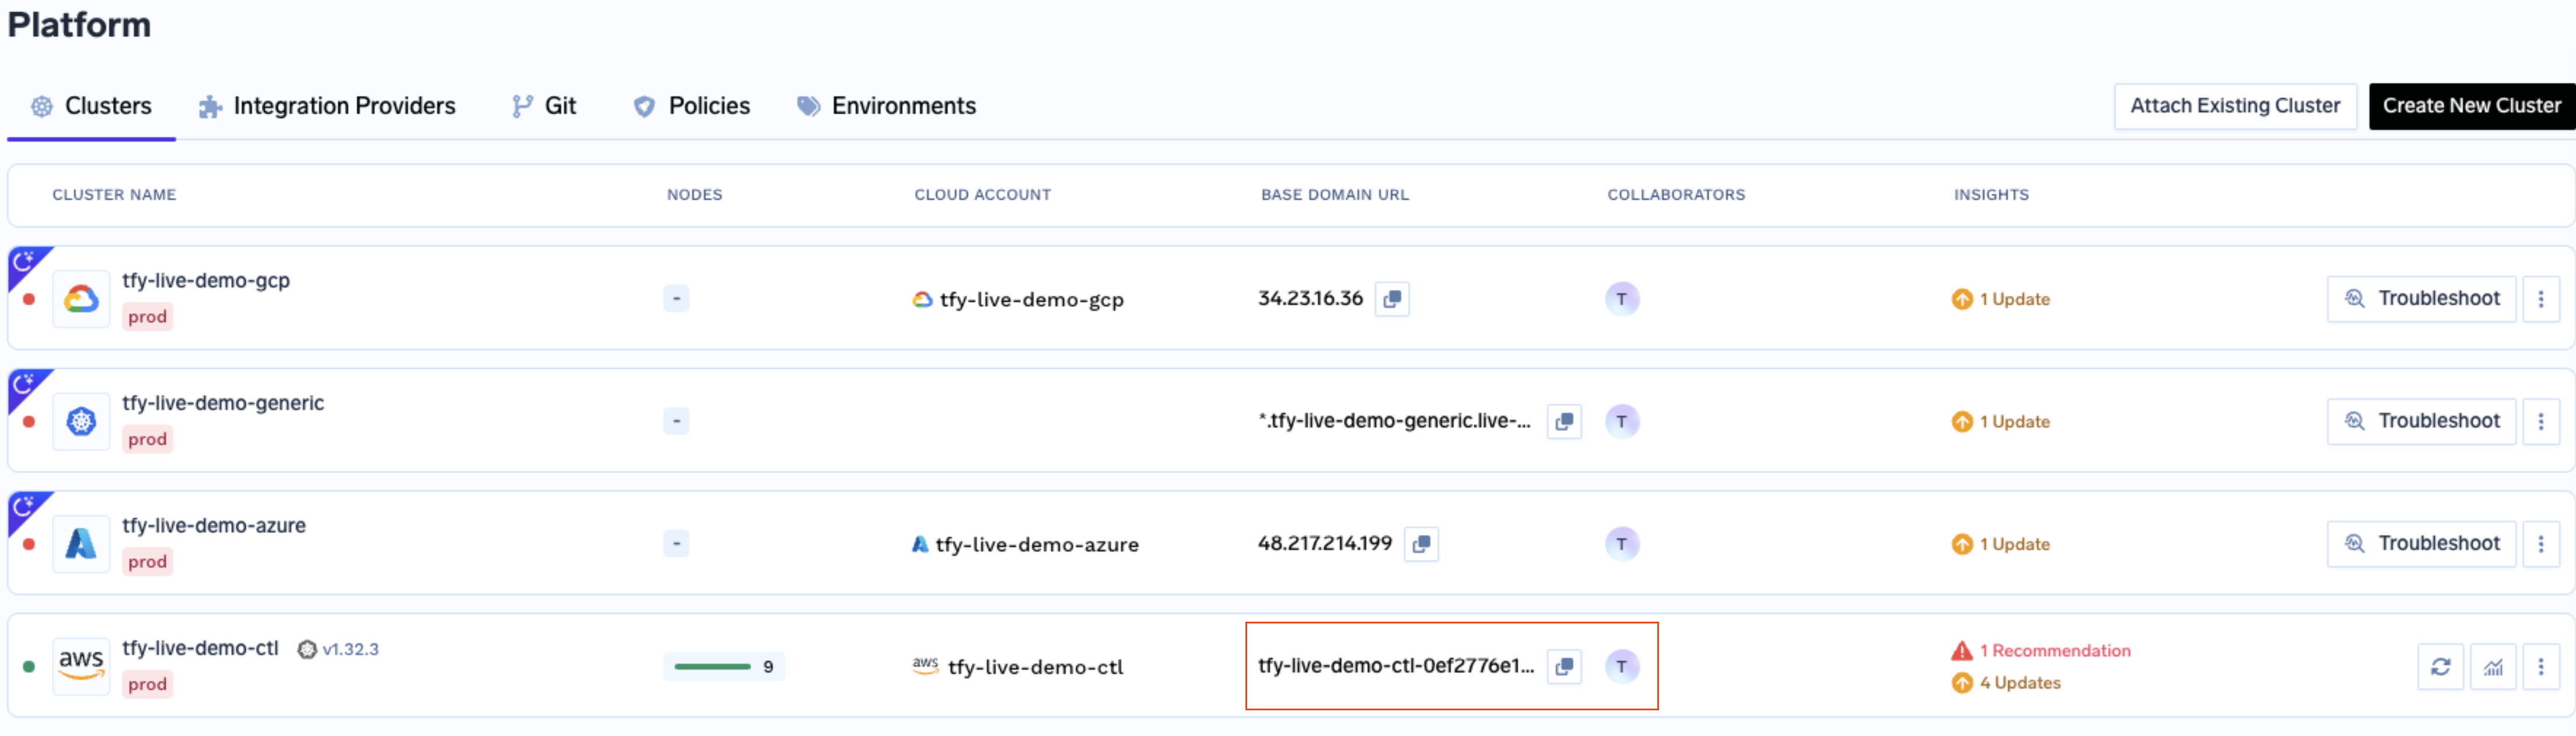
 Once the script is executed, the cluster will be shown as connected in the platform.
You can get the load balancer's IP address by going to the platform section in the bottom left panel under the Clusters section. Under the preferred cluster, you'll see the load balancer IP address under the `Base Domain URL` section.
Once the script is executed, the cluster will be shown as connected in the platform.
You can get the load balancer's IP address by going to the platform section in the bottom left panel under the Clusters section. Under the preferred cluster, you'll see the load balancer IP address under the `Base Domain URL` section.
 Create a DNS record in Amazon Route 53 or your DNS provider with the following details:
| Record Type | Record Name | Record value |
| ----------- | ------------------ | ------------------------- |
| CNAME | \*.tfy.example.com | LOADBALANCER\_IP\_ADDRESS |
You can start by [deploying your first service](/docs/deploy-first-service#deploy-from-github).
## FAQ
Set the `tags` variable in the generated OpenTofu/Terraform code to a map of your tags:
```hcl theme={"dark"}
tags = {
environment = "production"
team = "ml-platform"
cost-center = "1234"
}
```
This works for both new and existing clusters — applying only adds or updates tags **in place; no resources are recreated**. For an existing cluster, run `tofu plan` (or `terraform plan`) first and confirm the diff is tag-only before applying.
### How tagging works across all resources
Tags flow through three layers so every AWS resource — whether managed by Terraform or launched at runtime — gets consistent labels:
| Layer | Mechanism | Resources covered |
| ----------------------------------- | ------------------------------------------------------------------------------------------------------------------------- | -------------------------------------------------------------------------------------- |
| **1 — Terraform modules** | `var.tags` is passed into every TrueFoundry module (EKS, VPC, EFS, RDS, IAM, load balancer controller, platform features) | All module-managed AWS resources |
| **2 — AWS provider `default_tags`** | The `provider "aws"` block sets `default_tags { tags = var.tags }` as a catch-all | Any resource not explicitly tagged by a module |
| **3 — Helm / runtime** | `var.tags` is threaded into inframold Helm values and propagated at runtime | EC2 nodes (via Karpenter `extraTags`), EBS PVC volumes (via EBS CSI `extraVolumeTags`) |
**EC2 nodes and EBS volumes:** These are launched at runtime by Karpenter and the EBS CSI driver, so they can't be tagged via Terraform state. The tags are applied through Helm values and take effect on **newly launched** nodes and **newly provisioned** PVC volumes after you apply. Existing nodes need a rolling replacement to pick up new tags.
### Suppressing built-in TrueFoundry audit tags
By default, TrueFoundry modules add `truefoundry-managed`, `truefoundry-cluster-name`, and `truefoundry-terraform-module` tags. To suppress these without affecting your own `tags` or the provider `default_tags`, set:
```hcl theme={"dark"}
disable_default_tags = true
```
This is useful if your organization enforces a strict tag allowlist.
Yes, you can use cert-manager to add TLS to the load balancer and not use AWS Certificate Manager. Follow the [cert-manager getting started guide](https://cert-manager.io/docs/getting-started/) to install cert-manager and add TLS to the load balancer.
If you have your own certificate files (for example, from another certificate provider or self-signed), you can use them directly with TrueFoundry.
1. Create a Kubernetes secret with your certificate and key, or create a self-signed certificate:
```shell Shell lines theme={"dark"}
# Generate a self-signed certificate
openssl req -x509 -nodes -days 365 -newkey rsa:2048 \
-keyout tls.key -out tls.crt \
-subj "/CN=*.example.com" \
-addext "subjectAltName = DNS:example.com,DNS:*.example.com"
```
```shell Shell lines theme={"dark"}
# Create secret from local certificate files
kubectl create secret tls example-com-tls \
--cert=path/to/cert/file \
--key=path/to/key/file \
-n istio-system
```
2. Once the secret is created, head over to the cluster page and navigate to the `tfy-istio-ingress` add-on. Add the secret name in the `tfyGateway.spec.servers[1].tls.credentialName` section and ensure that `tfyGateway.spec.servers[1].port.protocol` is set to `HTTPS`. Here we are using `example-com-tls` as the secret name, which contains the certificate and key.
```yaml YAML lines theme={"dark"}
servers:
-
- hosts:
- "*"
port:
name: https-tfy-wildcard
number: 443
protocol: HTTPS
tls:
mode: SIMPLE
credentialName: example-com-tls
```
Self-signed certificates will cause browser warnings. They should only be used for testing or internal systems. To connect to services with self-signed certificates, you have to pass the CA certificate to verify the SSL certificate.
In Step 4 in the guide above, when you run the curl command, the OpenTofu/Terraform code will be downloaded to your local machine. The script will ask you before executing the OpenTofu/Terraform code at which point you can stop the execution and review the OpenTofu/Terraform code generated by the platform.
By default, Amazon VPC CNI assigns Pods an IP address from the primary subnet. If the primary subnet CIDR is too small, the CNI may not be able to acquire enough secondary IP addresses for your Pods. Custom networking solves this by using a secondary CIDR for Pod IPs. For more details, see the [Amazon EKS Custom Networking documentation](https://docs.aws.amazon.com/eks/latest/best-practices/custom-networking.html).
**Steps:**
1. Attach a secondary CIDR to the VPC (e.g. `100.64.0.0/16` per [RFC 6598](https://datatracker.ietf.org/doc/html/rfc6598)) and create new subnets with that CIDR in the same AZs as your primary subnets.
2. Ensure the secondary subnets are added to the route tables of your primary subnets (this typically happens automatically).
3. Configure the AWS VPC CNI to use the secondary subnets.
If you used TrueFoundry's OpenTofu/Terraform code, add this to the [EKS module](https://github.com/truefoundry/terraform-aws-truefoundry-cluster):
```hcl theme={"dark"}
cluster_addons_vpc_cni_additional_configurations = {
env = {
AWS_VPC_K8S_CNI_CUSTOM_NETWORK_CFG = "true"
ENI_CONFIG_LABEL_DEF = "topology.kubernetes.io/zone"
}
}
```
Otherwise, set the env variables directly:
```bash theme={"dark"}
kubectl set env daemonset aws-node -n kube-system "AWS_VPC_K8S_CNI_CUSTOM_NETWORK_CFG=true"
kubectl set env daemonset aws-node -n kube-system "ENI_CONFIG_LABEL_DEF=topology.kubernetes.io/zone"
```
4. Create an `ENIConfig` resource for each AZ where your EKS nodes run:
```yaml theme={"dark"}
apiVersion: crd.k8s.amazonaws.com/v1alpha1
kind: ENIConfig
metadata:
name: us-east-1a # AZ of the EKS nodes
spec:
securityGroups:
- sg-0dff111a1d11c1c11 # security group of the EKS nodes
subnet: subnet-011b111c1f11fdf11 # subnet with the secondary CIDR
```
5. Restart the nodes one by one to apply the changes. Pods will be rescheduled onto nodes with secondary IP addresses.
Remove infrastructure managed by Terraform, and Kubernetes-created resources (for example load balancers and Karpenter nodes).
```bash theme={"dark"}
aws eks update-kubeconfig --region --name
```
```bash theme={"dark"}
kubectl get svc -A --field-selector spec.type=LoadBalancer
kubectl delete svc tfy-istio-ingress -n istio-system
```
```bash theme={"dark"}
kubectl delete nodepool --all
kubectl delete ec2nodeclasses --all
```
Make sure the nodes are gone (if they are stuck, please delete them manually from the EC2 instances. This is only for the karpenter nodes):
```bash theme={"dark"}
kubectl get nodeclaims
```
```bash theme={"dark"}
terraform destroy
# or
tofu destroy
```
While creating the S3 bucket, `terraform apply` (or `tofu apply`) fails with an error like:
```text theme={"dark"}
Error: creating S3 Bucket () Public Access Block:
operation error S3: PutPublicAccessBlock, https response error StatusCode: 403,
api error AccessDenied: User: arn:aws:iam:::user/truefoundry is not
authorized to perform: s3:PutBucketPublicAccessBlock on resource:
"arn:aws:s3:::" with an explicit deny in a service control policy
```
**Why it happens:** Your AWS Organization blocks `s3:PutBucketPublicAccessBlock`, but the TrueFoundry module tries to set it on each bucket — so the call is denied and the apply fails.
**The fix:** Set the variable below to `false` so the module skips this step. This is safe — your account already blocks public access, so the per-bucket setting is redundant.
**Control plane** — add `truefoundry_s3_attach_public_policy = false` to the `tfy-control-plane` module:
```hcl theme={"dark"}
module "tfy-control-plane" {
source = "truefoundry/truefoundry-control-plane/aws"
# ... existing arguments ...
truefoundry_s3_attach_public_policy = false
}
```
**Compute plane** — add `blob_storage_attach_public_policy = false` to the `tfy-platform-features` module:
```hcl theme={"dark"}
module "tfy-platform-features" {
source = "truefoundry/truefoundry-platform-features/aws"
# ... existing arguments ...
blob_storage_attach_public_policy = false
}
```
Both variables default to `true`, so you must set them explicitly to `false`. Then re-run `terraform apply` (or `tofu apply`).
The Istio ingress service can remain in `Pending` state and fail to receive an external IP when the AWS account is missing the Elastic Load Balancing service-linked role and the AWS Load Balancer Controller cannot create it.
```bash theme={"dark"}
kubectl get svc -n istio-system tfy-istio-ingress
```
Output:
```bash theme={"dark"}
NAME TYPE CLUSTER-IP EXTERNAL-IP PORT(S)
tfy-istio-ingress LoadBalancer 172.xx.xx.xx 80:30490/TCP,443:30955/TCP
```
Describing the Service shows a `FailedDeployModel` warning:
```bash theme={"dark"}
kubectl describe svc tfy-istio-ingress -n istio-system
```
```
Warning FailedDeployModel 12m service Failed deploy model due to operation error Elastic Load Balancing v2: CreateLoadBalancer,
https response error StatusCode: 403, api error AccessDenied:
User: arn:aws:sts::123456789012:assumed-role/example-controller-role/example-session
is not authorized to perform: iam:CreateServiceLinkedRole
on resource: arn:aws:iam::123456789012:role/aws-service-role/elasticloadbalancing.amazonaws.com/AWSServiceRoleForElasticLoadBalancing
because no permissions boundary allows the iam:CreateServiceLinkedRole action
```
### Root Cause
The AWS account did not contain the required service-linked role: `AWSServiceRoleForElasticLoadBalancing`.
When AWS Load Balancer Controller attempted to create a Network Load Balancer (NLB) for the Istio ingress Service, AWS tried to automatically create this service-linked role. The controller was running with an IAM role that was restricted by a permissions boundary, which prevented execution of `iam:CreateServiceLinkedRole`. As a result, AWS rejected the load balancer creation request and the Kubernetes Service remained in the `Pending` state.
### Verification
Verify whether the service-linked role exists:
```bash theme={"dark"}
aws iam get-role \
--role-name AWSServiceRoleForElasticLoadBalancing
```
If the command returns `NoSuchEntity`, the service-linked role is missing.
### Resolution
```bash theme={"dark"}
aws iam create-service-linked-role \
--aws-service-name elasticloadbalancing.amazonaws.com
```
This is a one-time operation per AWS account. After the role exists, the AWS Load Balancer Controller does not need `iam:CreateServiceLinkedRole` permission to provision load balancers.
After the service-linked role is created, AWS Load Balancer Controller will successfully provision the NLB and the Istio ingress Service will receive an external endpoint.
```bash theme={"dark"}
kubectl get svc -n istio-system tfy-istio-ingress
```
The `EXTERNAL-IP` column should show the NLB hostname instead of ``.
CoreDNS handles in-cluster DNS resolution. As your cluster grows, DNS query load increases and a fixed number of CoreDNS replicas can become a bottleneck or single point of failure. EKS supports [autoscaling the CoreDNS addon](https://docs.aws.amazon.com/eks/latest/userguide/coredns-autoscaling.html) so the replica count scales with cluster demand.
If you used TrueFoundry's OpenTofu/Terraform code, add the `cluster_addons_coredns_additional_configurations` block to the [EKS module](https://github.com/truefoundry/terraform-aws-truefoundry-cluster):
```hcl theme={"dark"}
module "eks" {
source = "truefoundry/truefoundry-cluster/aws"
# ... existing arguments ...
cluster_addons_coredns_additional_configurations = {
autoScaling = {
enabled = true
minReplicas = 2
maxReplicas = 10
}
}
}
```
* `enabled` — turns on CoreDNS autoscaling.
* `minReplicas` / `maxReplicas` — lower and upper bounds for the replica count. Tune these values based on your cluster size and DNS query volume.
After updating the module, run `terraform apply` (or `tofu apply`) to apply the change.
TrueFoundry provisions on-demand and spot nodes dynamically using Karpenter, configured via the `karpenter-config` addon. You can restrict or allow specific instance families and sizes by editing the values of the `karpenter-config` addon from the TrueFoundry platform (via the cluster addon configuration in the UI).
Set a `notAllowed` list under `instanceFamilies` and `instanceSizes` to exclude specific types:
```yaml theme={"dark"}
instanceFamilies:
notAllowed: ["c5", "m5", "r5"]
instanceSizes:
notAllowed: ["metal", "24xlarge"]
```
Refer to the full [values.yaml](https://github.com/truefoundry/infra-charts/blob/main/charts/tfy-karpenter-config/values.yaml) for all configurable options.
In addition to Karpenter, you can add EKS managed node groups through the TrueFoundry EKS Terraform module using the `additional_eks_managed_node_groups` variable. For the node group to be discoverable and schedulable from the TrueFoundry platform, it **must** have the `truefoundry.com/node-pool` label — this is how TrueFoundry discovers and targets node pools.
For GPU node groups, also add the `nvidia.com/gpu` label and a matching taint so only GPU workloads land on those nodes.
```hcl theme={"dark"}
module "eks" {
source = "truefoundry/truefoundry-cluster/aws"
# ... existing arguments ...
additional_eks_managed_node_groups = {
gpu = {
ami_type = "AL2023_x86_64_NVIDIA"
instance_types = ["g5.xlarge"]
capacity_type = "ON_DEMAND"
min_size = 0
max_size = 1
desired_size = 0
block_device_mappings = {
xvda = {
device_name = "/dev/xvda"
ebs = {
volume_size = 200
volume_type = "gp3"
encrypted = true
delete_on_termination = true
}
}
}
labels = {
"truefoundry.com/node-pool" = "gpu"
"nvidia.com/gpu" = "true"
}
taints = {
gpu = {
key = "nvidia.com/gpu"
value = "true"
effect = "NO_SCHEDULE"
}
}
tags = var.tags
}
}
}
```
After updating the module, run `terraform apply` (or `tofu apply`) to apply the change.
## Overview
This section provides ready-to-use Terraform snippets for `waf.tf` that remediate the following findings on an AWS WAFv2 Web ACL:
| Finding | Severity | Area |
| -------------- | -------- | --------------------------------------------- |
| Custom-Rule-85 | Critical | Rate limiting + input validation (SQLi / XSS) |
| Custom-Rule-37 | High | Mandatory ownership / application tagging |
| WAF-021 | Medium | Data protection (log field redaction) |
| Custom-Rule-84 | Medium | Geo-location restriction |
| WAF-009 | Medium | AWS-managed "Anonymous IP list" rule group |
| WAF-013 | Low | Logging (already enabled, unchanged) |
| WAF-016 | Info | Default action (kept as `allow`, documented) |
Each section below is a standalone snippet — copy the block you need directly into your `waf.tf`. Snippets that add a `rule { ... }` block are meant to be inserted inside the existing `aws_wafv2_web_acl.this` resource, alongside the other rules; snippets that define a full `resource` block can be dropped anywhere in the file.
The `data_protection_config` block requires AWS provider **>= 5.98.0**. Pin this in your `versions.tf`:
```hcl theme={"dark"}
terraform {
required_providers {
aws = {
source = "hashicorp/aws"
version = ">= 5.98.0"
}
}
}
```
These snippets reference 5 variables that must exist in your `variables.tf`: `waf_app_name`, `waf_app_environment`, `waf_team`, `waf_it_owner_email`, `waf_geo_allowed_country_codes`. See [Required variables](#required-variables) at the bottom of this page.
***
## Optional trusted IP set
Defines a reusable IP set of trusted addresses. It's only created when `var.waf_ip_allowlist` is non-empty, and is referenced later by the allowlist rule. Skip this snippet if you don't need an IP allowlist.
```hcl theme={"dark"}
resource "aws_wafv2_ip_set" "allowlist" {
count = var.enable_waf && length(var.waf_ip_allowlist) > 0 ? 1 : 0
name = "${local.waf_name_effective}-allowlist"
description = "Trusted IPs that bypass WAF managed rules"
scope = var.waf_scope
ip_address_version = "IPV4"
addresses = var.waf_ip_allowlist
tags = local.waf_required_tags
}
```
***
## Web ACL skeleton and default action (WAF-016)
This is the top-level `aws_wafv2_web_acl` resource. All `rule { ... }` snippets below are inserted inside this resource's body. The default action is kept as `allow` — non-matching traffic passes through, and the rules that follow block bad traffic explicitly.
GIS flagged this as informational and suggested a deny-by-default (`default_action { block {} }`) alternative. Switching to deny-by-default requires an explicit `allow` rule that covers **all** trusted traffic first (otherwise you break the app), so it's intentionally left as `allow` here. If you want to move to deny-by-default later, add a catch-all allow rule at priority 0 before flipping this.
```hcl theme={"dark"}
resource "aws_wafv2_web_acl" "this" {
count = var.enable_waf ? 1 : 0
name = local.waf_name_effective
description = "WAFv2 Web ACL for ${var.cluster_name}"
scope = var.waf_scope
tags = local.waf_required_tags
# WAF-016 (Info): default action kept as `allow`. See note above for the
# deny-by-default alternative.
default_action {
allow {}
}
# ... insert rule blocks here (see sections below) ...
visibility_config {
cloudwatch_metrics_enabled = true
metric_name = "WebAclMetrics"
sampled_requests_enabled = true
}
}
```
***
## Managed rule: Known Bad Inputs
Blocks requests matching AWS's curated list of known malicious request patterns (e.g. exploitation of Log4j, credential stuffing patterns). Set at priority `0`.
```hcl theme={"dark"}
rule {
name = "AWSManagedRulesKnownBadInputsRuleSet"
priority = 0
override_action {
none {}
}
statement {
managed_rule_group_statement {
name = "AWSManagedRulesKnownBadInputsRuleSet"
vendor_name = "AWS"
}
}
visibility_config {
cloudwatch_metrics_enabled = true
metric_name = "AWSManagedRulesKnownBadInputsRuleSet"
sampled_requests_enabled = true
}
}
```
***
## Managed rule: SQL Injection Rule Set
Applies AWS's managed SQL injection detection ruleset across the request. Set at priority `1`.
```hcl theme={"dark"}
rule {
name = "AWSManagedRulesSQLiRuleSet"
priority = 1
override_action {
none {}
}
statement {
managed_rule_group_statement {
name = "AWSManagedRulesSQLiRuleSet"
vendor_name = "AWS"
}
}
visibility_config {
cloudwatch_metrics_enabled = true
metric_name = "AWSManagedRulesSQLiRuleSet"
sampled_requests_enabled = true
}
}
```
***
## Managed rule: Amazon IP Reputation List
Blocks traffic from IP addresses that AWS's threat intelligence has flagged as sources of botnets, scanners, or other malicious activity. Set at priority `2`.
```hcl theme={"dark"}
rule {
name = "AWSManagedRulesAmazonIpReputationList"
priority = 2
override_action {
none {}
}
statement {
managed_rule_group_statement {
name = "AWSManagedRulesAmazonIpReputationList"
vendor_name = "AWS"
}
}
visibility_config {
cloudwatch_metrics_enabled = true
metric_name = "AWSManagedRulesAmazonIpReputationList"
sampled_requests_enabled = true
}
}
```
***
## Managed rule: Common Rule Set (OWASP baseline)
Applies AWS's Core Rule Set (broad OWASP-style protections). Two rule-level overrides are included: `SizeRestrictions_BODY` is set to `allow` (so large but legitimate request bodies aren't blocked), and `NoUserAgent_HEADER` is set to `count` (monitor requests without a User-Agent header, rather than blocking them). Set at priority `3`.
```hcl theme={"dark"}
rule {
name = "AWS-AWSManagedRulesCommonRuleSet"
priority = 3
override_action {
none {}
}
statement {
managed_rule_group_statement {
name = "AWSManagedRulesCommonRuleSet"
vendor_name = "AWS"
rule_action_override {
name = "SizeRestrictions_BODY"
action_to_use {
allow {}
}
}
rule_action_override {
name = "NoUserAgent_HEADER"
action_to_use {
count {}
}
}
}
}
visibility_config {
cloudwatch_metrics_enabled = true
metric_name = "AWS-AWSManagedRulesCommonRuleSet"
sampled_requests_enabled = true
}
}
```
***
## Rate limiting on `/api/` traffic (Custom-Rule-85)
Remediates the Critical finding by changing the previous `count {}` action to `block {}`, and scoping the rate limit to requests whose path starts with `/api/` — so UI, health check, and static asset traffic isn't rate-limited alongside API calls. Set at priority `4`.
```hcl theme={"dark"}
rule {
name = "Rate_limit_by_IP_Address_to_manage_DDoS_attacks"
priority = 4
action {
block {}
}
statement {
rate_based_statement {
limit = var.waf_rate_limit
aggregate_key_type = "IP"
evaluation_window_sec = var.waf_evaluation_window_sec
scope_down_statement {
byte_match_statement {
search_string = "/api/"
positional_constraint = "STARTS_WITH"
field_to_match {
uri_path {}
}
text_transformation {
priority = 0
type = "LOWERCASE"
}
}
}
}
}
visibility_config {
cloudwatch_metrics_enabled = true
metric_name = "LimitRequests100"
sampled_requests_enabled = true
}
}
```
***
## Trusted IP allowlist rule
Allows traffic from the IP set defined earlier to bypass the rules that follow it. Only rendered when the allowlist IP set was created. Set at priority `5`.
This rule sits at priority `5` — **after** the managed rule groups (priorities 0–3) and the rate-limit rule (priority 4). Allowlisted IPs are still subject to those earlier rules. If allowlisted IPs should bypass everything, move this rule to priority `0` and renumber the rest accordingly.
```hcl theme={"dark"}
dynamic "rule" {
for_each = length(aws_wafv2_ip_set.allowlist) > 0 ? [1] : []
content {
name = "cargill_whitelist_ips"
priority = 5
action {
allow {}
}
statement {
ip_set_reference_statement {
arn = aws_wafv2_ip_set.allowlist[0].arn
}
}
visibility_config {
cloudwatch_metrics_enabled = true
metric_name = "cargill_whitelist_ips"
sampled_requests_enabled = true
}
}
}
```
***
## Managed rule: Anonymous IP List (WAF-009)
Blocks requests originating from VPNs, Tor exit nodes, proxies, and hosting providers — sources commonly used to mask the true origin of malicious traffic. Set at priority `6`.
`override_action` is set to `none {}` so the rule group's own block action applies immediately. If you'd rather observe traffic before enforcing, change this to `count {}` first.
```hcl theme={"dark"}
rule {
name = "AWSManagedRulesAnonymousIpList"
priority = 6
override_action {
none {}
}
statement {
managed_rule_group_statement {
name = "AWSManagedRulesAnonymousIpList"
vendor_name = "AWS"
}
}
visibility_config {
cloudwatch_metrics_enabled = true
metric_name = "AWSManagedRulesAnonymousIpList"
sampled_requests_enabled = true
}
}
```
***
## Standalone SQL injection block rule (Custom-Rule-85)
A dedicated SQLi detection rule scoped to the request body, independent of the managed SQLi rule set above. Deployed in `count {}` (monitor-only) mode at priority `7` — check CloudWatch metrics and sampled requests for false positives before switching the action to `block {}`.
```hcl theme={"dark"}
rule {
name = "BlockSQLiAttacks"
priority = 7
action {
count {} # TODO: switch to `block {}` after validating no false positives
}
statement {
sqli_match_statement {
field_to_match {
body {}
}
text_transformation {
priority = 0
type = "URL_DECODE"
}
text_transformation {
priority = 1
type = "HTML_ENTITY_DECODE"
}
}
}
visibility_config {
cloudwatch_metrics_enabled = true
metric_name = "BlockSQLiAttacks"
sampled_requests_enabled = true
}
}
```
***
## Standalone XSS block rule (Custom-Rule-85)
A dedicated cross-site scripting detection rule scoped to all query string arguments. Also deployed in `count {}` (monitor-only) mode at priority `8` — switch to `block {}` once validated against real traffic.
```hcl theme={"dark"}
rule {
name = "BlockXSSAttacks"
priority = 8
action {
count {} # TODO: switch to `block {}` after validating no false positives
}
statement {
xss_match_statement {
field_to_match {
all_query_arguments {}
}
text_transformation {
priority = 0
type = "URL_DECODE"
}
text_transformation {
priority = 1
type = "HTML_ENTITY_DECODE"
}
}
}
visibility_config {
cloudwatch_metrics_enabled = true
metric_name = "BlockXSSAttacks"
sampled_requests_enabled = true
}
}
```
***
## Geo-location restriction (Custom-Rule-84)
Blocks any request whose source country is **not** in the approved list, using a `not_statement` wrapped around a `geo_match_statement`. Configure the approved countries via `var.waf_geo_allowed_country_codes`. Set at priority `9`.
```hcl theme={"dark"}
rule {
name = "GeoBlockRule"
priority = 9
action {
block {}
}
statement {
not_statement {
statement {
geo_match_statement {
country_codes = var.waf_geo_allowed_country_codes
}
}
}
}
visibility_config {
cloudwatch_metrics_enabled = true
metric_name = "GeoBlockRule"
sampled_requests_enabled = true
}
}
```
***
## Data protection / field redaction (WAF-021)
Substitutes the values of sensitive request headers — `authorization`, `cookie`, `x-api-key`, `x-auth-token` — before they're written to any WAF logging destination (CloudWatch Logs, sampled requests, etc.). This block goes directly inside `aws_wafv2_web_acl.this`, alongside the `default_action` and rules.
The request body is intentionally **not** redacted here, to preserve forensic detail in logs. If full-body redaction is required later, add:
```hcl theme={"dark"}
data_protection {
action = "SUBSTITUTION"
field {
field_type = "BODY"
}
}
```
```hcl theme={"dark"}
data_protection_config {
data_protection {
action = "SUBSTITUTION"
field {
field_type = "SINGLE_HEADER"
field_keys = ["authorization"]
}
}
data_protection {
action = "SUBSTITUTION"
field {
field_type = "SINGLE_HEADER"
field_keys = ["cookie"]
}
}
data_protection {
action = "SUBSTITUTION"
field {
field_type = "SINGLE_HEADER"
field_keys = ["x-api-key"]
}
}
data_protection {
action = "SUBSTITUTION"
field {
field_type = "SINGLE_HEADER"
field_keys = ["x-auth-token"]
}
}
}
```
***
## Logging (WAF-013, unchanged)
Creates the CloudWatch log group and logging configuration for the Web ACL. This was already compliant and is included here unchanged for completeness — the log group name **must** be prefixed with `aws-waf-logs-`, which AWS enforces.
```hcl theme={"dark"}
resource "aws_cloudwatch_log_group" "waf" {
count = var.enable_waf ? 1 : 0
name = "aws-waf-logs-${local.waf_name_effective}"
retention_in_days = var.waf_log_retention_days
tags = local.waf_required_tags
}
resource "aws_wafv2_web_acl_logging_configuration" "this" {
count = var.enable_waf ? 1 : 0
log_destination_configs = [aws_cloudwatch_log_group.waf[0].arn]
resource_arn = aws_wafv2_web_acl.this[0].arn
redacted_fields {
single_header {
name = "authorization"
}
}
redacted_fields {
single_header {
name = "cookie"
}
}
}
```
***
## Associating the Web ACL with an ALB
Associates the Web ACL with an Application Load Balancer. Only needed if the ALB was created outside of the AWS Load Balancer Controller — pass its ARN via `var.waf_associate_alb_arn`; otherwise leave that variable empty and skip this snippet.
```hcl theme={"dark"}
resource "aws_wafv2_web_acl_association" "alb" {
count = var.enable_waf && var.waf_associate_alb_arn != "" ? 1 : 0
resource_arn = var.waf_associate_alb_arn
web_acl_arn = aws_wafv2_web_acl.this[0].arn
}
```
***
## Required variables
Add these to `variables.tf` if they don't already exist (used for Custom-Rule-37 mandatory ownership/application tagging, and the geo-block rule):
* `waf_app_name`
* `waf_app_environment`
* `waf_team`
* `waf_it_owner_email`
* `waf_geo_allowed_country_codes`
These are merged, along with any caller-supplied tags, into the `local.waf_required_tags` local referenced throughout the snippets above, and applied to every WAF resource.
Create a DNS record in Amazon Route 53 or your DNS provider with the following details:
| Record Type | Record Name | Record value |
| ----------- | ------------------ | ------------------------- |
| CNAME | \*.tfy.example.com | LOADBALANCER\_IP\_ADDRESS |
You can start by [deploying your first service](/docs/deploy-first-service#deploy-from-github).
## FAQ
Set the `tags` variable in the generated OpenTofu/Terraform code to a map of your tags:
```hcl theme={"dark"}
tags = {
environment = "production"
team = "ml-platform"
cost-center = "1234"
}
```
This works for both new and existing clusters — applying only adds or updates tags **in place; no resources are recreated**. For an existing cluster, run `tofu plan` (or `terraform plan`) first and confirm the diff is tag-only before applying.
### How tagging works across all resources
Tags flow through three layers so every AWS resource — whether managed by Terraform or launched at runtime — gets consistent labels:
| Layer | Mechanism | Resources covered |
| ----------------------------------- | ------------------------------------------------------------------------------------------------------------------------- | -------------------------------------------------------------------------------------- |
| **1 — Terraform modules** | `var.tags` is passed into every TrueFoundry module (EKS, VPC, EFS, RDS, IAM, load balancer controller, platform features) | All module-managed AWS resources |
| **2 — AWS provider `default_tags`** | The `provider "aws"` block sets `default_tags { tags = var.tags }` as a catch-all | Any resource not explicitly tagged by a module |
| **3 — Helm / runtime** | `var.tags` is threaded into inframold Helm values and propagated at runtime | EC2 nodes (via Karpenter `extraTags`), EBS PVC volumes (via EBS CSI `extraVolumeTags`) |
**EC2 nodes and EBS volumes:** These are launched at runtime by Karpenter and the EBS CSI driver, so they can't be tagged via Terraform state. The tags are applied through Helm values and take effect on **newly launched** nodes and **newly provisioned** PVC volumes after you apply. Existing nodes need a rolling replacement to pick up new tags.
### Suppressing built-in TrueFoundry audit tags
By default, TrueFoundry modules add `truefoundry-managed`, `truefoundry-cluster-name`, and `truefoundry-terraform-module` tags. To suppress these without affecting your own `tags` or the provider `default_tags`, set:
```hcl theme={"dark"}
disable_default_tags = true
```
This is useful if your organization enforces a strict tag allowlist.
Yes, you can use cert-manager to add TLS to the load balancer and not use AWS Certificate Manager. Follow the [cert-manager getting started guide](https://cert-manager.io/docs/getting-started/) to install cert-manager and add TLS to the load balancer.
If you have your own certificate files (for example, from another certificate provider or self-signed), you can use them directly with TrueFoundry.
1. Create a Kubernetes secret with your certificate and key, or create a self-signed certificate:
```shell Shell lines theme={"dark"}
# Generate a self-signed certificate
openssl req -x509 -nodes -days 365 -newkey rsa:2048 \
-keyout tls.key -out tls.crt \
-subj "/CN=*.example.com" \
-addext "subjectAltName = DNS:example.com,DNS:*.example.com"
```
```shell Shell lines theme={"dark"}
# Create secret from local certificate files
kubectl create secret tls example-com-tls \
--cert=path/to/cert/file \
--key=path/to/key/file \
-n istio-system
```
2. Once the secret is created, head over to the cluster page and navigate to the `tfy-istio-ingress` add-on. Add the secret name in the `tfyGateway.spec.servers[1].tls.credentialName` section and ensure that `tfyGateway.spec.servers[1].port.protocol` is set to `HTTPS`. Here we are using `example-com-tls` as the secret name, which contains the certificate and key.
```yaml YAML lines theme={"dark"}
servers:
-
- hosts:
- "*"
port:
name: https-tfy-wildcard
number: 443
protocol: HTTPS
tls:
mode: SIMPLE
credentialName: example-com-tls
```
Self-signed certificates will cause browser warnings. They should only be used for testing or internal systems. To connect to services with self-signed certificates, you have to pass the CA certificate to verify the SSL certificate.
In Step 4 in the guide above, when you run the curl command, the OpenTofu/Terraform code will be downloaded to your local machine. The script will ask you before executing the OpenTofu/Terraform code at which point you can stop the execution and review the OpenTofu/Terraform code generated by the platform.
By default, Amazon VPC CNI assigns Pods an IP address from the primary subnet. If the primary subnet CIDR is too small, the CNI may not be able to acquire enough secondary IP addresses for your Pods. Custom networking solves this by using a secondary CIDR for Pod IPs. For more details, see the [Amazon EKS Custom Networking documentation](https://docs.aws.amazon.com/eks/latest/best-practices/custom-networking.html).
**Steps:**
1. Attach a secondary CIDR to the VPC (e.g. `100.64.0.0/16` per [RFC 6598](https://datatracker.ietf.org/doc/html/rfc6598)) and create new subnets with that CIDR in the same AZs as your primary subnets.
2. Ensure the secondary subnets are added to the route tables of your primary subnets (this typically happens automatically).
3. Configure the AWS VPC CNI to use the secondary subnets.
If you used TrueFoundry's OpenTofu/Terraform code, add this to the [EKS module](https://github.com/truefoundry/terraform-aws-truefoundry-cluster):
```hcl theme={"dark"}
cluster_addons_vpc_cni_additional_configurations = {
env = {
AWS_VPC_K8S_CNI_CUSTOM_NETWORK_CFG = "true"
ENI_CONFIG_LABEL_DEF = "topology.kubernetes.io/zone"
}
}
```
Otherwise, set the env variables directly:
```bash theme={"dark"}
kubectl set env daemonset aws-node -n kube-system "AWS_VPC_K8S_CNI_CUSTOM_NETWORK_CFG=true"
kubectl set env daemonset aws-node -n kube-system "ENI_CONFIG_LABEL_DEF=topology.kubernetes.io/zone"
```
4. Create an `ENIConfig` resource for each AZ where your EKS nodes run:
```yaml theme={"dark"}
apiVersion: crd.k8s.amazonaws.com/v1alpha1
kind: ENIConfig
metadata:
name: us-east-1a # AZ of the EKS nodes
spec:
securityGroups:
- sg-0dff111a1d11c1c11 # security group of the EKS nodes
subnet: subnet-011b111c1f11fdf11 # subnet with the secondary CIDR
```
5. Restart the nodes one by one to apply the changes. Pods will be rescheduled onto nodes with secondary IP addresses.
Remove infrastructure managed by Terraform, and Kubernetes-created resources (for example load balancers and Karpenter nodes).
```bash theme={"dark"}
aws eks update-kubeconfig --region --name
```
```bash theme={"dark"}
kubectl get svc -A --field-selector spec.type=LoadBalancer
kubectl delete svc tfy-istio-ingress -n istio-system
```
```bash theme={"dark"}
kubectl delete nodepool --all
kubectl delete ec2nodeclasses --all
```
Make sure the nodes are gone (if they are stuck, please delete them manually from the EC2 instances. This is only for the karpenter nodes):
```bash theme={"dark"}
kubectl get nodeclaims
```
```bash theme={"dark"}
terraform destroy
# or
tofu destroy
```
While creating the S3 bucket, `terraform apply` (or `tofu apply`) fails with an error like:
```text theme={"dark"}
Error: creating S3 Bucket () Public Access Block:
operation error S3: PutPublicAccessBlock, https response error StatusCode: 403,
api error AccessDenied: User: arn:aws:iam:::user/truefoundry is not
authorized to perform: s3:PutBucketPublicAccessBlock on resource:
"arn:aws:s3:::" with an explicit deny in a service control policy
```
**Why it happens:** Your AWS Organization blocks `s3:PutBucketPublicAccessBlock`, but the TrueFoundry module tries to set it on each bucket — so the call is denied and the apply fails.
**The fix:** Set the variable below to `false` so the module skips this step. This is safe — your account already blocks public access, so the per-bucket setting is redundant.
**Control plane** — add `truefoundry_s3_attach_public_policy = false` to the `tfy-control-plane` module:
```hcl theme={"dark"}
module "tfy-control-plane" {
source = "truefoundry/truefoundry-control-plane/aws"
# ... existing arguments ...
truefoundry_s3_attach_public_policy = false
}
```
**Compute plane** — add `blob_storage_attach_public_policy = false` to the `tfy-platform-features` module:
```hcl theme={"dark"}
module "tfy-platform-features" {
source = "truefoundry/truefoundry-platform-features/aws"
# ... existing arguments ...
blob_storage_attach_public_policy = false
}
```
Both variables default to `true`, so you must set them explicitly to `false`. Then re-run `terraform apply` (or `tofu apply`).
The Istio ingress service can remain in `Pending` state and fail to receive an external IP when the AWS account is missing the Elastic Load Balancing service-linked role and the AWS Load Balancer Controller cannot create it.
```bash theme={"dark"}
kubectl get svc -n istio-system tfy-istio-ingress
```
Output:
```bash theme={"dark"}
NAME TYPE CLUSTER-IP EXTERNAL-IP PORT(S)
tfy-istio-ingress LoadBalancer 172.xx.xx.xx 80:30490/TCP,443:30955/TCP
```
Describing the Service shows a `FailedDeployModel` warning:
```bash theme={"dark"}
kubectl describe svc tfy-istio-ingress -n istio-system
```
```
Warning FailedDeployModel 12m service Failed deploy model due to operation error Elastic Load Balancing v2: CreateLoadBalancer,
https response error StatusCode: 403, api error AccessDenied:
User: arn:aws:sts::123456789012:assumed-role/example-controller-role/example-session
is not authorized to perform: iam:CreateServiceLinkedRole
on resource: arn:aws:iam::123456789012:role/aws-service-role/elasticloadbalancing.amazonaws.com/AWSServiceRoleForElasticLoadBalancing
because no permissions boundary allows the iam:CreateServiceLinkedRole action
```
### Root Cause
The AWS account did not contain the required service-linked role: `AWSServiceRoleForElasticLoadBalancing`.
When AWS Load Balancer Controller attempted to create a Network Load Balancer (NLB) for the Istio ingress Service, AWS tried to automatically create this service-linked role. The controller was running with an IAM role that was restricted by a permissions boundary, which prevented execution of `iam:CreateServiceLinkedRole`. As a result, AWS rejected the load balancer creation request and the Kubernetes Service remained in the `Pending` state.
### Verification
Verify whether the service-linked role exists:
```bash theme={"dark"}
aws iam get-role \
--role-name AWSServiceRoleForElasticLoadBalancing
```
If the command returns `NoSuchEntity`, the service-linked role is missing.
### Resolution
```bash theme={"dark"}
aws iam create-service-linked-role \
--aws-service-name elasticloadbalancing.amazonaws.com
```
This is a one-time operation per AWS account. After the role exists, the AWS Load Balancer Controller does not need `iam:CreateServiceLinkedRole` permission to provision load balancers.
After the service-linked role is created, AWS Load Balancer Controller will successfully provision the NLB and the Istio ingress Service will receive an external endpoint.
```bash theme={"dark"}
kubectl get svc -n istio-system tfy-istio-ingress
```
The `EXTERNAL-IP` column should show the NLB hostname instead of ``.
CoreDNS handles in-cluster DNS resolution. As your cluster grows, DNS query load increases and a fixed number of CoreDNS replicas can become a bottleneck or single point of failure. EKS supports [autoscaling the CoreDNS addon](https://docs.aws.amazon.com/eks/latest/userguide/coredns-autoscaling.html) so the replica count scales with cluster demand.
If you used TrueFoundry's OpenTofu/Terraform code, add the `cluster_addons_coredns_additional_configurations` block to the [EKS module](https://github.com/truefoundry/terraform-aws-truefoundry-cluster):
```hcl theme={"dark"}
module "eks" {
source = "truefoundry/truefoundry-cluster/aws"
# ... existing arguments ...
cluster_addons_coredns_additional_configurations = {
autoScaling = {
enabled = true
minReplicas = 2
maxReplicas = 10
}
}
}
```
* `enabled` — turns on CoreDNS autoscaling.
* `minReplicas` / `maxReplicas` — lower and upper bounds for the replica count. Tune these values based on your cluster size and DNS query volume.
After updating the module, run `terraform apply` (or `tofu apply`) to apply the change.
TrueFoundry provisions on-demand and spot nodes dynamically using Karpenter, configured via the `karpenter-config` addon. You can restrict or allow specific instance families and sizes by editing the values of the `karpenter-config` addon from the TrueFoundry platform (via the cluster addon configuration in the UI).
Set a `notAllowed` list under `instanceFamilies` and `instanceSizes` to exclude specific types:
```yaml theme={"dark"}
instanceFamilies:
notAllowed: ["c5", "m5", "r5"]
instanceSizes:
notAllowed: ["metal", "24xlarge"]
```
Refer to the full [values.yaml](https://github.com/truefoundry/infra-charts/blob/main/charts/tfy-karpenter-config/values.yaml) for all configurable options.
In addition to Karpenter, you can add EKS managed node groups through the TrueFoundry EKS Terraform module using the `additional_eks_managed_node_groups` variable. For the node group to be discoverable and schedulable from the TrueFoundry platform, it **must** have the `truefoundry.com/node-pool` label — this is how TrueFoundry discovers and targets node pools.
For GPU node groups, also add the `nvidia.com/gpu` label and a matching taint so only GPU workloads land on those nodes.
```hcl theme={"dark"}
module "eks" {
source = "truefoundry/truefoundry-cluster/aws"
# ... existing arguments ...
additional_eks_managed_node_groups = {
gpu = {
ami_type = "AL2023_x86_64_NVIDIA"
instance_types = ["g5.xlarge"]
capacity_type = "ON_DEMAND"
min_size = 0
max_size = 1
desired_size = 0
block_device_mappings = {
xvda = {
device_name = "/dev/xvda"
ebs = {
volume_size = 200
volume_type = "gp3"
encrypted = true
delete_on_termination = true
}
}
}
labels = {
"truefoundry.com/node-pool" = "gpu"
"nvidia.com/gpu" = "true"
}
taints = {
gpu = {
key = "nvidia.com/gpu"
value = "true"
effect = "NO_SCHEDULE"
}
}
tags = var.tags
}
}
}
```
After updating the module, run `terraform apply` (or `tofu apply`) to apply the change.
## Overview
This section provides ready-to-use Terraform snippets for `waf.tf` that remediate the following findings on an AWS WAFv2 Web ACL:
| Finding | Severity | Area |
| -------------- | -------- | --------------------------------------------- |
| Custom-Rule-85 | Critical | Rate limiting + input validation (SQLi / XSS) |
| Custom-Rule-37 | High | Mandatory ownership / application tagging |
| WAF-021 | Medium | Data protection (log field redaction) |
| Custom-Rule-84 | Medium | Geo-location restriction |
| WAF-009 | Medium | AWS-managed "Anonymous IP list" rule group |
| WAF-013 | Low | Logging (already enabled, unchanged) |
| WAF-016 | Info | Default action (kept as `allow`, documented) |
Each section below is a standalone snippet — copy the block you need directly into your `waf.tf`. Snippets that add a `rule { ... }` block are meant to be inserted inside the existing `aws_wafv2_web_acl.this` resource, alongside the other rules; snippets that define a full `resource` block can be dropped anywhere in the file.
The `data_protection_config` block requires AWS provider **>= 5.98.0**. Pin this in your `versions.tf`:
```hcl theme={"dark"}
terraform {
required_providers {
aws = {
source = "hashicorp/aws"
version = ">= 5.98.0"
}
}
}
```
These snippets reference 5 variables that must exist in your `variables.tf`: `waf_app_name`, `waf_app_environment`, `waf_team`, `waf_it_owner_email`, `waf_geo_allowed_country_codes`. See [Required variables](#required-variables) at the bottom of this page.
***
## Optional trusted IP set
Defines a reusable IP set of trusted addresses. It's only created when `var.waf_ip_allowlist` is non-empty, and is referenced later by the allowlist rule. Skip this snippet if you don't need an IP allowlist.
```hcl theme={"dark"}
resource "aws_wafv2_ip_set" "allowlist" {
count = var.enable_waf && length(var.waf_ip_allowlist) > 0 ? 1 : 0
name = "${local.waf_name_effective}-allowlist"
description = "Trusted IPs that bypass WAF managed rules"
scope = var.waf_scope
ip_address_version = "IPV4"
addresses = var.waf_ip_allowlist
tags = local.waf_required_tags
}
```
***
## Web ACL skeleton and default action (WAF-016)
This is the top-level `aws_wafv2_web_acl` resource. All `rule { ... }` snippets below are inserted inside this resource's body. The default action is kept as `allow` — non-matching traffic passes through, and the rules that follow block bad traffic explicitly.
GIS flagged this as informational and suggested a deny-by-default (`default_action { block {} }`) alternative. Switching to deny-by-default requires an explicit `allow` rule that covers **all** trusted traffic first (otherwise you break the app), so it's intentionally left as `allow` here. If you want to move to deny-by-default later, add a catch-all allow rule at priority 0 before flipping this.
```hcl theme={"dark"}
resource "aws_wafv2_web_acl" "this" {
count = var.enable_waf ? 1 : 0
name = local.waf_name_effective
description = "WAFv2 Web ACL for ${var.cluster_name}"
scope = var.waf_scope
tags = local.waf_required_tags
# WAF-016 (Info): default action kept as `allow`. See note above for the
# deny-by-default alternative.
default_action {
allow {}
}
# ... insert rule blocks here (see sections below) ...
visibility_config {
cloudwatch_metrics_enabled = true
metric_name = "WebAclMetrics"
sampled_requests_enabled = true
}
}
```
***
## Managed rule: Known Bad Inputs
Blocks requests matching AWS's curated list of known malicious request patterns (e.g. exploitation of Log4j, credential stuffing patterns). Set at priority `0`.
```hcl theme={"dark"}
rule {
name = "AWSManagedRulesKnownBadInputsRuleSet"
priority = 0
override_action {
none {}
}
statement {
managed_rule_group_statement {
name = "AWSManagedRulesKnownBadInputsRuleSet"
vendor_name = "AWS"
}
}
visibility_config {
cloudwatch_metrics_enabled = true
metric_name = "AWSManagedRulesKnownBadInputsRuleSet"
sampled_requests_enabled = true
}
}
```
***
## Managed rule: SQL Injection Rule Set
Applies AWS's managed SQL injection detection ruleset across the request. Set at priority `1`.
```hcl theme={"dark"}
rule {
name = "AWSManagedRulesSQLiRuleSet"
priority = 1
override_action {
none {}
}
statement {
managed_rule_group_statement {
name = "AWSManagedRulesSQLiRuleSet"
vendor_name = "AWS"
}
}
visibility_config {
cloudwatch_metrics_enabled = true
metric_name = "AWSManagedRulesSQLiRuleSet"
sampled_requests_enabled = true
}
}
```
***
## Managed rule: Amazon IP Reputation List
Blocks traffic from IP addresses that AWS's threat intelligence has flagged as sources of botnets, scanners, or other malicious activity. Set at priority `2`.
```hcl theme={"dark"}
rule {
name = "AWSManagedRulesAmazonIpReputationList"
priority = 2
override_action {
none {}
}
statement {
managed_rule_group_statement {
name = "AWSManagedRulesAmazonIpReputationList"
vendor_name = "AWS"
}
}
visibility_config {
cloudwatch_metrics_enabled = true
metric_name = "AWSManagedRulesAmazonIpReputationList"
sampled_requests_enabled = true
}
}
```
***
## Managed rule: Common Rule Set (OWASP baseline)
Applies AWS's Core Rule Set (broad OWASP-style protections). Two rule-level overrides are included: `SizeRestrictions_BODY` is set to `allow` (so large but legitimate request bodies aren't blocked), and `NoUserAgent_HEADER` is set to `count` (monitor requests without a User-Agent header, rather than blocking them). Set at priority `3`.
```hcl theme={"dark"}
rule {
name = "AWS-AWSManagedRulesCommonRuleSet"
priority = 3
override_action {
none {}
}
statement {
managed_rule_group_statement {
name = "AWSManagedRulesCommonRuleSet"
vendor_name = "AWS"
rule_action_override {
name = "SizeRestrictions_BODY"
action_to_use {
allow {}
}
}
rule_action_override {
name = "NoUserAgent_HEADER"
action_to_use {
count {}
}
}
}
}
visibility_config {
cloudwatch_metrics_enabled = true
metric_name = "AWS-AWSManagedRulesCommonRuleSet"
sampled_requests_enabled = true
}
}
```
***
## Rate limiting on `/api/` traffic (Custom-Rule-85)
Remediates the Critical finding by changing the previous `count {}` action to `block {}`, and scoping the rate limit to requests whose path starts with `/api/` — so UI, health check, and static asset traffic isn't rate-limited alongside API calls. Set at priority `4`.
```hcl theme={"dark"}
rule {
name = "Rate_limit_by_IP_Address_to_manage_DDoS_attacks"
priority = 4
action {
block {}
}
statement {
rate_based_statement {
limit = var.waf_rate_limit
aggregate_key_type = "IP"
evaluation_window_sec = var.waf_evaluation_window_sec
scope_down_statement {
byte_match_statement {
search_string = "/api/"
positional_constraint = "STARTS_WITH"
field_to_match {
uri_path {}
}
text_transformation {
priority = 0
type = "LOWERCASE"
}
}
}
}
}
visibility_config {
cloudwatch_metrics_enabled = true
metric_name = "LimitRequests100"
sampled_requests_enabled = true
}
}
```
***
## Trusted IP allowlist rule
Allows traffic from the IP set defined earlier to bypass the rules that follow it. Only rendered when the allowlist IP set was created. Set at priority `5`.
This rule sits at priority `5` — **after** the managed rule groups (priorities 0–3) and the rate-limit rule (priority 4). Allowlisted IPs are still subject to those earlier rules. If allowlisted IPs should bypass everything, move this rule to priority `0` and renumber the rest accordingly.
```hcl theme={"dark"}
dynamic "rule" {
for_each = length(aws_wafv2_ip_set.allowlist) > 0 ? [1] : []
content {
name = "cargill_whitelist_ips"
priority = 5
action {
allow {}
}
statement {
ip_set_reference_statement {
arn = aws_wafv2_ip_set.allowlist[0].arn
}
}
visibility_config {
cloudwatch_metrics_enabled = true
metric_name = "cargill_whitelist_ips"
sampled_requests_enabled = true
}
}
}
```
***
## Managed rule: Anonymous IP List (WAF-009)
Blocks requests originating from VPNs, Tor exit nodes, proxies, and hosting providers — sources commonly used to mask the true origin of malicious traffic. Set at priority `6`.
`override_action` is set to `none {}` so the rule group's own block action applies immediately. If you'd rather observe traffic before enforcing, change this to `count {}` first.
```hcl theme={"dark"}
rule {
name = "AWSManagedRulesAnonymousIpList"
priority = 6
override_action {
none {}
}
statement {
managed_rule_group_statement {
name = "AWSManagedRulesAnonymousIpList"
vendor_name = "AWS"
}
}
visibility_config {
cloudwatch_metrics_enabled = true
metric_name = "AWSManagedRulesAnonymousIpList"
sampled_requests_enabled = true
}
}
```
***
## Standalone SQL injection block rule (Custom-Rule-85)
A dedicated SQLi detection rule scoped to the request body, independent of the managed SQLi rule set above. Deployed in `count {}` (monitor-only) mode at priority `7` — check CloudWatch metrics and sampled requests for false positives before switching the action to `block {}`.
```hcl theme={"dark"}
rule {
name = "BlockSQLiAttacks"
priority = 7
action {
count {} # TODO: switch to `block {}` after validating no false positives
}
statement {
sqli_match_statement {
field_to_match {
body {}
}
text_transformation {
priority = 0
type = "URL_DECODE"
}
text_transformation {
priority = 1
type = "HTML_ENTITY_DECODE"
}
}
}
visibility_config {
cloudwatch_metrics_enabled = true
metric_name = "BlockSQLiAttacks"
sampled_requests_enabled = true
}
}
```
***
## Standalone XSS block rule (Custom-Rule-85)
A dedicated cross-site scripting detection rule scoped to all query string arguments. Also deployed in `count {}` (monitor-only) mode at priority `8` — switch to `block {}` once validated against real traffic.
```hcl theme={"dark"}
rule {
name = "BlockXSSAttacks"
priority = 8
action {
count {} # TODO: switch to `block {}` after validating no false positives
}
statement {
xss_match_statement {
field_to_match {
all_query_arguments {}
}
text_transformation {
priority = 0
type = "URL_DECODE"
}
text_transformation {
priority = 1
type = "HTML_ENTITY_DECODE"
}
}
}
visibility_config {
cloudwatch_metrics_enabled = true
metric_name = "BlockXSSAttacks"
sampled_requests_enabled = true
}
}
```
***
## Geo-location restriction (Custom-Rule-84)
Blocks any request whose source country is **not** in the approved list, using a `not_statement` wrapped around a `geo_match_statement`. Configure the approved countries via `var.waf_geo_allowed_country_codes`. Set at priority `9`.
```hcl theme={"dark"}
rule {
name = "GeoBlockRule"
priority = 9
action {
block {}
}
statement {
not_statement {
statement {
geo_match_statement {
country_codes = var.waf_geo_allowed_country_codes
}
}
}
}
visibility_config {
cloudwatch_metrics_enabled = true
metric_name = "GeoBlockRule"
sampled_requests_enabled = true
}
}
```
***
## Data protection / field redaction (WAF-021)
Substitutes the values of sensitive request headers — `authorization`, `cookie`, `x-api-key`, `x-auth-token` — before they're written to any WAF logging destination (CloudWatch Logs, sampled requests, etc.). This block goes directly inside `aws_wafv2_web_acl.this`, alongside the `default_action` and rules.
The request body is intentionally **not** redacted here, to preserve forensic detail in logs. If full-body redaction is required later, add:
```hcl theme={"dark"}
data_protection {
action = "SUBSTITUTION"
field {
field_type = "BODY"
}
}
```
```hcl theme={"dark"}
data_protection_config {
data_protection {
action = "SUBSTITUTION"
field {
field_type = "SINGLE_HEADER"
field_keys = ["authorization"]
}
}
data_protection {
action = "SUBSTITUTION"
field {
field_type = "SINGLE_HEADER"
field_keys = ["cookie"]
}
}
data_protection {
action = "SUBSTITUTION"
field {
field_type = "SINGLE_HEADER"
field_keys = ["x-api-key"]
}
}
data_protection {
action = "SUBSTITUTION"
field {
field_type = "SINGLE_HEADER"
field_keys = ["x-auth-token"]
}
}
}
```
***
## Logging (WAF-013, unchanged)
Creates the CloudWatch log group and logging configuration for the Web ACL. This was already compliant and is included here unchanged for completeness — the log group name **must** be prefixed with `aws-waf-logs-`, which AWS enforces.
```hcl theme={"dark"}
resource "aws_cloudwatch_log_group" "waf" {
count = var.enable_waf ? 1 : 0
name = "aws-waf-logs-${local.waf_name_effective}"
retention_in_days = var.waf_log_retention_days
tags = local.waf_required_tags
}
resource "aws_wafv2_web_acl_logging_configuration" "this" {
count = var.enable_waf ? 1 : 0
log_destination_configs = [aws_cloudwatch_log_group.waf[0].arn]
resource_arn = aws_wafv2_web_acl.this[0].arn
redacted_fields {
single_header {
name = "authorization"
}
}
redacted_fields {
single_header {
name = "cookie"
}
}
}
```
***
## Associating the Web ACL with an ALB
Associates the Web ACL with an Application Load Balancer. Only needed if the ALB was created outside of the AWS Load Balancer Controller — pass its ARN via `var.waf_associate_alb_arn`; otherwise leave that variable empty and skip this snippet.
```hcl theme={"dark"}
resource "aws_wafv2_web_acl_association" "alb" {
count = var.enable_waf && var.waf_associate_alb_arn != "" ? 1 : 0
resource_arn = var.waf_associate_alb_arn
web_acl_arn = aws_wafv2_web_acl.this[0].arn
}
```
***
## Required variables
Add these to `variables.tf` if they don't already exist (used for Custom-Rule-37 mandatory ownership/application tagging, and the geo-block rule):
* `waf_app_name`
* `waf_app_environment`
* `waf_team`
* `waf_it_owner_email`
* `waf_geo_allowed_country_codes`
These are merged, along with any caller-supplied tags, into the `local.waf_required_tags` local referenced throughout the snippets above, and applied to every WAF resource.