Truefoundry ships as a helm chart (https://github.com/truefoundry/infra-charts/tree/main/charts/truefoundry) that has configurable options to either deploy both Deployment and AI Gateway feature or just choose the one of them according to your needs. The compute requirements change based on the set of features and the scale of the number of users and requests.Here are a few scenarios that you can choose from based on your needs.
Small (Dev)
Medium (Prod)
Large (Prod)
The small tier is recommended for development purposes. Here all the components are deployed on Kubernetes and in non HA mode (single replica). This is suitable if you are just testing out the different features of Truefoundry.
This setup brings up 1 replica of the services and is not highly-available. It
can enable you to test the features but we do not recommend this for
production mode.
AWS
GCP
Azure
Component
CPU
Memory
Storage
Min Nodes
Remarks
Helm-Chart (AI Gateway Control Plane components)
6 vCPU
12GB
60GB Persistent Volumes (Block Storage) On Kubernetes
2 Pods should be spread over min 2 nodes
Cost: ~ $220 pm(EC2 and EC2 others)
Helm-Chart (AI Gateway component only)
1 vCPU
512Mi
-
1 Pods should be spread over min 1 node
Cost: ~ $35 pm(EC2 and EC2 others)
Postgres (Deployed on Kubernetes)
0.5 vCPU
0.5GB
5GB Persistent Volumes (Block Storage) On Kubernetes
Cost: ~ $15 pm (RDS compute and storage)
Blob Storage (S3 Compatible)
20GB
Cost: ~ $3 pm (S3 storage)
Component
CPU
Memory
Storage
Min Nodes
Remarks
Helm-Chart (AI Gateway Control Plane components)
6 vCPU
12GB
60GB Persistent Volumes (Block Storage) On Kubernetes
2 Pods should be spread over min 2 nodes
Cost: ~ Coming up
Helm-Chart (AI Gateway component only)
1 vCPU
512Mi
-
1 Pods should be spread over min 1 node
Cost: ~ Coming up
Postgres (Deployed on Kubernetes)
0.5 vCPU
0.5GB
5GB Persistent Volumes (Block Storage) On Kubernetes
Cost: ~ Coming up
Blob Storage (S3 Compatible)
20GB
Cost: ~ Coming up
The medium tier is configured for production and will suffice teams of 10-500 members.
The AI Gateway is configured for a minimum 3 replicas (1 vCPU 1GB each) which can handle around 500 requests/second to LLMs.It’s configured to be horizontally scalable and autoscale when the load increases. The Block Storage and S3 are used to store LLM request logs. The size is dependent on the size and number of requests and should be set as per the expected usage.
AWS
GCP
Azure
Component
CPU
Memory
Storage
Min Nodes
Remarks
Helm-Chart (AI Gateway Control Plane components)
14 vCPU
32GB
250GB
3 Pods should be spread over min 3 nodes
Cost: ~ $600 pm (EC2 and EC2 others)
Helm-Chart (AI Gateway component only)
3 vCPU
3GB
-
3 Pods should be spread over min 3 nodes
Cost: ~ $105 pm (EC2 and EC2 others)
Postgres (Managed Database)
2 vCPU
4GB
30GB
Cost: ~ $60 pm (RDS compute and storage)
Blob Storage (S3 Compatible)
500GB
Cost: ~ $15 pm (S3 storage)
Component
CPU
Memory
Storage
Min Nodes
Remarks
Helm-Chart (AI Gateway Control Plane components)
14 vCPU
32GB
250GB
3 Pods should be spread over min 3 nodes
Cost: ~ Coming up
Helm-Chart (AI Gateway component only)
3 vCPU
3GB
-
3 Pods should be spread over min 3 nodes
Cost: ~ Coming up
Postgres (Managed Database)
2 vCPU
4GB
30GB
Cost: ~ Coming up
Blob Storage (S3 Compatible)
500GB
Cost: ~ Coming up
The large tier is configured for production and will suffice organizations of 500-50000 members.
The AI Gateway is configured for a minimum 10 replicas (1 vCPU 1GB each) which can handle around 2000 requests/second to LLMs.It’s configured to be horizontally scalable and autoscale when the load increases. The Block Storage and S3 are used to store LLM request logs. The size is dependent on the size and number of requests and should be set as per the expected usage.
Support for dynamic provisioning of storage for PVC (for e.g AWS EBS, Azure Disk etc.) and support for ingress controller (for e.g. Nginx Ingress Controller) or istio service mesh for exposing the control plane dashboard and AI Gateway at an endpoint.
Domain to map the ingress of the Control Plane dashboard and AI Gateway along with certificate for the domain.
This Domain will be referred as Control Plane URL in our documentation.
Tenant Name, Licence key, and image pull secret - This will be given by TrueFoundry team. Make sure your organization is registered((https://truefoundry.com/register)) on TrueFoundry.
One Tenant Name and Licence key must only be used to setup one Control
Plane. Later, switching to new tenant name and licence key would lead to
complete data lose of existing control plane.
PostgreSQL database. We usually recommend managed PostgreSQL database (For e.g. AWS RDS, or Google Cloud SQL, or Azure Database for PostgreSQL) for production environments.
PostgreSQL version >= 13
IOPS: Default (suitable for dev/testing).
For PostgreSQL 17+: Disable SSL, for AWS: by setting force_ssl parameter to 0 in the parameter group, for Azure: by setting require_secure_transport parameter to false in the parameter group
In case, you do not have a managed database just for testing purposes,
set devMode to true in the values file to spin up a local PostgreSQL
database.
Blob Storage to store the AI Gateway request logs (either S3, GCS, Azure Blob Storage, or any other S3 compatible storage). You can find the instructions in the guide below.
In place of <ACCOUNT_ID>, <AWS_REGION>, and <OIDC_ID> you can also give the values from your EKS cluster.
You can find the OIDC_ID from the EKS cluster. Also, here we are assuming that the service account is truefoundry and the namespace is truefoundry, you can change it as per your needs.
Create a IAM Policy to allow access to the S3 Bucket with following config:
Attach the IAM Policy to the Control Plane Platform IAM Role. You can also attach the IAM policy to access AWS bedrock models from the link here.
If you want to restrict the S3 permissions to a minimal set instead of using s3:*, see the FAQ section below.
If you are integrating with AWS bedrock models from a different AWS account, you can check the FAQ section.
3
Create Postgres RDS Database
Create a Postgres RDS instance of size db.t3.medium with storage size of 30GB.
Important Configuration Notes: - For PostgreSQL 17: Disable SSL by
setting force_ssl parameter to 0 in the parameter group - Security
Group: Ensure your RDS security group has inbound rules allowing traffic
from EKS node security groups
In case you want to setup PostgreSQL on Kubernetes and not use RDS for testing purposes, skip this step and set devMode to true in the values file below
4
Create Kubernetes Secrets
We will create two secrets in this step:
Store the License Key and DB Credentials
Store the Image Pull Secret
Create Kubernetes Secret for License Key and DB Credentials
We need to create a Kubernetes secret containing the licence key and db credentials.
If you are using PostgreSQL on Kubernetes in the dev mode, the values will be as follows:DB_HOST: <HELM_RELEASE_NAME>-postgresql.<NAMESPACE>.svc.cluster.local // eg. truefoundry-postgresql.truefoundry.svc.cluster.localDB_NAME: truefoundryDB_USERNAME: postgres # In order to use custom username, please update the same at postgresql.auth.usernameDB_PASSWORD: randompassword # You can change this to any value here.
Create a values file as given below and replace the following values:
Control Plane URL: URL that you will map to the control plane dashboard (e.g., https://truefoundry.example.com)
Tenant Name: Tenant name provided by TrueFoundry team
AWS S3 Bucket Name: Name of the S3 bucket you created in the previous step (e.g., my-truefoundry-bucket)
AWS Region: Region of the S3 bucket you created in the previous step (e.g., us-west-2)
Control Plane IAM Role ARN: ARN of the IAM role you created in the previous step (e.g., arn:aws:iam::123456789012:role/tfy-control-plane-platform-deps)
truefoundry-values.yaml
global: # Domain to map the platform to controlPlaneURL: https://example.com # Ask TrueFoundry team to provide these tenantName: <TENANT_NAME> # Choose the resource tier as per your needs resourceTier: medium # or small or large # This is the reference to the secrets we created in the previous step existingTruefoundryCredsSecret: "truefoundry-creds" imagePullSecrets: - name: "truefoundry-image-pull-secret" ## Add if you have restricted public registry access # image: # pullSecretNames: # - "truefoundry-image-pull-secret" config: defaultCloudProvider: "aws" storageConfiguration: awsS3BucketName: "<AWS_S3_BUCKET_NAME>" awsRegion: "<AWS_REGION>" serviceAccount: annotations: eks.amazonaws.com/role-arn: <CONTROL_PLANE_IAM_ROLE_ARN> ingress: hosts: - example.com enabled: true annotations: {} ingressClassName: nginx # Replace with your ingress class name# In case, you want to spin up PostgreSQL on kubernetes, enable this# Please add creds and host details in the secret `truefoundry-creds` in the previous stepdevMode: enabled: falsetags: llmGateway: true llmGatewayRequestLogging: true# Disable few dependencies for only LLM Gateway setuptfyBuild: enabled: falsesfyManifestService: enabled: falsetfyController: enabled: falsetfyConfigs: enabled: false
Make sure to add the lifecycle configurations on the bucket to delete multipart upload after 7 days.
For this go to GCP bucket -> Lifecycle -> Add a rule
Select Delete multi-part upload for 7 days
We also need to add the CORS policy to the GCP bucket. Right now adding the CORS policy to the GCP bucket is not possible through the console so for this, we will use gsutil
Create a file called cors.json using the below command
Add the following IAM condition - resource.name.startsWith('projects/\_/buckets/<bucket name>}') to the above IAM role.
2
Create Google Cloud SQL for PostgreSQL database
Create a Google Cloud SQL for PostgreSQL database of size db-custom-1-3840 with storage size of 30GB.
Important Configuration Notes: - For PostgreSQL 17+: Disable SSL
Security > Allow unencrypted network traffic - Firewall Rules: Ensure your
database firewall rules allow inbound traffic from GKE node pools
In case you want to setup PostgreSQL on Kubernetes in the dev mode, skip this step and set devMode to true in the values file in the steps below.
3
Create Kubernetes Secrets
We will create two secrets in this step:
Store the License Key and DB Credentials
Store the Image Pull Secret
Create Kubernetes Secret for License Key and DB Credentials
We need to create a Kubernetes secret containing the licence key and db credentials.
If you are using PostgreSQL on Kubernetes in the dev mode, the values will be as follows:DB_HOST: <HELM_RELEASE_NAME>-postgresql.<NAMESPACE>.svc.cluster.local // eg. truefoundry-postgresql.truefoundry.svc.cluster.localDB_NAME: truefoundryDB_USERNAME: postgres # In order to use custom username, please update the same at postgresql.auth.usernameDB_PASSWORD: randompassword # You can change this to any value here.
Create a values file as given below and replace the following values:
Control Plane URL: URL that you will map to the control plane dashboard.
Tenant Name: Tenant name provided by TrueFoundry team.
GCP Project ID: GCP project ID provided by TrueFoundry team.
GCP Storage Bucket Name: Name of the GCS bucket you created in the previous step.
GCP Service Account Name: Name of the GCP service account you created in the previous step.
truefoundry-values.yaml
global: # Domain to map the control plane dashboard controlPlaneURL: https://example.com # Ask TrueFoundry team to provide these tenantName: <TENANT_NAME> # Choose the resource tier as per your needs resourceTier: medium # or small or large # This is the reference to the secrets we created in the previous step existingTruefoundryCredsSecret: "truefoundry-creds" imagePullSecrets: - name: "truefoundry-image-pull-secret" ## Add if you have restricted public registry access # image: # pullSecretNames: # - "truefoundry-image-pull-secret" config: defaultCloudProvider: "gcp" storageConfiguration: googleCloudProjectId: "<GCP_PROJECT_ID>" googleCloudStorageBucketName: "<GCP_STORAGE_BUCKET_NAME>" serviceAccount: annotations: iam.gke.io/gcp-service-account: <CONTROL_PLANE_GCP_SERVICE_ACCOUNT_NAME>@<PROJECT_ID>.iam.gserviceaccount.com ingress: hosts: - example.com enabled: true annotations: {} ingressClassName: nginx # Replace with your ingress class name# In case, you want to spin up PostgreSQL on kubernetes, enable thisdevMode: enabled: falsetags: llmGateway: true llmGatewayRequestLogging: true# Disable few dependencies for only LLM Gateway setuptfyBuild: enabled: falsesfyManifestService: enabled: falsetfyController: enabled: falsetfyConfigs: enabled: false
Search for CORS from the left panel and for Blob service (optional for File serviceQueue service and Table Service, only apply the change if you are using them) select the below options
Allowed Origins - * or your control plane URL
Allowed Methods - GET, POST, PUT
Allowed Headers - *
Exposed Headers - Etag
MaxAgeSeconds - 3600
Collect the following information
Standard endpoint - Endpoint of the blob storage Once the container is created we need to get the standard endpoint of the blob storage along with the container which will look something like this. Replace this with your storage account name and the container name.
Connection string - From the Azure portal in your storage account, head over to the Security + Networking section under Access keys which will contain the Connection String .
2
Create Azure Database for PostgreSQL database
Create a PostgreSQL database of size GP_Standard_D4ds_v5 with storage size of 30GB.
Important Configuration Notes: - For PostgreSQL 17+: Disable SSL,
allowing both encrypted and unencrypted client communications, you can change
the server parameter require_secure_transport to OFF - Security Group:
Ensure your database firewall rules allow inbound traffic from AKS node pools
In case you want to setup PostgreSQL on Kubernetes in the dev mode, skip this step and set devMode to true in the values file in the steps below.
3
Create Kubernetes Secrets
We will create two secrets in this step:
Store the License Key and DB Credentials
Store the Image Pull Secret
Create Kubernetes Secret for License Key and DB Credentials
We need to create a Kubernetes secret containing the licence key and db credentials.
If you are using PostgreSQL on Kubernetes in the dev mode, the values will be as follows:DB_HOST: <HELM_RELEASE_NAME>-postgresql.<NAMESPACE>.svc.cluster.local // eg. truefoundry-postgresql.truefoundry.svc.cluster.localDB_NAME: truefoundryDB_USERNAME: postgres # In order to use custom username, please update the same at postgresql.auth.usernameDB_PASSWORD: randompassword # You can change this to any value here.
Create a values file as given below and replace the following values:
Control Plane URL: URL that you will map to the control plane dashboard.
Tenant Name: Tenant name provided by TrueFoundry team.
Azure Blob URI: Azure Blob URI provided by TrueFoundry team.
Azure Blob Connection String: Azure Blob Connection String provided by TrueFoundry team.
truefoundry-values.yaml
global: # Domain to map the platform to controlPlaneURL: https://example.com # Ask TrueFoundry team to provide these tenantName: <TENANT_NAME> # This is the reference to the secrets we created in the previous step existingTruefoundryCredsSecret: "truefoundry-creds" imagePullSecrets: - name: "truefoundry-image-pull-secret" ## Add if you have restricted public registry access # image: # pullSecretNames: # - "truefoundry-image-pull-secret" # Choose the resource tier as per your needs resourceTier: medium # or small or large config: defaultCloudProvider: "azure" storageConfiguration: azureBlobUri: "<AZURE_BLOB_URI>" # Add the connection string as part of truefoundry-creds secret(refer - https://github.com/truefoundry/infra-charts/blob/main/charts/truefoundry/README.md#using-k8s-secret-for-additional-fields): azureBlobConnectionString: ${k8s-secret/truefoundry-creds/AZURE_BLOB_CONNECTION_STRING} ingress: hosts: - example.com enabled: true annotations: {} ingressClassName: nginx # Replace with your ingress class name# In case, you want to spin up PostgreSQL on kubernetes, enable this# Please add creds and host details in the secret `truefoundry-creds`devMode: enabled: falsetags: llmGateway: true llmGatewayRequestLogging: truetfyBuild: enabled: falsesfyManifestService: enabled: falsetfyController: enabled: falsetfyConfigs: enabled: false
In OpenShift clusters, the values file will be slightly different. The rest of the steps remains the exact same as what you would do for AWS/GCP/Azure.
If your cluster has Security Context Constraints (SCCs) that require pods to have an empty security context, you will need to disable the default security contexts in the Helm chart. See How to deploy on OpenShift with restricted SCCs in the FAQ below.
The values file will be as follows:
truefoundry-values.yaml
global: # Domain to map the control plane dashboard controlPlaneURL: https://example.com # Ask TrueFoundry team to provide these tenantName: <TENANT_NAME> # This is the reference to the secrets we created in the previous step existingTruefoundryCredsSecret: "truefoundry-creds" imagePullSecrets: - name: "truefoundry-image-pull-secret" ## Add if you have restricted public registry access # image: # pullSecretNames: # - "truefoundry-image-pull-secret" # Choose the resource tier as per your needs resourceTier: medium # or small or large config: defaultCloudProvider: "aws" storageConfiguration: awsS3BucketName: "<AWS_S3_BUCKET_NAME>" awsRegion: "<AWS_REGION>" serviceAccount: annotations: eks.amazonaws.com/role-arn: <CONTROL_PLANE_IAM_ROLE_ARN> ingress: hosts: - example.com enabled: true annotations: {} ingressClassName: nginx # Replace with your ingress class name # For haproxy openshift, please add the following annotation to the ingress haproxy.router.openshift.io/rewrite-target: /# In case, you want to spin up PostgreSQL on kubernetes, enable this# Please add creds and host details in the secret `truefoundry-creds`devMode: enabled: falsetags: llmGateway: true llmGatewayRequestLogging: true# Disable few dependencies for only LLM Gateway setuptfyBuild: enabled: falsesfyManifestService: enabled: falsetfyController: enabled: falsetfyConfigs: enabled: false
1
Get S3 compatible storage
You can use Minio or any other S3 compatible storage.
Using Minio (Self-Hosted S3-Compatible Storage)
If you’re using Minio or another S3-compatible storage solution, you’ll need to provide the following configuration:
Bucket Name: Name of the S3-compatible bucket
Region: Region identifier (can be any string for Minio)
Access Key ID: Access key for authentication
Secret Access Key: Secret key for authentication
Endpoint URL: Full URL to your S3-compatible storage endpoint
These values will be used in the configuration steps below.
2
Create Postgres database
If you have a managed postgres database, we highly recommend you to use it. If you don’t have one, you can create a PostgreSQL database of size equivalent to db.t3.medium with storage size of 30GB.
Important Configuration Notes:
For PostgreSQL 17+: Disable SSL by setting force_ssl parameter to 0 in the parameter group
Security Group: Ensure your database security group/firewall rules allow traffic from Kubernetes node groups
Using Managed PostgreSQL
For production environments, we strongly recommend using a managed PostgreSQL service:
Create a PostgreSQL instance with the specifications from the Compute Requirements section
Create a database named truefoundry (or your preferred name)
Create a user with full permissions on this database
Note down the following details:
DB_HOST: Database hostname or IP address
DB_PORT: Database port (usually 5432)
DB_NAME: Database name
DB_USERNAME: Database username
DB_PASSWORD: Database password
Using PostgreSQL on Kubernetes (Dev/Testing Only)
For development or testing purposes only, you can deploy PostgreSQL on Kubernetes:
Set devMode.enabled: true in the values file (shown in a later step)
The PostgreSQL will be automatically deployed with the control plane
This setup is NOT highly-available and should NOT be used for production environments.
3
Create Kubernetes Secrets
We will create two secrets in this step:
Store the License Key and DB Credentials
Store the Image Pull Secret
Create Kubernetes Secret for License Key and DB Credentials
We need to create a Kubernetes secret containing the licence key and db credentials.
If you are using PostgreSQL on Kubernetes in the dev mode, the values will be as follows:DB_HOST: <HELM_RELEASE_NAME>-postgresql.<NAMESPACE>.svc.cluster.local // eg. truefoundry-postgresql.truefoundry.svc.cluster.localDB_NAME: truefoundryDB_USERNAME: postgres # In order to use custom username, please update the same at postgresql.auth.usernameDB_PASSWORD: randompassword # You can change this to any value here.
Create a values file as given below and replace the following values:
Control Plane URL: URL that you will map to the control plane dashboard.
Tenant Name: Tenant name provided by TrueFoundry team.
AWS S3 Bucket Name: AWS S3 Bucket Name
AWS Region: AWS Region
AWS Access Key ID: AWS Access Key ID
AWS Secret Access Key: AWS Secret Access Key
AWS Endpoint URL: URL for your S3 compatible Blob storage
truefoundry-values.yaml
global: # Domain to map the control plane dashboard controlPlaneURL: https://example.com # Ask TrueFoundry team to provide these tenantName: <TENANT_NAME> # This is the reference to the secrets we created in the previous step existingTruefoundryCredsSecret: "truefoundry-creds" imagePullSecrets: - name: "truefoundry-image-pull-secret" ## Add if you have restricted public registry access # image: # pullSecretNames: # - "truefoundry-image-pull-secret" # Choose the resource tier as per your needs resourceTier: medium # or small or large config: defaultCloudProvider: "aws" storageConfiguration: # In case of S3 compatible storage, provide the details here awsS3BucketName: "<AWS_S3_BUCKET_NAME_EQUIVALENT>" awsRegion: "<AWS_REGION_EQUIVALENT>" ingress: hosts: - example.com enabled: true annotations: {} ingressClassName: nginx # Replace with your ingress class name# In case, you want to spin up PostgreSQL on kubernetes, enable this# Please add creds and host details in the secret `truefoundry-creds`devMode: enabled: falsetags: llmGateway: true llmGatewayRequestLogging: trueservicefoundryServer: env: AWS_ACCESS_KEY_ID: <AWS_ACCESS_KEY_ID_EQUIVALENT> AWS_SECRET_ACCESS_KEY: <AWS_SECRET_ACCESS_KEY_EQUIVALENT> AWS_ENDPOINT_URL: <AWS_ENDPOINT_URL_EQUIVALENT> # AWS_ALLOW_HTTP: <AWS_ALLOW_HTTP_EQUIVALENT> (optional)deltaFusionIngestor: env: AWS_ACCESS_KEY_ID: <AWS_ACCESS_KEY_ID_EQUIVALENT> AWS_SECRET_ACCESS_KEY: <AWS_SECRET_ACCESS_KEY_EQUIVALENT> AWS_ENDPOINT_URL: <AWS_ENDPOINT_URL_EQUIVALENT> # AWS_ALLOW_HTTP: <AWS_ALLOW_HTTP_EQUIVALENT> (optional)deltaFusionQueryServer: env: AWS_ACCESS_KEY_ID: <AWS_ACCESS_KEY_ID_EQUIVALENT> AWS_SECRET_ACCESS_KEY: <AWS_SECRET_ACCESS_KEY_EQUIVALENT> AWS_ENDPOINT_URL: <AWS_ENDPOINT_URL_EQUIVALENT> # AWS_ALLOW_HTTP: <AWS_ALLOW_HTTP_EQUIVALENT> (optional)# Disable few dependencies for only LLM Gateway setuptfyBuild: enabled: falsesfyManifestService: enabled: falsetfyController: enabled: falsetfyConfigs: enabled: false
We need to create a Image Pull Secret to enable pulling the truefoundry images from the private registry.
Same image pull secret will be used for all the gateway planes as used for the
control plane. Use your credentials if you are pulling TrueFoundry images from
your registry.
truefoundry-image-pull-secret.yaml
apiVersion: v1kind: Secretmetadata: name: truefoundry-image-pull-secrettype: kubernetes.io/dockerconfigjsondata: .dockerconfigjson: <IMAGE_PULL_SECRET> # Provided by TrueFoundry team
Apply the secret to the Kubernetes cluster (Assuming you are installing the control plane in the truefoundry namespace)
Create a values file as given below and replace the following values:
CONTROL_PLANE_URL: URL that you will map to the control plane dashboard.
TENANT_NAME: Tenant name provided by TrueFoundry team.
GATEWAY_ENDPOINT_HOST: The domain where you will expose the gateway endpoint (e.g., gateway.example.com)
truefoundry-gateway-values.yaml
global: # This is the reference to the secrets we created in the previous step imagePullSecrets: - name: "truefoundry-image-pull-secret" # Choose the resource tier as per your needs resourceTier: medium # or small or large controlPlaneURL: <CONTROL_PLANE_URL> # eg. https://example-company.truefoundry.cloud tenantName: <TENANT_NAME>ingress: enabled: true annotations: {} ingressClassName: nginx tls: [] hosts: - <GATEWAY_ENDPOINT_HOST># Optional: Istio configuration (if using Istio instead of standard ingress)# istio:# virtualservice:# hosts:# - <GATEWAY_ENDPOINT_HOST># enabled: true# retries:# enabled: true# retryOn: gateway-error# gateways:# - istio-system/tfy-wildcard# annotations: {}
Can I use my Artifactory as a mirror to pull images?
Yes. You can configure your Artifactory to mirror our registry.
Credentials for accessing the TrueFoundry private registry are required and
will be provided during onboarding.
1. Registry Configuration
URL: https://tfy.jfrog.io/
2. Update Helm values
global: image: registry: <YOUR_REGISTRY> # Replace with your registrypostgresql: image: registry: <YOUR_REGISTRY> # Replace with your registry, use this if `devMode` is enabled
Can I copy images to my own private registry?
Yes. We provide a script that uses the truefoundry Helm Chart to identify and copy required images to your private registry.
Credentials for accessing the TrueFoundry private registry are required and
will be provided during onboarding.
Replace <USERNAME> with your registry username.
Replace <PASSWORD> with your registry password.
Replace <YOUR_REGISTRY> with the URL of your registry.Skopeo will use authentication details for a registry that was previously authenticated with docker login.Alternatively, you can use the --dest-user and --dest-password flags to provide the username and password for the destination registry.
Replace <TRUEFOUNDRY_HELM_CHART_VERSION> with the version of the Truefoundry
helm chart you want to use. You can find the latest version in the
changelog.Replace <TRUEFOUNDRY_HELM_VALUES_FILE> with the path to the values file you created in the Installation Instructions.Replace <DEST_REGISTRY> with the URL of your registry.
6. Update the Helm values file to use your registry
global: image: registry: <YOUR_REGISTRY> # Replace with your registrypostgresql: image: registry: <YOUR_REGISTRY> # Replace with your registry, use this if `devMode` is enabled
Replace <USERNAME> with the TrueFoundry registry username.
Replace <PASSWORD> with the TrueFoundry registry password.
4. Authenticate to your destination registry
# Set your AWS profileexport AWS_PROFILE=<AWS_PROFILE># Authenticate to ECR using the profileaws ecr get-login-password --region us-west-2 | skopeo login --username AWS --password-stdin <YOUR_ECR_REGISTRY>
Replace <AWS_PROFILE> with your AWS profile name.
Replace <YOUR_ECR_REGISTRY> with the URL of your ECR registry (ex. 123456789012.dkr.ecr.us-east-2.amazonaws.com).Skopeo will use authentication details for a registry that was previously authenticated with docker login.
5. Run Clone Image Script
This script creates required ECR repositories and copies images.
Optionally append a path to your registry URL to namespace repositories (e.g., 123456789012.dkr.ecr.us-east-2.amazonaws.com/truefoundry).
Replace <TRUEFOUNDRY_HELM_CHART_VERSION> with the TrueFoundry Helm chart version. Find the latest version in the changelog.Replace <TRUEFOUNDRY_HELM_VALUES_FILE> with the path to your values file from Installation Instructions.Replace <YOUR_DESTINATION_ECR_REGISTRY> with your ECR registry URL (e.g., 123456789012.dkr.ecr.us-east-2.amazonaws.com/truefoundy).
6. Update the Helm values file to use your registry
global: image: registry: <YOUR_REGISTRY> # Replace with your registrypostgresql: image: registry: <YOUR_REGISTRY> # Replace with your registry, use this if `devMode` is enabled
How to install in an air-gapped / restricted network environment?
An air-gapped environment is isolated from the internet. Since the control plane and gateway plane ship as a single helm chart (truefoundry), you only need to make the container images available in your private registry and update the helm values to point to it.
In the IAM role in the destination AWS account (which has bedrock access), add the following trust policy to allow the control plane IAM role to assume it:
Now you can use the IAM role of the destination AWS account while integrating AWS bedrock models in the TrueFoundry AI gateway.
Do we need any NFS volumes in Kubernetes for the AI Gateway or Control Plane?
No, we only need block storage for installing and running Truefoundry. This should be supported via the CSI driver and only ReadWriteOnce access is required.
What is the structure of access logs
We log access information in standard output with the following format:
logfmt
json
These can be switched with the help of an environment variable to the AI Gateway installation. (Default: logfmt)
How to use SSO directly without using TrueFoundry Auth Server?
By default, the control plane uses the TrueFoundry Auth Server for user authentication. However, you can configure it to use your own external identity provider instead. We support both OIDC and SAML-compliant identity providers. Read more
Requests to the gateway are timing out after a certain duration
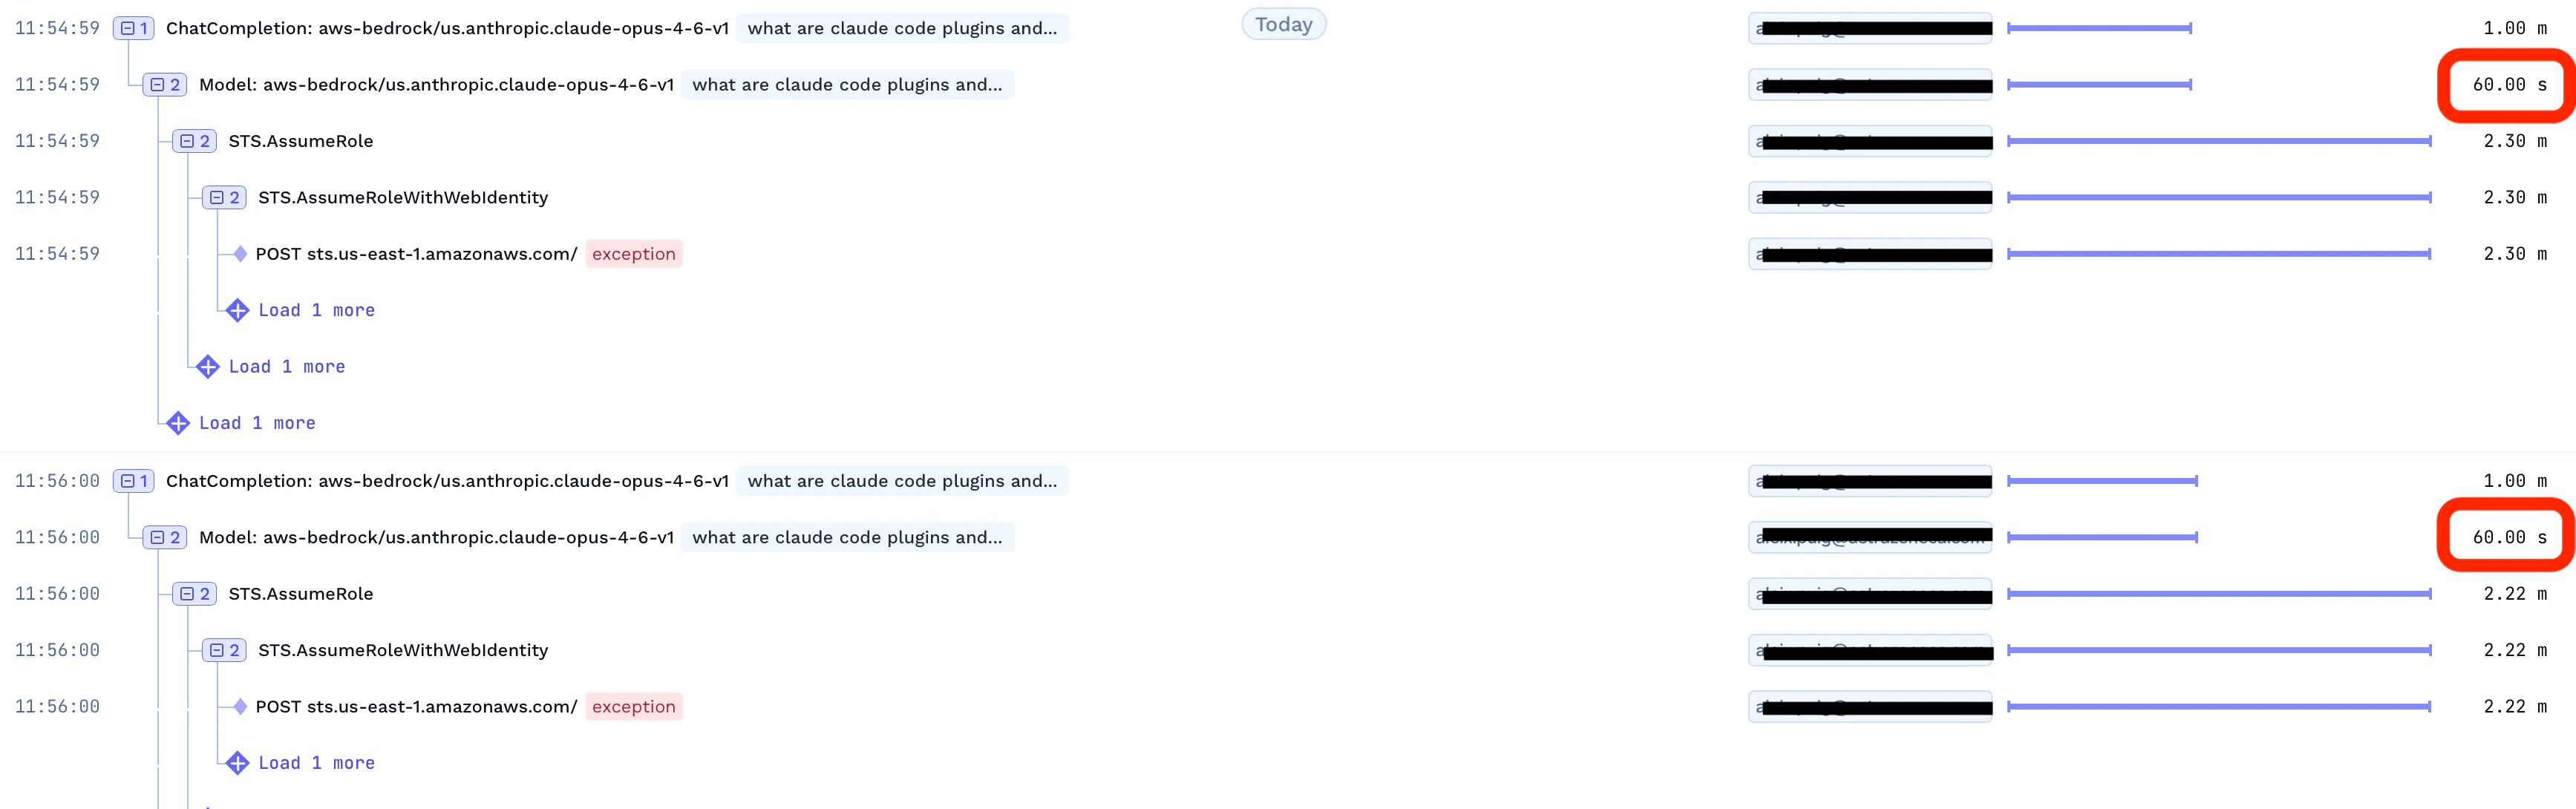
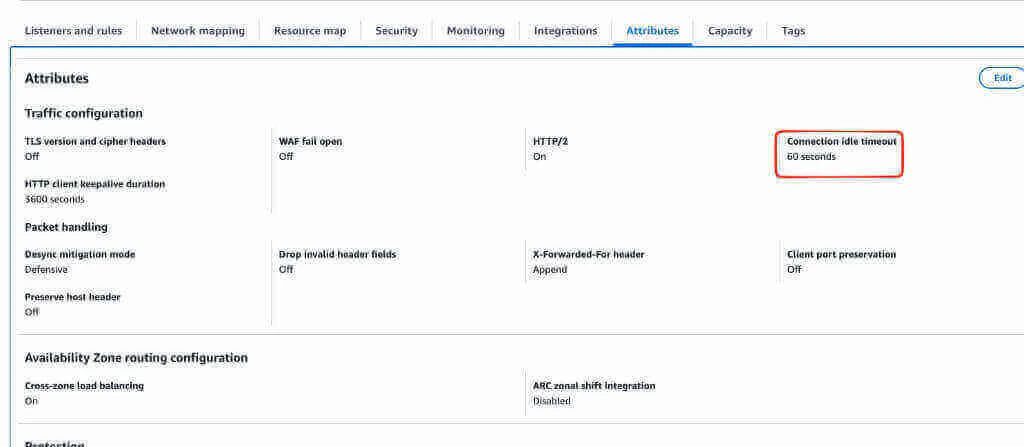
If your LLM requests are timing out after a certain duration, the first thing to check is the traces in the TrueFoundry dashboard. Look at the request duration — if you see requests consistently timing out at exactly 60 seconds, the issue is almost certainly the load balancer, not the TrueFoundry AI Gateway. The TrueFoundry gateway does not impose any request timeout.This commonly happens when an Application Load Balancer (ALB) is placed in front of the gateway to expose it. The default Connection idle timeout on AWS ALBs is 60 seconds, which is too short for long-running LLM inference requests (especially streaming responses or large prompts).Solution: Increase the idle timeout on your AWS ALB to a higher value (e.g., 300 seconds or more).You can find this setting in the AWS Console under EC2 → Load Balancers → Select your ALB → Attributes tab → Connection idle timeout.You can also update it via the AWS CLI:
If you are using an ingress controller (e.g., NGINX Ingress) in addition to the ALB, also verify that the ingress controller’s proxy timeout settings are configured appropriately.
Can I get TrueFoundry metrics in Victoria Metrics instead of Prometheus?
Yes. TrueFoundry supports exporting metrics to Victoria Metrics as an alternative to Prometheus. To enable this, add the following to your truefoundry-values.yaml file and upgrade the Helm release:
This only installs the VMServiceScrape and related custom resources for
scraping TrueFoundry metrics. It does not deploy Victoria Metrics itself —
you are responsible for installing and managing your own Victoria Metrics
instance.
truefoundry-values.yaml
victoriaMetricsMonitoring:
  enabled: true
Then upgrade the Helm release to apply the changes:
The TrueFoundry control plane supports SSL connections to PostgreSQL. You can configure SSL by setting the DB_SSL_MODE environment variable in your truefoundry-values.yaml.Supported DB_SSL_MODE values:
Mode
Encryption
Certificate Validation
Use Case
disable
No
No
Local development or trusted networks
no-verify
Yes
No
Managed databases with self-signed or unverified certs
require
Yes
Yes (system CA store)
When you have a valid CA certificate and want full verification
verify-ca
Yes
Yes (custom CA)
Same as require but explicitly checks CA
verify-full
Yes
Yes (CA + hostname)
Strictest mode, validates CA and hostname
SSL certificate environment variables:
Variable
Purpose
Required
DB_SSL_CA_PATH
Path to the server CA certificate file
For require, verify-ca, or verify-full modes
DB_SSL_CERT_PATH
Path to the client certificate file (for mTLS)
Only for mTLS (GCP Cloud SQL, Azure Database for PostgreSQL)
DB_SSL_KEY_PATH
Path to the client private key file (for mTLS)
Only for mTLS (GCP Cloud SQL, Azure Database for PostgreSQL)
The certificate requirements vary by cloud provider. AWS RDS only needs the server CA bundle (DB_SSL_CA_PATH), while GCP Cloud SQL and Azure Database for PostgreSQL may require all three certificate paths when client certificate authentication (mTLS) is enabled. Refer to the cloud-specific control plane documentation for detailed examples.
Scenario 1: Encrypted connection without certificate validation (no-verify)This is the simplest option for managed databases. It encrypts the connection but skips server certificate validation.
Scenario 2: Encrypted connection with certificate validation (require)This mode encrypts the connection and validates the server certificate. You must provide the appropriate certificate files for your database provider. The example below shows the full configuration with all three certificate paths (for GCP/Azure mTLS). For AWS RDS, only DB_SSL_CA_PATH is needed.Create a Kubernetes Secret containing your certificate files:
If your TrueFoundry deployment needs to trust custom Certificate Authorities (e.g., for internal services, private registries, or corporate proxies), you can configure custom CA certificates in the Helm chart.There are two methods to provide custom CA certificates:
Method 2: Use an existing ConfigMap containing CA certificate(s)
If you already have your custom CA certificates in a Kubernetes ConfigMap, you can reference it directly. An initContainer will merge the custom CA with the system CAs.
1
Create a ConfigMap with your custom CA certificate(s)
Create a Kubernetes ConfigMap containing your custom CA certificate(s):
Method 2b: Use an existing ConfigMap with overrideCAList
If you want the ConfigMap to replace the system CA bundle entirely instead of merging, set overrideCAList to true. In this mode, the ConfigMap is mounted directly at /etc/ssl/certs/ (no initContainer is used), so the ConfigMap must contain the full CA bundle (system + custom CAs).
1
Prepare your CA certificate file
Add your custom CA certificate(s) to your system’s CA bundle. On a Linux system with the certificate file saved as custom-ca.crt:
# Copy the certificate to the CA directorysudo cp custom-ca.crt /usr/local/share/ca-certificates/# Update the CA certificates bundlesudo update-ca-certificates
This will generate or update /etc/ssl/certs/ca-certificates.crt with your custom CA included (system CAs + your custom CA).
2
Create a ConfigMap from the complete ca-certificates.crt file
Create a Kubernetes ConfigMap containing the complete CA bundle:
When overrideCAList is set to true, the ConfigMap is mounted directly replacing the system CA bundle. Your ConfigMap must contain the complete CA bundle (system CAs + your custom CAs). If you only include your custom CAs, all standard public CA trust will be lost and outbound HTTPS connections to public services will fail.
The custom CA certificates will be mounted into all TrueFoundry pods and added to the system’s trust store. This ensures that all outgoing HTTPS connections from TrueFoundry services will trust your custom CAs.
After adding custom CA certificates, verify that your TrueFoundry pods have restarted and are running correctly. You may need to restart existing pods for the changes to take effect.
How to enable and access control plane monitoring (Grafana)?
TrueFoundry ships with a built-in monitoring stack that includes Grafana dashboards for the control plane. To enable it, add the following to your truefoundry-values.yaml:
Replace <your-truefoundry-control-plane-url> with your actual control plane domain (e.g., app.example.com) and <tenant-name> with your TrueFoundry tenant name provided during onboarding.
Only users with the admin role can access this endpoint.
Make sure to include the trailing / at the end of the URL.
If you already have Prometheus or VictoriaLogs in your cluster, you can point the monitoring stack to them using externalServices instead of installing new instances.
How do you add default metadata to all requests passing via the gateway?
You can attach default metadata to every request that passes through the AI Gateway by setting the DEFAULT_GATEWAY_METADATA environment variable on the gateway. The value should be a JSON string of key-value pairs.Add the following to your gateway configuration in values file of the gateway plane:
The metadata key-value pairs will be automatically included in every request routed through the gateway. You can use this to tag requests with organizational identifiers, environment labels, or any other metadata your downstream systems need.
How to expose additional metadata as Prometheus labels for gateway metrics?
By default, the AI Gateway exposes a fixed set of Prometheus labels on its metrics. If you want to slice and aggregate gateway metrics by your own metadata fields (e.g. customer_id, request_type, environment), set the LLM_GATEWAY_METADATA_LOGGING_KEYS environment variable on the gateway. The value is a JSON-encoded array of metadata keys.Each key listed here is exposed as a Prometheus label prefixed with ai_gateway_metadata_* — for example, customer_id becomes the label ai_gateway_metadata_customer_id. You can then use these labels for granular filtering and aggregation in Grafana.Add the following to your gateway configuration in values file of the gateway plane:
Once the gateway is restarted, requests that include these metadata keys (either via default metadata or per-request metadata) will emit Prometheus metrics with the corresponding ai_gateway_metadata_customer_id and ai_gateway_metadata_request_type labels.
Only add metadata keys with bounded, low-cardinality values (e.g. customer tier, request type, environment). Adding high-cardinality keys like user IDs or trace IDs as labels can cause your Prometheus / Victoria Metrics instance to consume excessive memory and storage.
How to use HTTPRoute to route traffic using Kubernetes Gateway API?
The TrueFoundry Helm charts support the Kubernetes Gateway API as an alternative to standard Ingress resources. Use HTTPRoute when your cluster uses a Gateway API-compatible controller (e.g. Envoy Gateway, Istio, NGINX Gateway Fabric, GKE Gateway).Control plane (truefoundry chart)Add the following to your truefoundry-values.yaml, setting parentRefs to point to your existing Gateway:
truefoundry-values.yaml
global:
  httpRoute:
    enabled: true
    parentRefs:
      - name: my-gateway        # Name of your Gateway resource
        namespace: gateway-system  # Namespace where the Gateway is deployed
        sectionName: https      # Listener section on the Gateway (e.g. http or https)
    hostnames:
      - "app.example.com"       # Hostname that this HTTPRoute should match
Only one routing method should be enabled at a time. Disable global.ingress.enabled and global.virtualservice.enabled when using httpRoute.
The sectionName must match a named listener on your Gateway resource. Omit it if your Gateway has a single unnamed listener.
TLS termination is handled by the parent Gateway — no TLS configuration is needed on the HTTPRoute itself.
How to restrict AWS S3 permissions to a minimal set?
By default, the installation instructions use s3:* for the S3 bucket IAM policy for simplicity. If your organization requires a least-privilege approach, you can replace s3:* with the following minimal set of permissions:
How to configure security context for TrueFoundry components?
By default, the TrueFoundry Helm chart ships with container and pod security contexts configured for all components to follow security best practices — pods run as a non-root user (runAsNonRoot: true), use a read-only root filesystem (readOnlyRootFilesystem: true), and drop all privileges (capabilities.drop: [ALL]).However, NATS (used internally for messaging) does not have these defaults applied automatically. If your cluster enforces Pod Security Standards (e.g. restricted profile) or you want a consistent security posture across all components, you need to explicitly add the security context for NATS by adding the following to your truefoundry-values.yaml:
The NATS subchart uses a different values structure (container.merge and podTemplate.merge) compared to other TrueFoundry components. This is because NATS uses its own Helm chart conventions for overriding pod and container specs.
How to deploy on OpenShift with restricted Security Context Constraints (SCC)?
OpenShift clusters enforce Security Context Constraints (SCCs) that expect pods to have an empty security context so that OpenShift can inject arbitrary user and group IDs at runtime. By default, the TrueFoundry Helm chart sets explicit podSecurityContext and securityContext values (such as runAsUser, runAsNonRoot, fsGroup, etc.) on its components, which conflicts with the restricted or restricted-v2 SCC.To resolve this, disable both pod-level and container-level security contexts for all components by adding the following overrides to your truefoundry-values.yaml:
Setting enabled: false removes all explicit security context fields from the pod and container specs, allowing OpenShift’s SCC admission controller to assign user and group IDs as needed.