This section explains the steps to add Databricks models and configure the required access controls.
1
Navigate to Databricks Models in AI Gateway
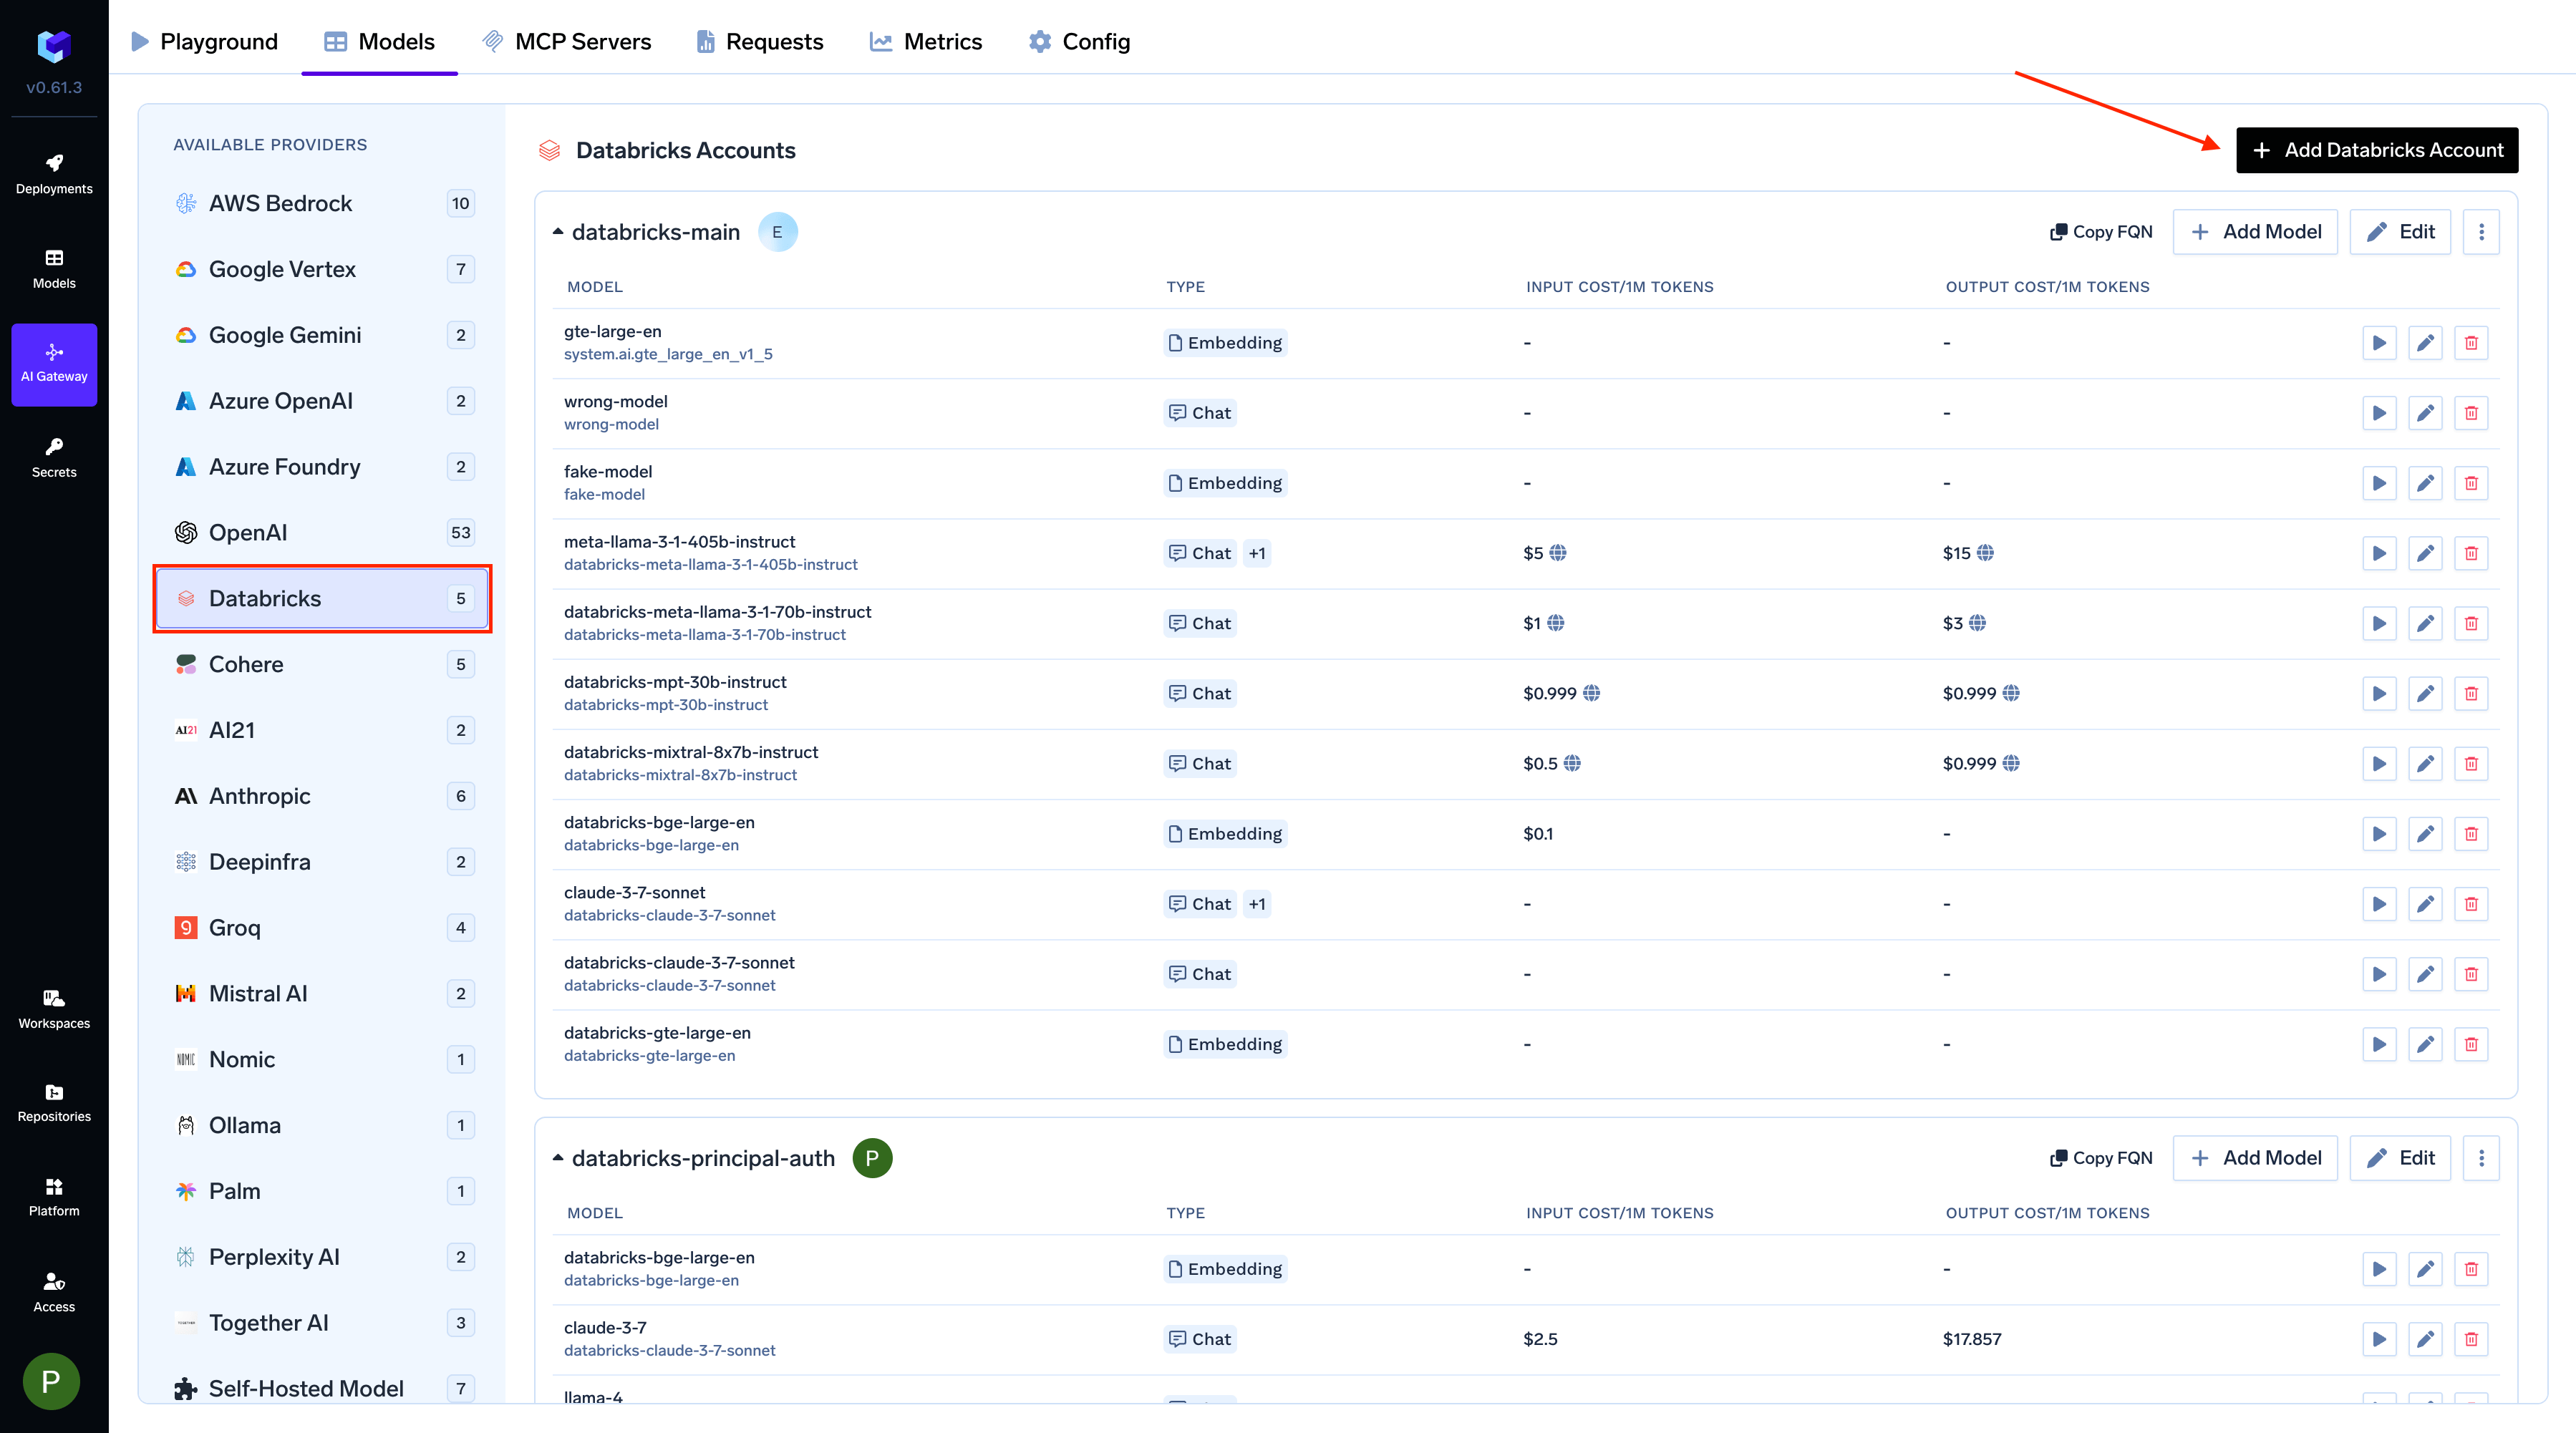
From the TrueFoundry dashboard, navigate to AI Gateway > Models and select Databricks.
Navigate to Databricks Models
2
Add Databricks Account and Authentication
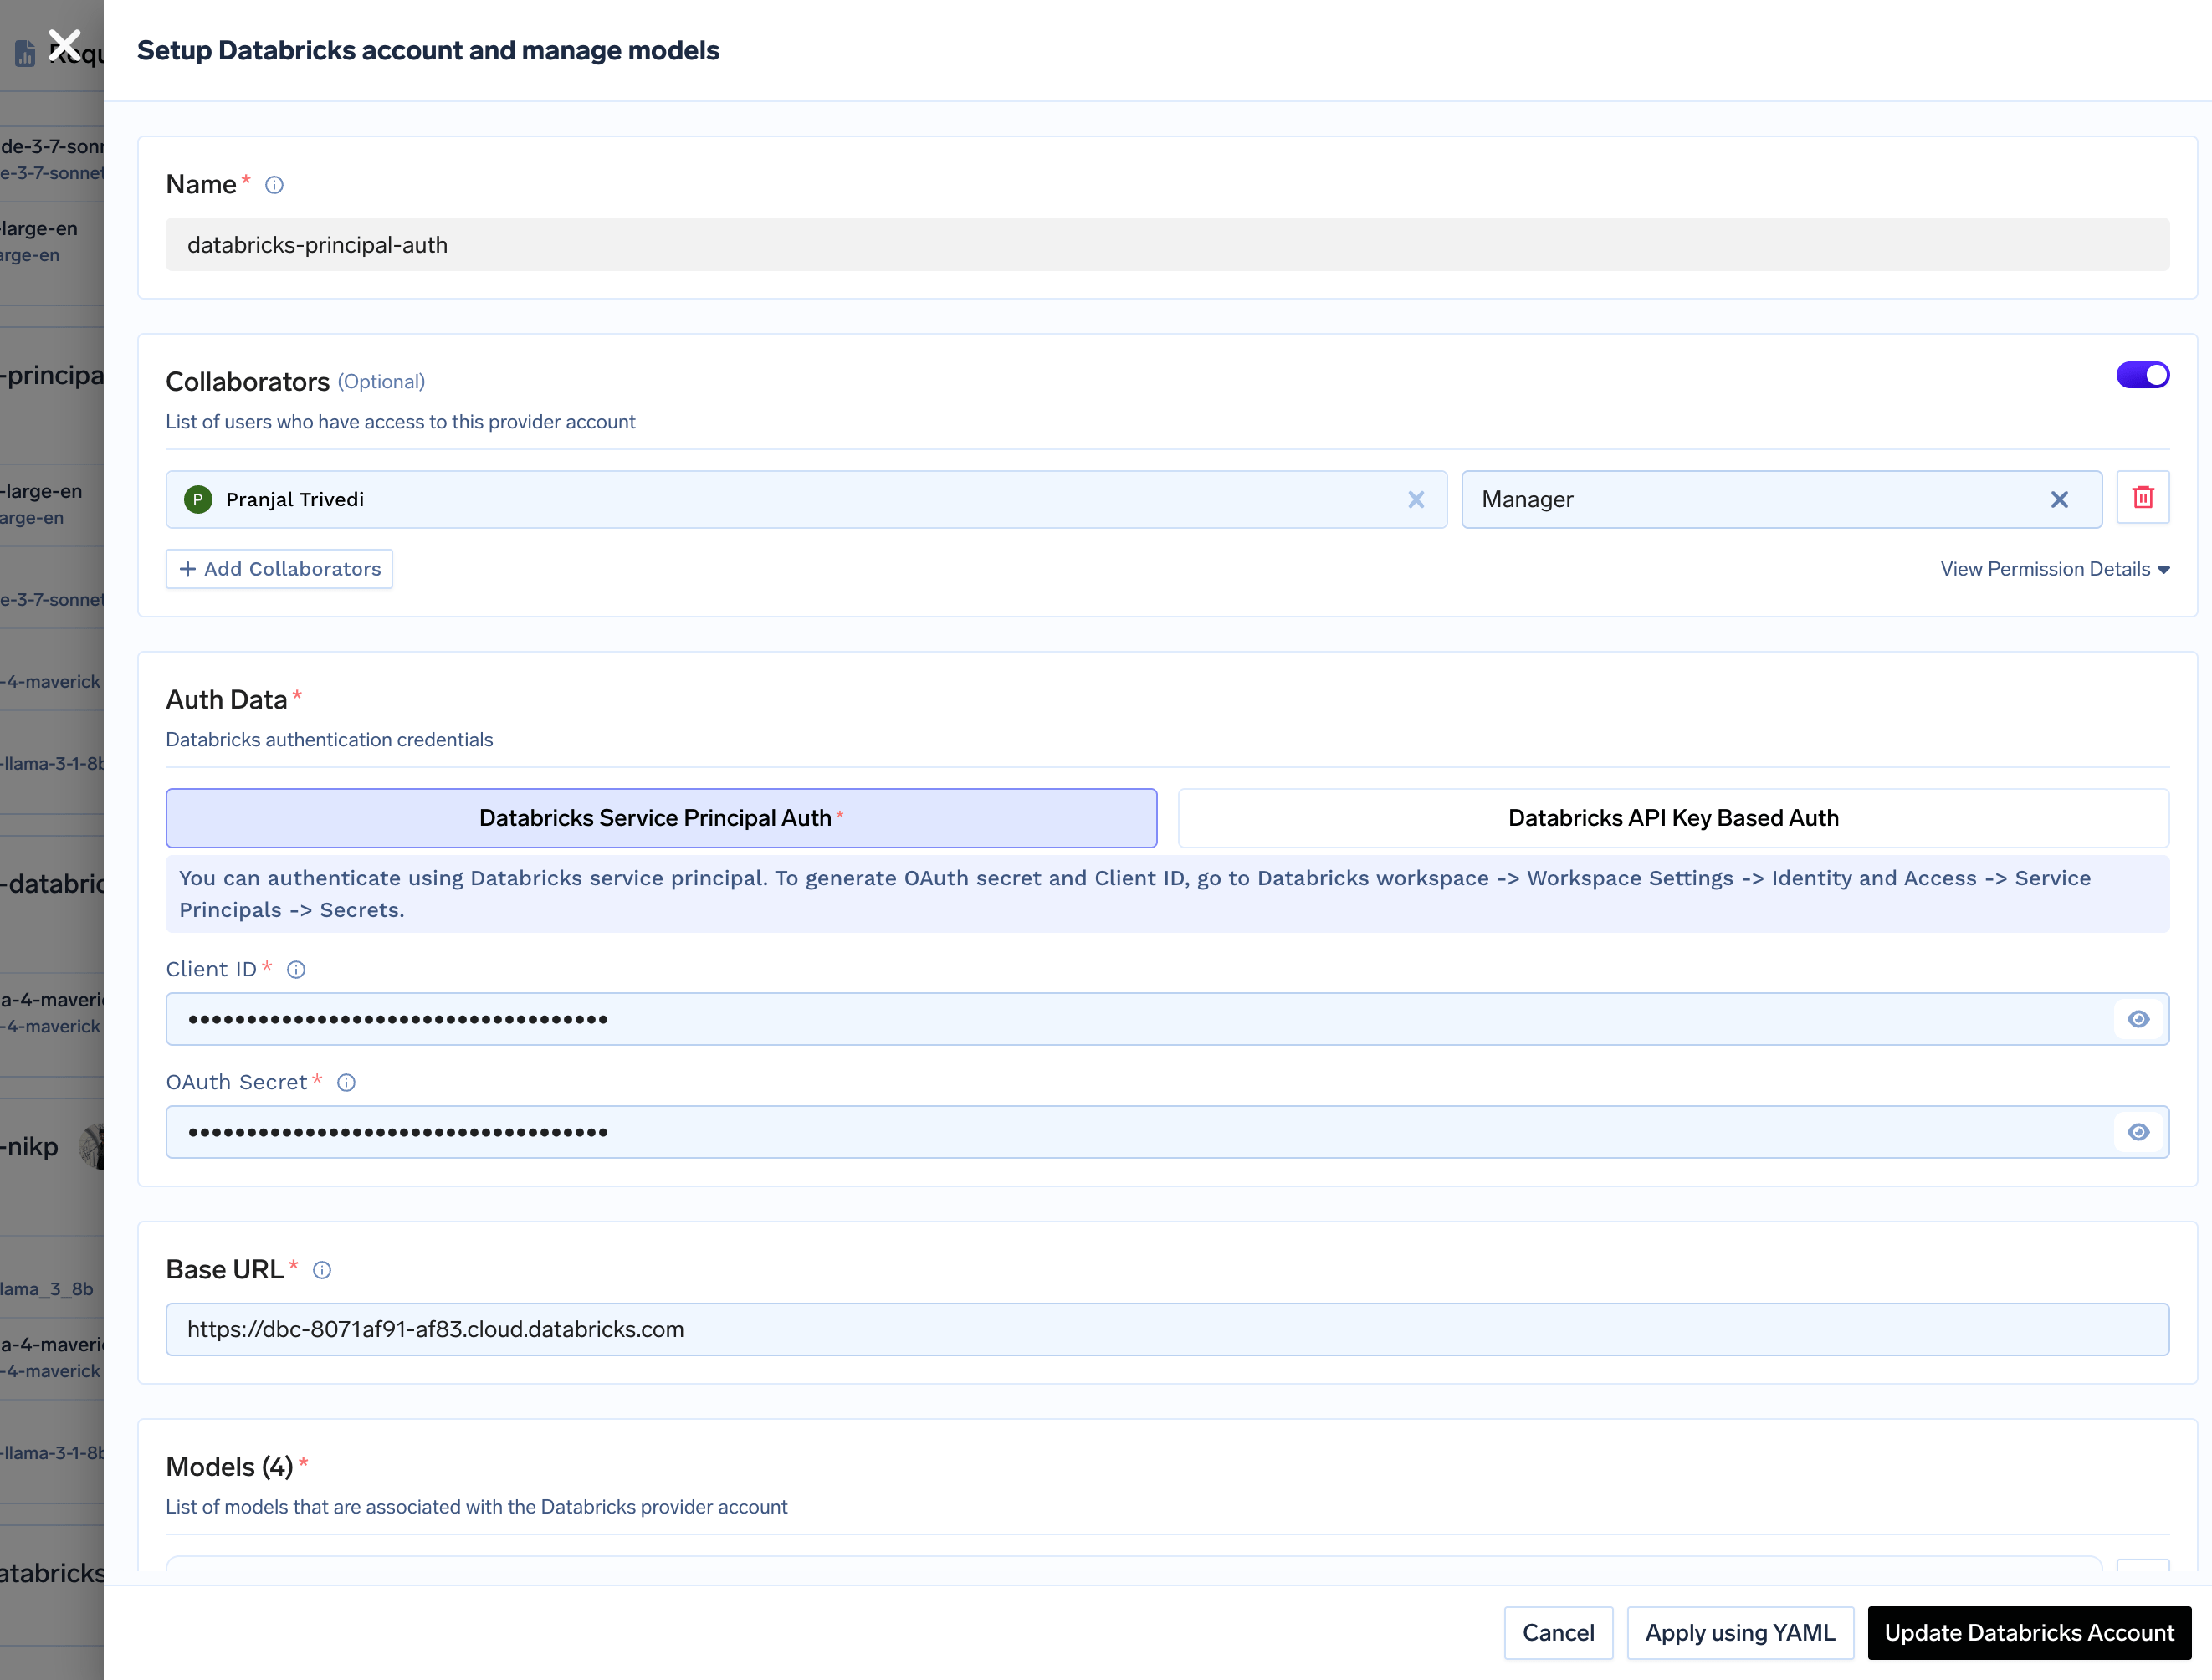
Give a unique name for the Databricks account. This will be used to refer to the models later. Provide the authentication details for the AI Gateway to access your Databricks models. TrueFoundry supports both Service Principal and Personal Access Token (PAT) based authentication.
Get Databricks Authentication Details
Using Service Principal (Recommended):Service Principal authentication is the recommended approach for production environments as it provides better security and access control.
Choose Service Principal Auth.
Enter your Databricks Service Principal Client ID and OAuth Secret.
When generating the OAuth secret in Databricks, select the scopes model-serving and ai-gateway. All APIs also works.
Service Principal Authentication
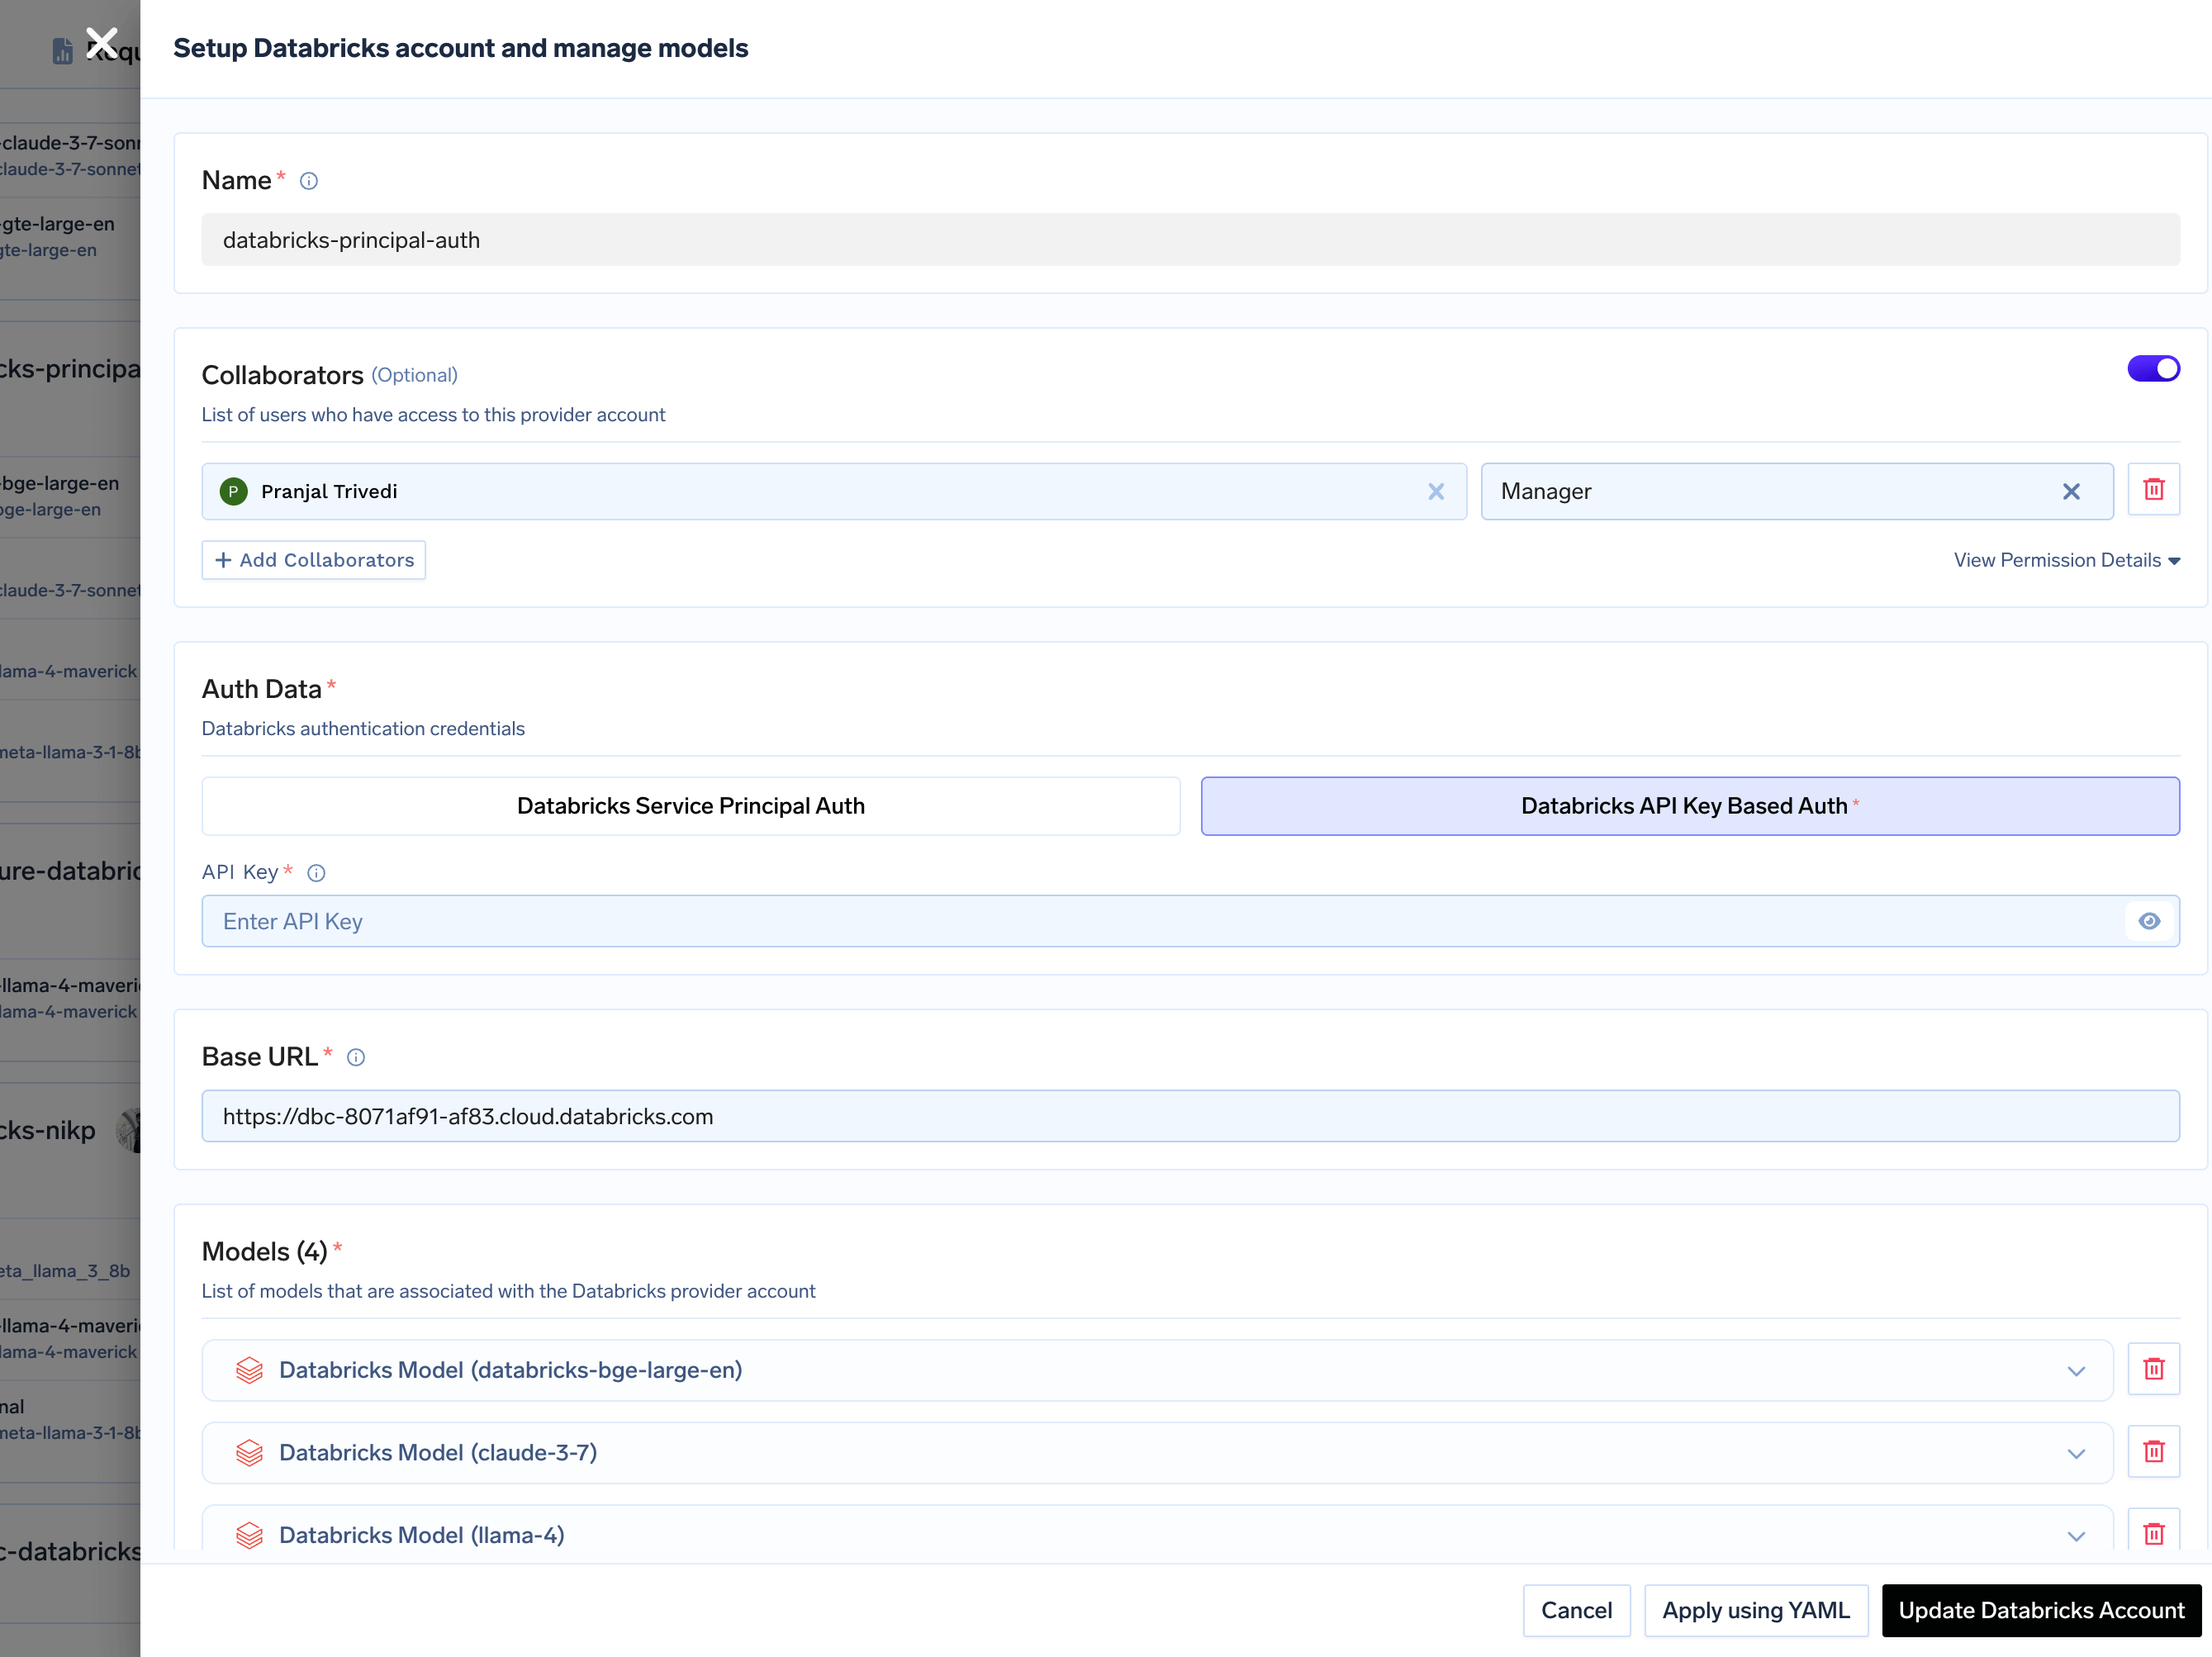
Using Personal Access Token (PAT):Personal Access Tokens are suitable for development and testing environments.
Choose Databricks API Key Based Auth.
Enter your PAT.
Personal Access Token (PAT) Authentication
Finally, enter your Databricks workspace URL (e.g., https://<workspace_id>.cloud.databricks.com).
Enter the workspace URL only — do not append /serving-endpoints or any other path. The AI Gateway adds the correct path for each model and each API.
3
Add Models
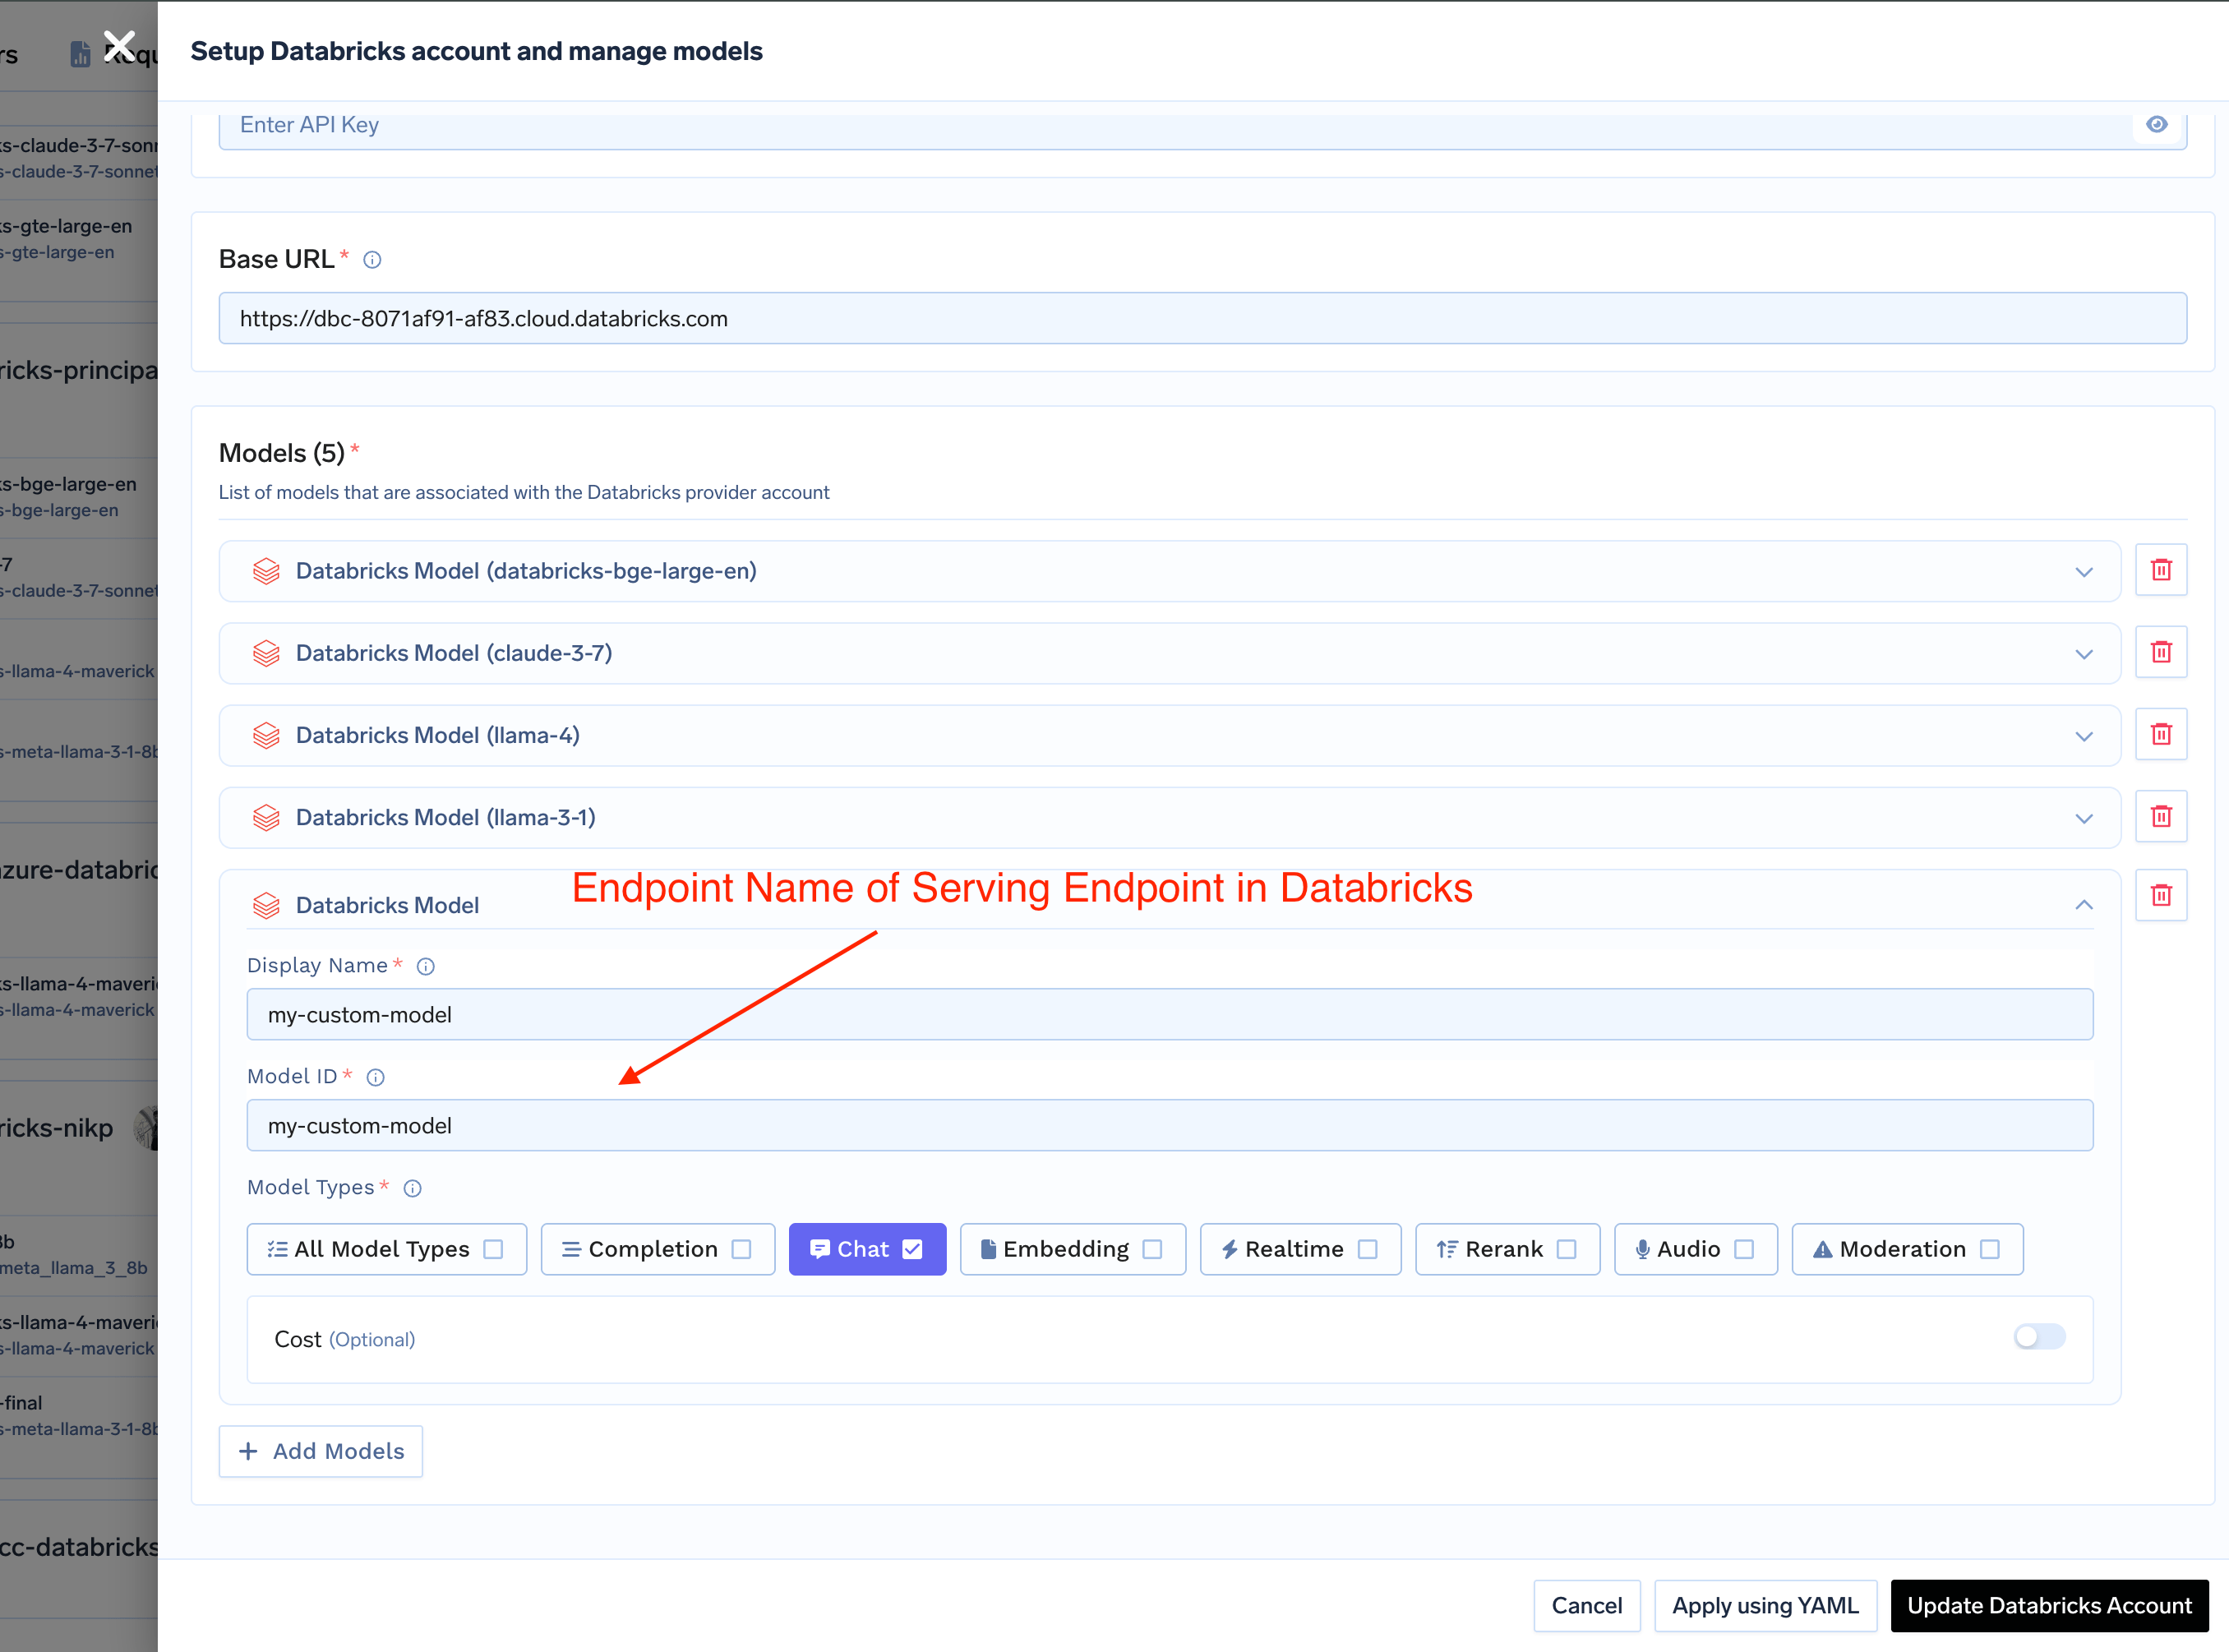
Click + Add Model to add a new model configuration. The Model IDmust exactly match the name Databricks uses for the model, which depends on how the model is served:
How the model is served in Databricks
Model ID to enter
Example
Model Serving endpoint
The serving endpoint name
databricks-gpt-5-1
Unity Catalog model service
The fully qualified name, catalog.schema.name
system.ai.claude-sonnet-4-5
Both styles can live in the same model account. The AI Gateway routes on the name itself — a three-part dotted name goes to Databricks’ Unity AI Gateway, anything else to Model Serving — so nothing else needs to be configured.
How to Find Your Unity Catalog Model Service Name
Databricks serves newer models as model services in Unity Catalog rather than as serving endpoints. To find one:
In your Databricks workspace, click AI Gateway in the left sidebar, or open Catalog Explorer and browse to the schema that holds the model service.
Note its catalog, schema, and name, and join them with dots — that full string is your Model ID. Databricks’ own pay-per-token models live under system.ai (for example, system.ai.claude-sonnet-4-5); models your team creates use your own catalog and schema (for example, my_catalog.my_schema.my_gpt).
The service principal or PAT on your model account needs EXECUTE on the model service, plus USE CATALOG and USE SCHEMA on its catalog and schema. Services in system.ai grant EXECUTE to all account users by default. See Govern model services.
How to Set Up Databricks Serving Endpoints
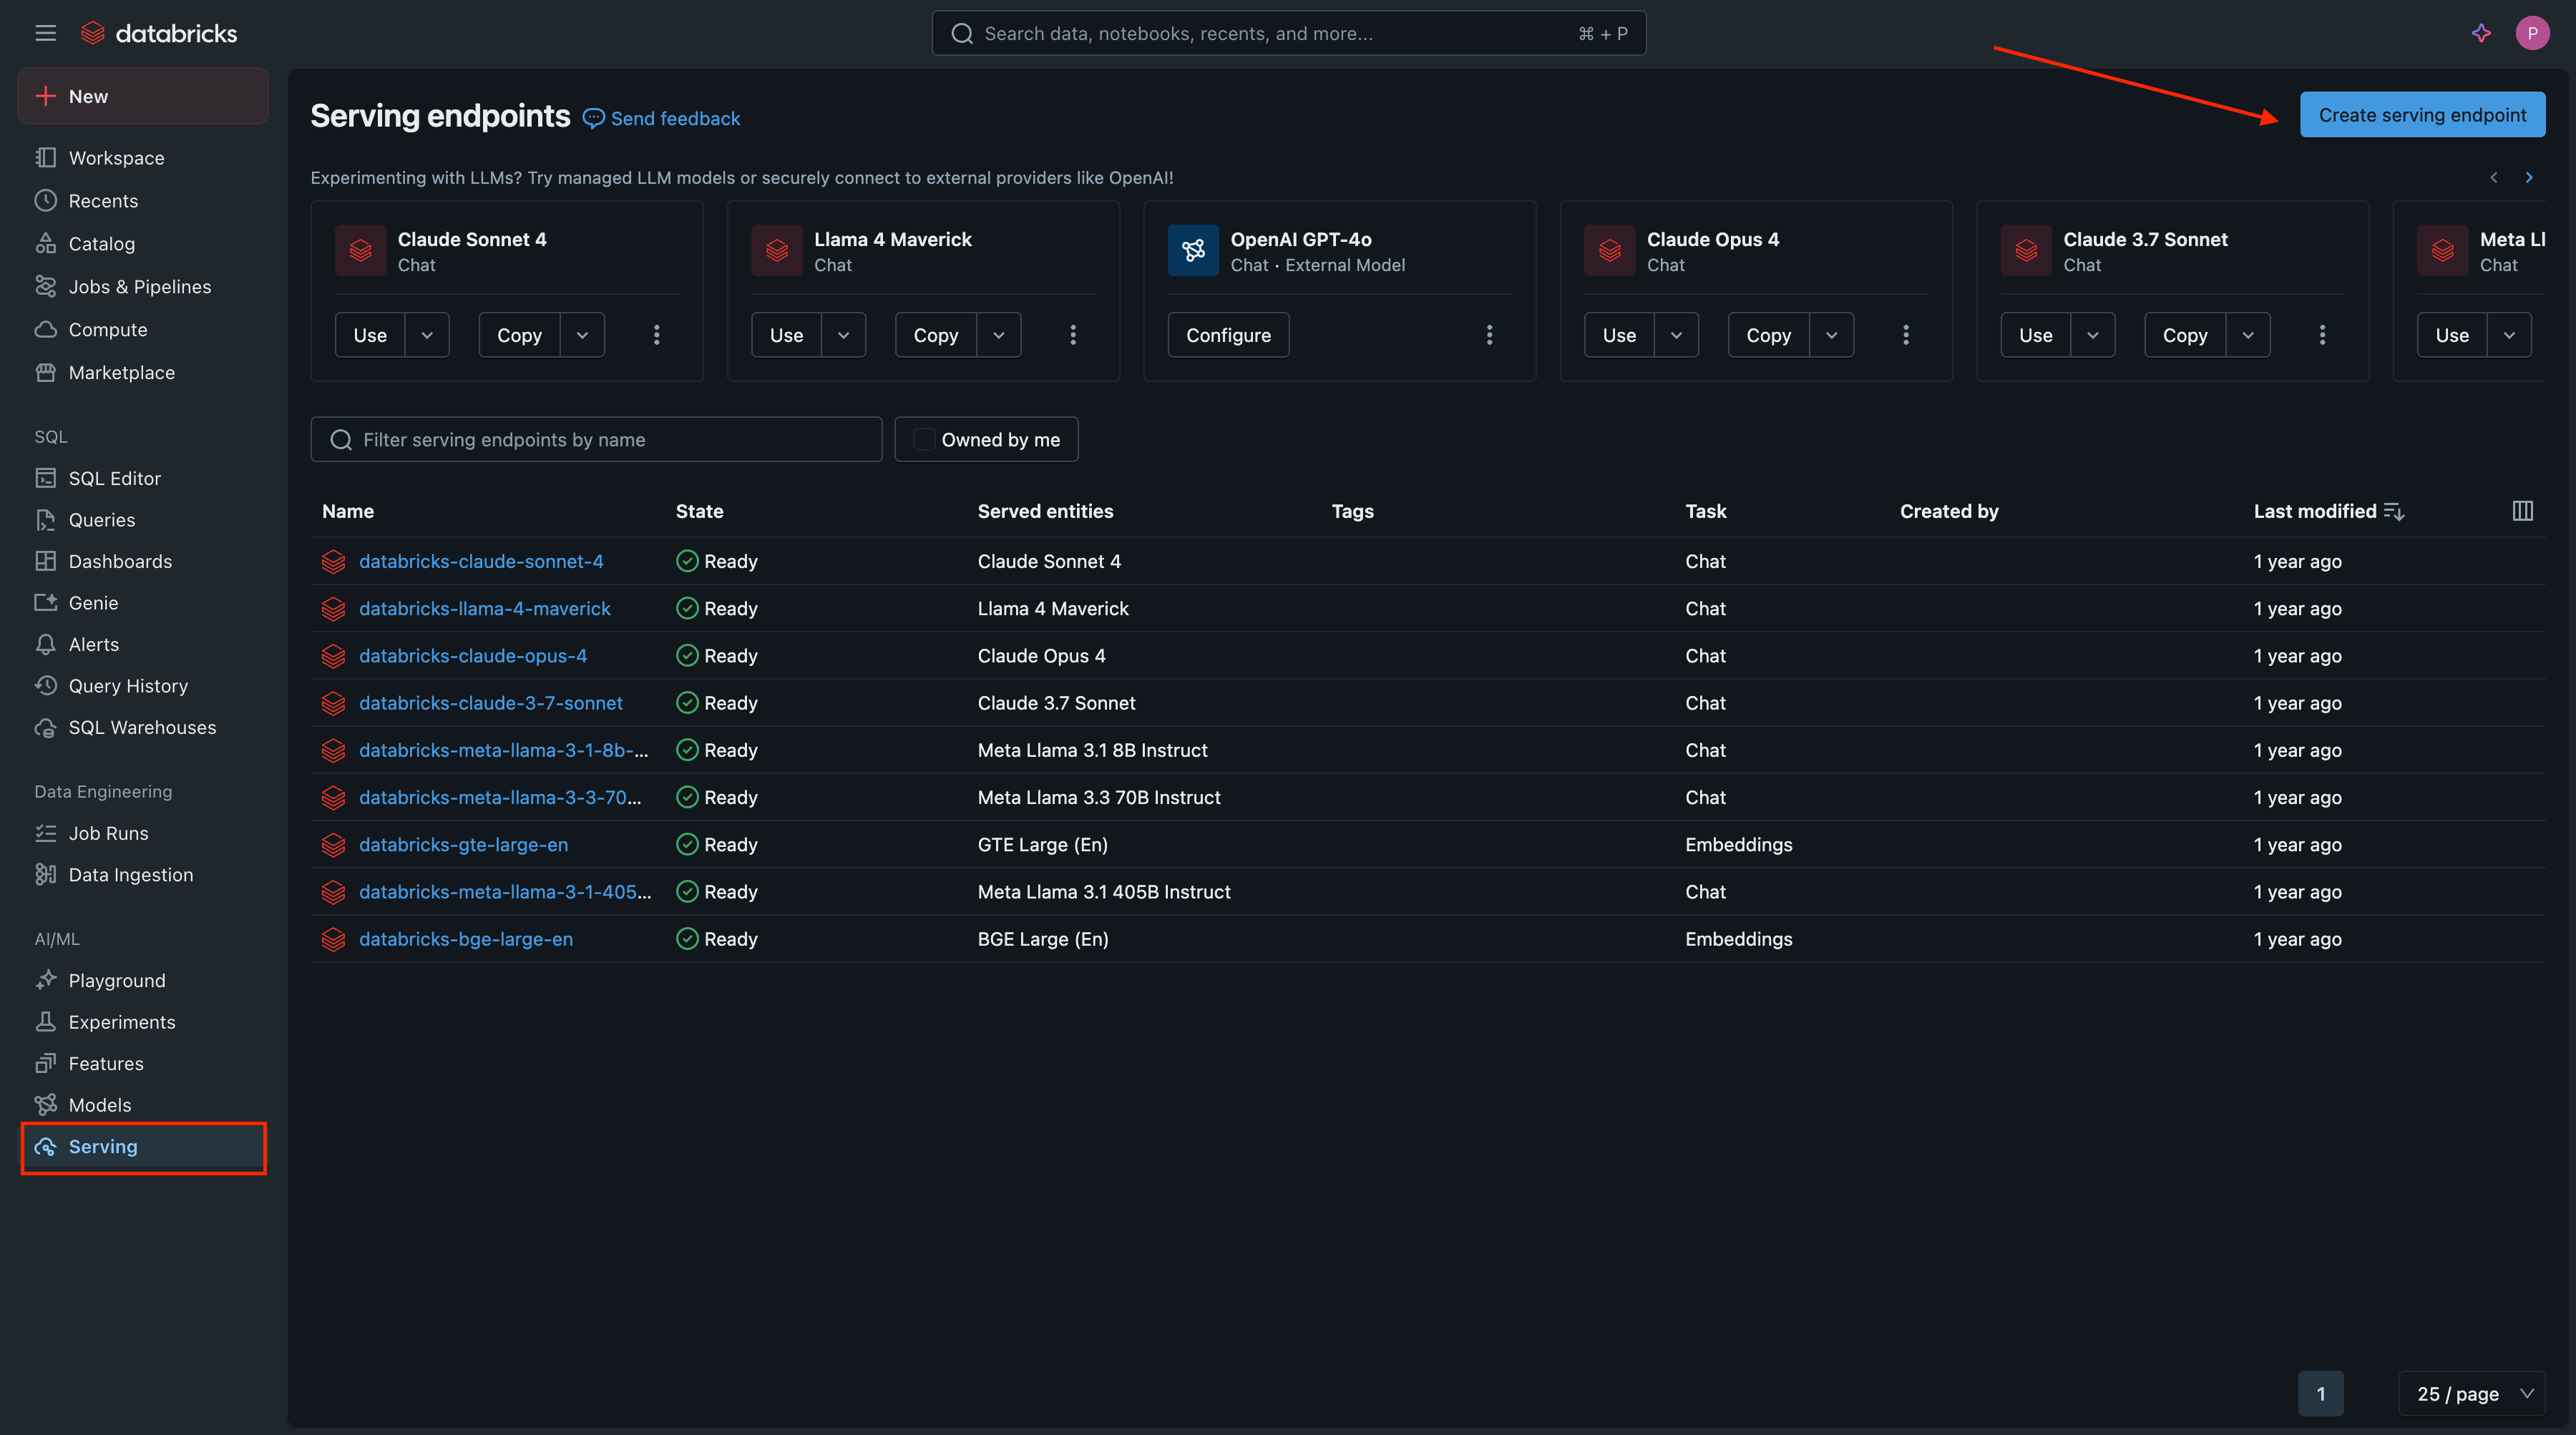
Access Databricks Serving: In your Databricks workspace, navigate to Serving in the left sidebar and click Create serving endpoint.
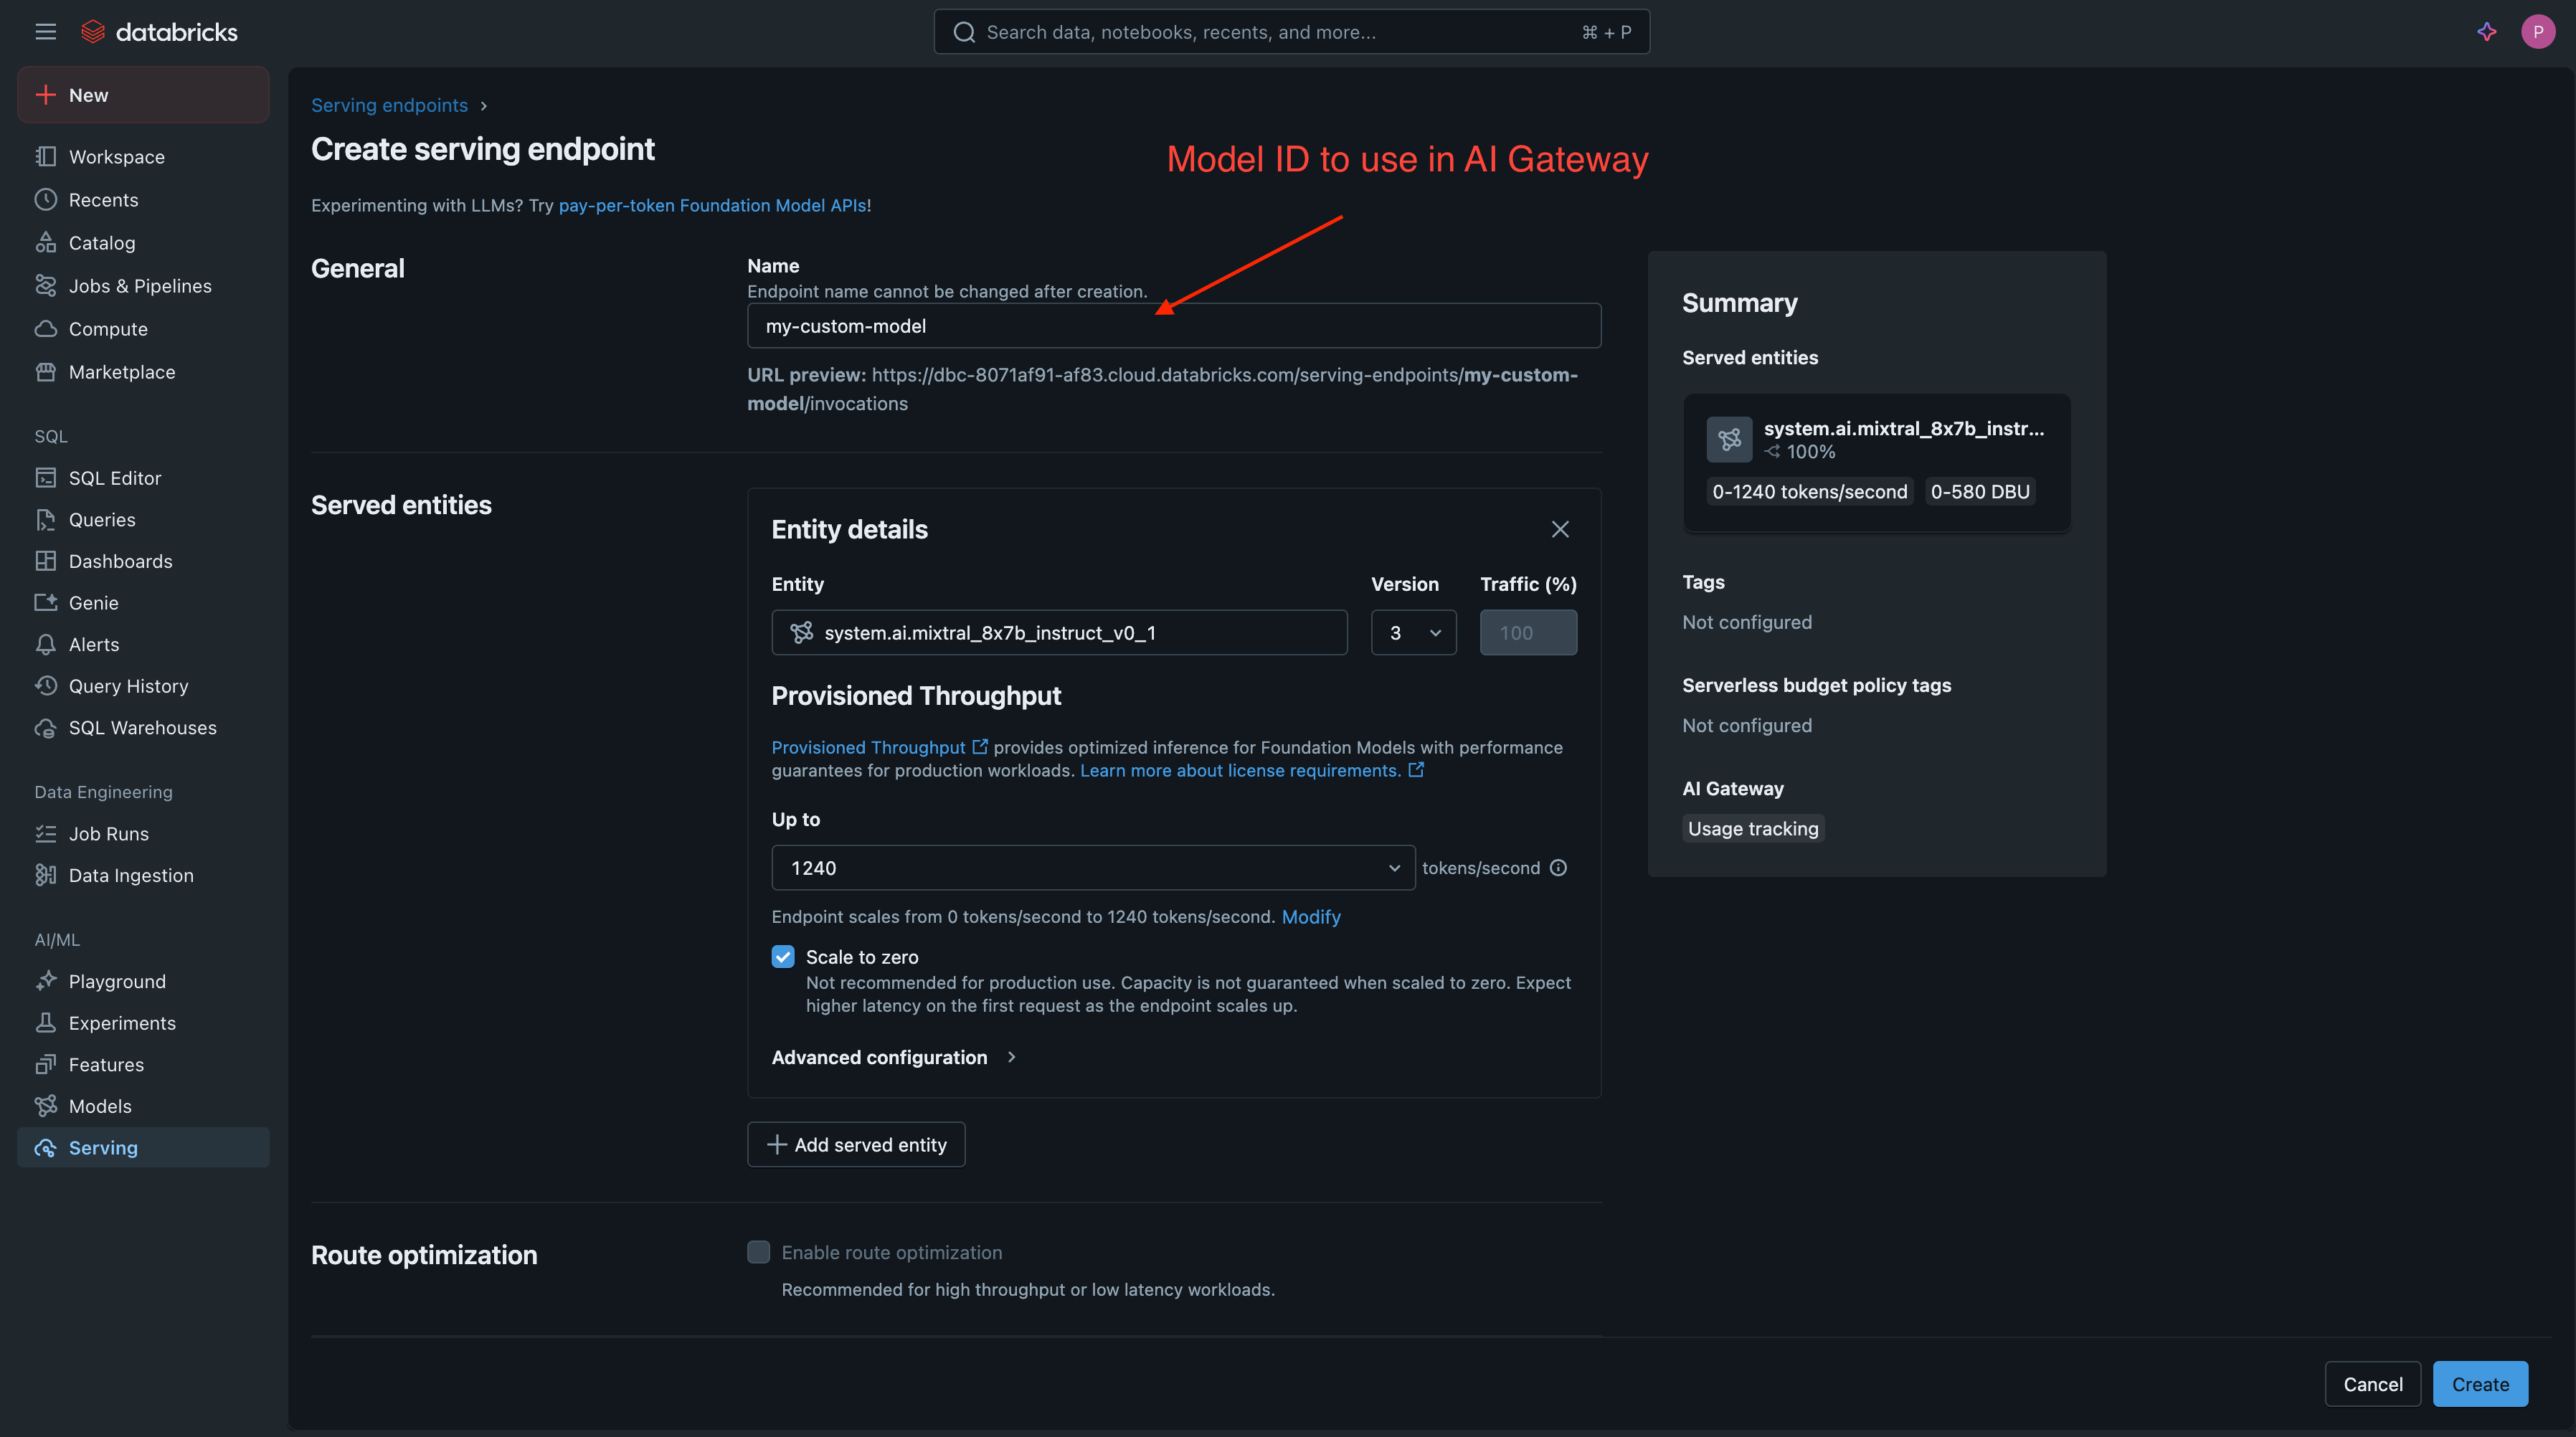
Configure Endpoint:
Endpoint name: Choose a descriptive name. This name will be your Model ID in TrueFoundry.
Served Entity: Choose from Foundation Models or your custom models.
Deploy and Verify: Click Create and wait for the deployment to become Ready.
Add Databricks Model in TrueFoundry
The two naming styles are not interchangeable — copy the name exactly as Databricks shows it. Calling a model service by an endpoint-style name returns the given endpoint does not exist, and calling a serving endpoint that has moved to Unity Catalog returns 501 ... no longer available. Use Unity Catalog model services.
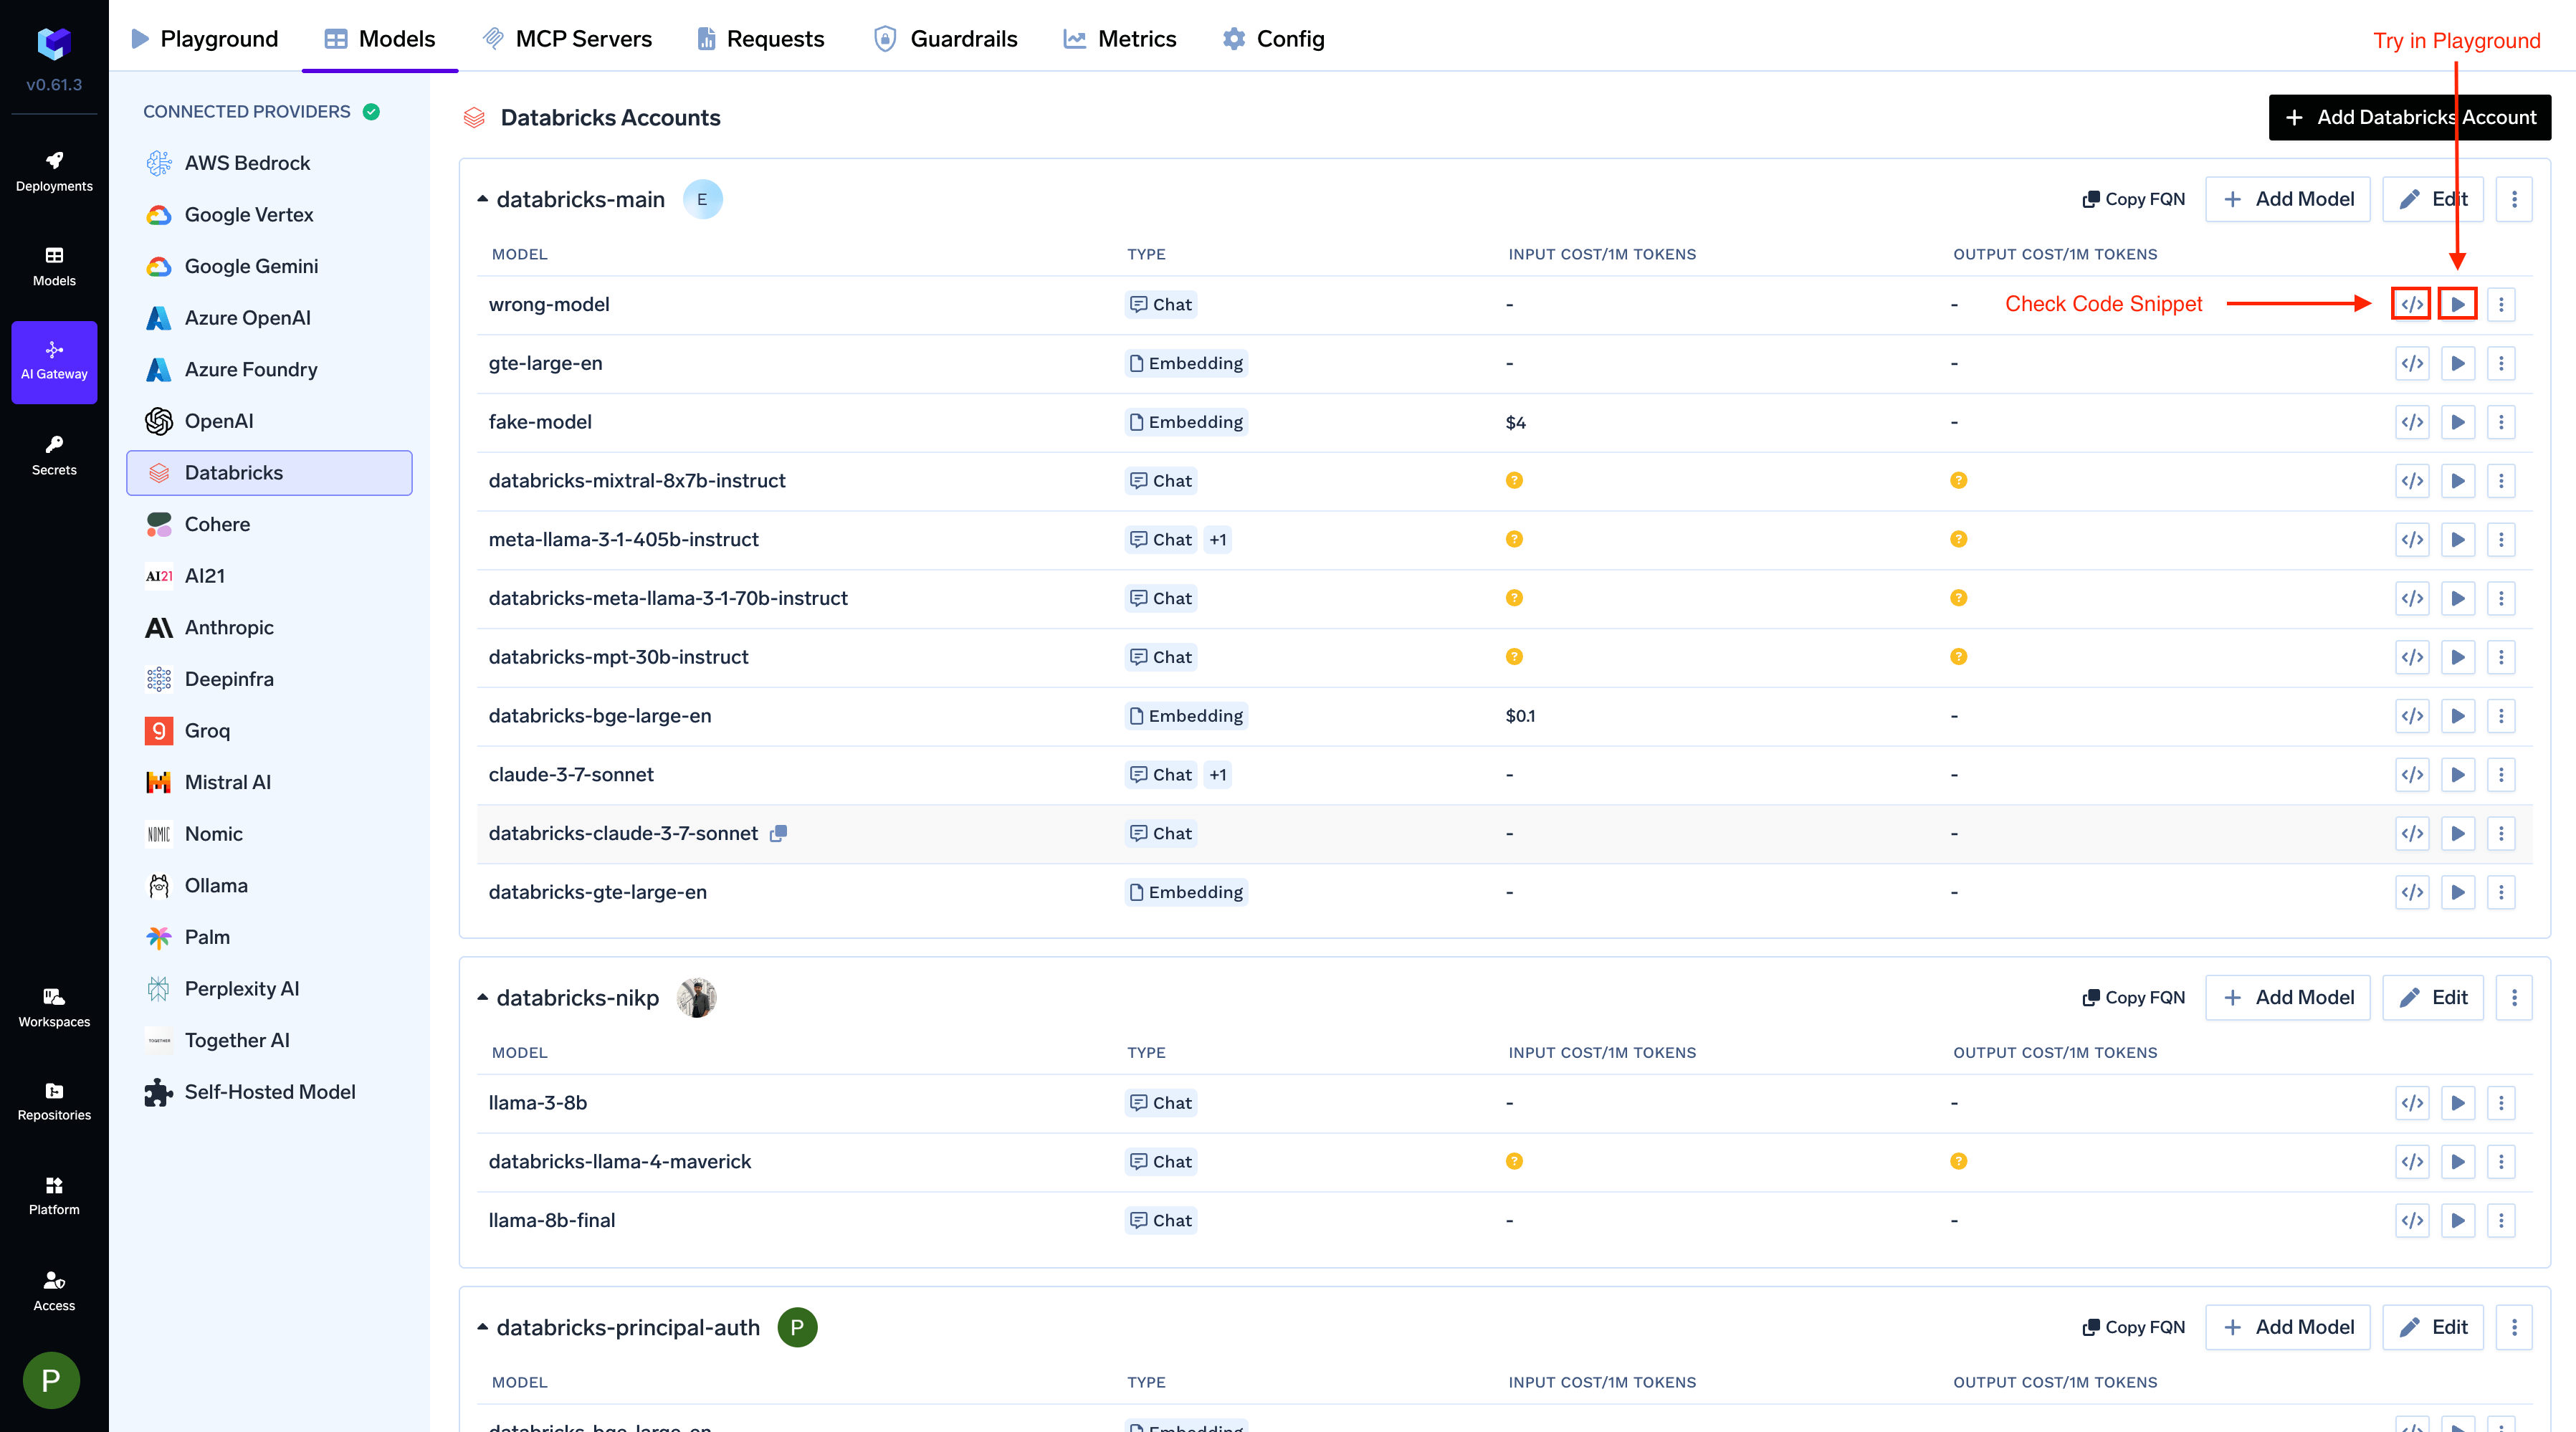
After adding the models, you can perform inference using an OpenAI-compatible API via the Playground or by integrating it with your own application.
Infer Model in Playground or Get Code Snippet
Requests are OpenAI-compatible for both naming styles, so nothing in your application changes when a model moves from a serving endpoint to a model service. As with every provider, model is <model-account-name>/<display-name> — the Model ID you configured is what the AI Gateway sends to Databricks:
Python
from openai import OpenAIclient = OpenAI( api_key="your-truefoundry-api-key", base_url="{GATEWAY_BASE_URL}",)response = client.chat.completions.create( model="databricks-main/system.ai.claude-sonnet-4-5", messages=[{"role": "user", "content": "What is TrueFoundry in one line?"}],)print(response.choices[0].message.content)
The APIs available to a model depend on how Databricks serves it:
Databricks serves the Responses API natively for every Unity Catalog model service, and for its OpenAI foundation model serving endpoints — databricks-gpt-5, databricks-gpt-5-1, databricks-gpt-5-mini, and the rest of the databricks-gpt-5* family. The AI Gateway forwards these requests to Databricks unchanged, so you get back a real Responses object with a resp_ id, including the model’s reasoning output.
Python
from openai import OpenAIclient = OpenAI( api_key="your-truefoundry-api-key", base_url="{GATEWAY_BASE_URL}",)response = client.responses.create( model="databricks-main/databricks-gpt-5-1", input=[{"role": "user", "content": "What is TrueFoundry in one line?"}],)print(response.output_text)
Streaming works the same way — set stream=True and iterate over the emitted events.
Every other Databricks serving endpoint still accepts /responses, but the AI Gateway translates the request into a chat completion and converts the reply back. The response id tells you which path a request took: resp_ means it went to Databricks natively, chatcmpl- means it was translated. Reasoning output is not returned on the translated path.This is decided by the serving endpoint name, which is your Model ID in TrueFoundry. A GPT-5 model you deploy behind a custom endpoint name is treated like any other endpoint.
On Unity Catalog model services, /responses is served by the Databricks Supervisor API, which is in Beta behind a workspace preview flag. If your workspace does not have it enabled, chat completions and embeddings still work while /responses fails.
Databricks does not support server-side conversation state on pay-per-token endpoints. previous_response_id, store, and background are passed through to Databricks rather than dropped, so sending them returns an upstream 400 rather than silently losing your conversation history:
databricks error: BAD_REQUEST: Databricks does not support the previous_response_id parameter for OpenAI Responses API
To hold a multi-turn conversation, send the full history in input on each turn.
Claude Unity Catalog model services are served natively on the Messages API, so you can point the Anthropic SDK at the AI Gateway and get a real Anthropic response back.
Python
from anthropic import Anthropicclient = Anthropic( api_key="your-truefoundry-api-key", base_url="{GATEWAY_BASE_URL}",)message = client.messages.create( model="databricks-main/system.ai.claude-sonnet-4-5", max_tokens=256, messages=[{"role": "user", "content": "What is TrueFoundry in one line?"}],)print(message.content[0].text)
Non-Claude model services and all Model Serving endpoints also accept /messages, but the request is translated into a chat completion and converted back. The response id tells you which path a request took: msg_bdrk_ means Databricks served it natively, chatcmpl- means it was translated.
Databricks serves System One models such as OpenJev. Add the model with Model Types set to Decision. The Model ID is the name Databricks uses:
How the model is served
Model ID
Example
Model Serving endpoint
Serving endpoint name
databricks-openjev-qwen35-4b
Unity Catalog model service
catalog.schema.name
system.ai.openjev-qwen35-4b
Call POST /v1/systemone or POST /v1/decisions. Serving endpoints are invoked at /serving-endpoints/{endpoint}/invocations. Unity Catalog model services go to Databricks’ TypeSafe AI Gateway path (/ai-gateway/typesafe/v1/systemone). Full docs: Decisions API and Query System One models.
Python
import osimport requestsgateway_base_url = os.environ["GATEWAY_BASE_URL"].rstrip("/")response = requests.post( f"{gateway_base_url}/v1/systemone", headers={"Authorization": f"Bearer {os.environ['TFY_API_KEY']}"}, json={ "model": "databricks-main/databricks-openjev-qwen35-4b", "state": "I was charged twice for order #4411 and want a refund.", "questions": { "is_refund_request": { "type": "noul", "instructions": "Is the customer asking for a refund?", } }, }, timeout=60,)response.raise_for_status()print(response.json()["answers"]["is_refund_request"])